

You can remodel a vanity in three ways: refresh the cabinet you have, upgrade its top and fixtures, or replace the whole unit. The right path depends on the cabinet’s condition, your layout, and your budget. This guide shows you how to remodel a vanity step by step, with real costs, size standards, and 15 makeover ideas for every budget.
Key Takeaways
- Paint and new hardware cost about $100–$400 and suit any solid cabinet.
- A new top, sink, and faucet on the old base costs about $400–$1,500.
- A full replacement usually runs $300–$3,800 installed, with most projects landing near $1,500.
- Swollen particleboard, a soft floor, or a layout that doesn’t work means replace, not refresh.
- Keep at least 21 inches of clear floor in front of the sink. Aim for 30.
Contents
Should You Refresh, Upgrade, or Replace Your Vanity?
Refresh the vanity if the box is solid and the layout works. Replace it if the cabinet has water damage, the size is wrong, or you need more storage. Many people overspend by replacing a cabinet that only needed paint. Others waste money painting a box that’s already falling apart.
Check these signs before you decide:
- Press the cabinet floor and base. Soft, swollen, or flaking particleboard won’t hold paint or screws. Replace it.
- Look at the sink cutout from below. Dark stains or crumbling edges mean water has been getting in for years.
- Check doors and drawers. Sagging hinges and loose joints can be fixed. A twisted frame can’t.
- Measure the room. If the vanity blocks the door or crowds the toilet, no paint job fixes that.
- Think about height. A 30-inch vanity feels low for most adults. Moving to a taller unit means replacing it.

| Remodel level | What changes | Typical cost | Time | Skill |
| Cosmetic refresh | Paint, hardware, maybe faucet | $100–$400 DIY | 3–5 days (mostly paint cure time) | Beginner |
| Partial upgrade | New top, sink, faucet; keep base | $400–$1,500 | 1–2 days, plus 1–3 weeks for stone fabrication | Intermediate or pro |
| Full replacement (prefab) | New cabinet, top, sink, faucet | $300–$3,800 installed | 1 day for a like-for-like swap | Intermediate |
| Custom or built-in | Made-to-measure cabinet and top | $1,800–$5,800 installed | 4–8 weeks lead time | Pro |
Labor adds up fast. Pros typically charge $665–$3,300 to remove an old vanity, handle the plumbing, and install the new cabinet and top. That’s why a refresh often makes sense when the box is sound. You can spend the savings on tile, lighting, or a better shower.
How to Remodel a Vanity: Step-by-Step Plan
Step 1: Measure the Space and Check Clearances
Measure the wall width at counter height in three spots. Walls are rarely straight. Then measure the depth available before the vanity hits a door swing, toilet, or tub edge.
Standard sizes make shopping easier. Most stock vanities run 24 to 72 inches wide in roughly 6-inch steps, 20 to 21 inches deep, and 30 to 36 inches tall. Read the spec sheet closely. Cabinet heights usually exclude the countertop, which adds about 0.75 to 1.5 inches.
Traditional vanities finish at 30 to 32 inches. Comfort-height models finish at 34 to 36 inches and are now the default in most remodels. A useful designer rule: set the sink rim about 3 inches below the main user’s elbow.
Next, check clearances. Building codes set the minimum. Design guidelines set the comfort target.
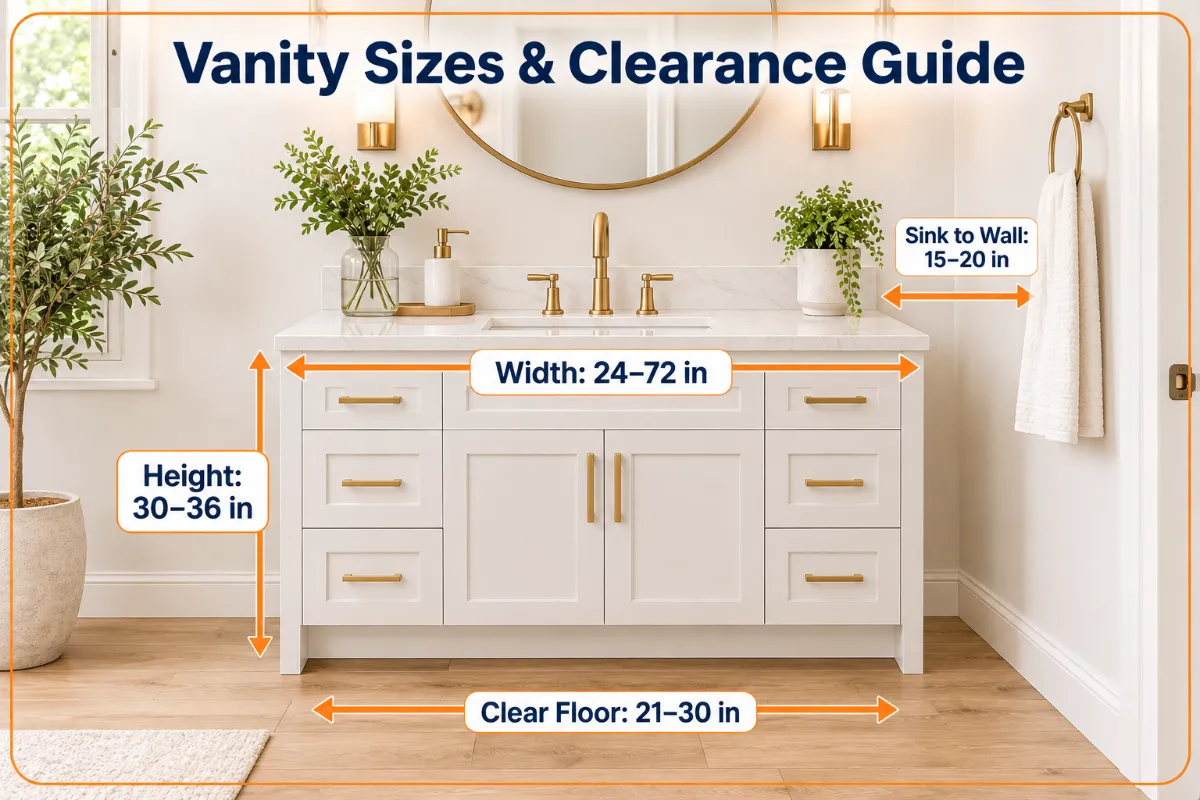
| Measurement | Typical code minimum | Comfort target |
| Clear floor in front of the sink | 21 in | 30 in |
| Sink centerline to side wall | 15 in | 20 in |
| Between two sink centerlines | 30 in | 36 in |
Local rules vary, so confirm these numbers with your building authority before you buy.
Check the toilet, too. A deep vanity can steal the toilet’s side clearance. If the toilet sits 15 inches from the side wall, the vanity’s side panel can’t project past that centerline. Use a 21-inch-deep vanity, offset it, or add clearance.
Step 2: Set a Realistic Budget
Add 10–15% to your budget for surprises. Rotted subfloor, missing tile under the old cabinet, and corroded shutoff valves show up often. A swap that skips these repairs looks fine for a year, then fails.
Step 3: Choose the Countertop and Sink
The top drives both the look and the price. Here’s how common materials compare.
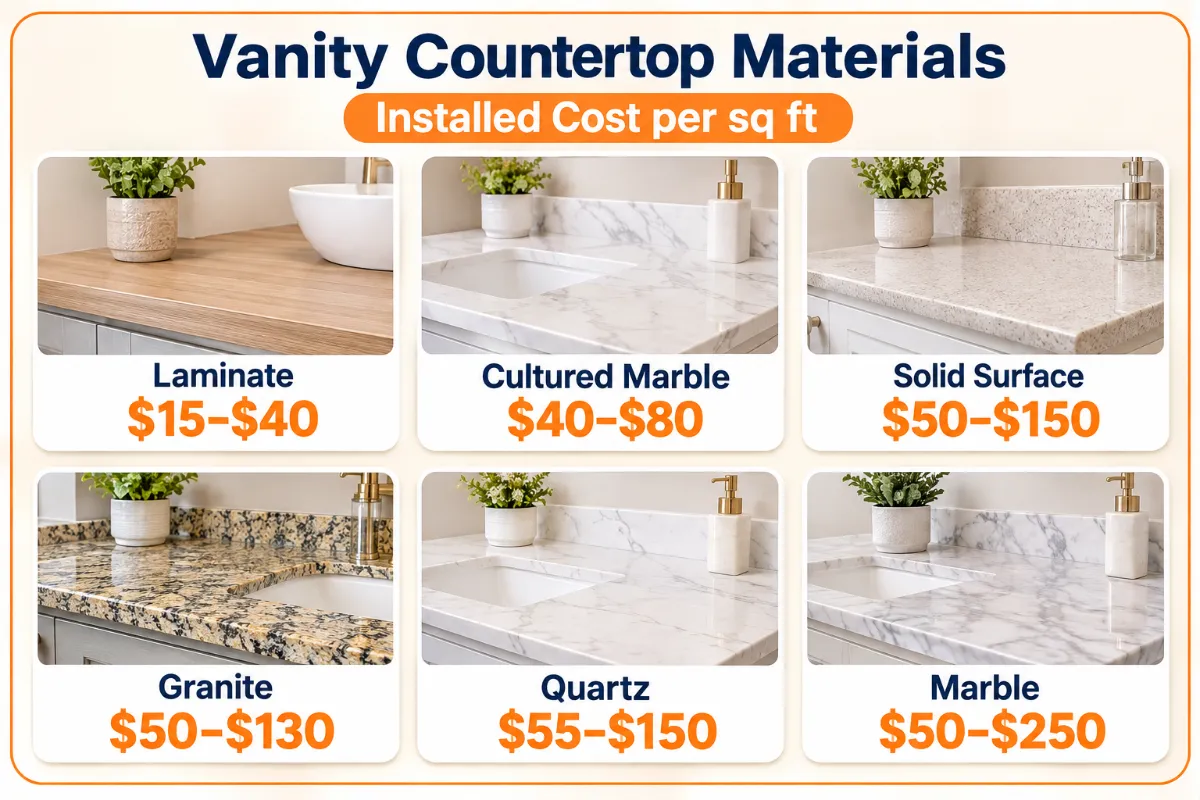
| Material | Installed cost per sq ft | Strengths | Watch out for |
| Laminate | $15–$40 | Cheapest, many patterns | Swells if water reaches the core |
| Cultured marble | $40–$80 | Molded one-piece sink, easy to clean | Scratches; dated patterns |
| Solid surface | $50–$150 | Integrated sinks, repairable | Softer; can scorch |
| Granite | $50–$130 | Tough, unique slabs | Needs periodic sealing |
| Quartz | $55–$150 | No sealing, very stain-resistant | Can discolor in direct sun |
| Marble | $50–$250 | Classic luxury look | Etches and needs regular sealing |
Single-vanity tops are small, so minimum charges matter. Most fabricators charge a $400–$600 minimum, which makes a small powder room top feel expensive per square foot. Ask about remnant pieces. A remnant can cut that bill in half.
For most family bathrooms, quartz is the safest pick. It handles toothpaste, hair dye, and makeup without sealing. Choose marble only if you like the patina it develops.
Step 4: Plan the Plumbing and Electrical
Small plumbing details decide whether your new parts fit.
- Faucet holes: Single-hole faucets need one hole. Centerset faucets need three holes spread 4 inches. Widespread faucets need three holes spread 8 inches or more. Order the top with holes that match your faucet.
- Sink type and height: Vessel sinks sit on top of the counter and add about 5–6 inches. Vessel vanities usually sit lower than standard ones.
- Shutoff valves: Replace old multi-turn valves with quarter-turn valves while the cabinet is out. It costs little now and prevents a flood later.
- Outlets: Bathroom outlets need GFCI protection. Add an outlet inside a drawer if you use hair tools daily.
- Permits: A simple swap that reuses the existing plumbing and wiring usually doesn’t need a permit. Moving a drain or adding a circuit often does. Check with your local authority.
Hire a licensed plumber if you need to move the drain or supply lines. That job involves opening walls and meeting code.
Step 5: Choose Your Path
You now know whether you’re refreshing or replacing. The next two sections cover each path.
How to Paint a Bathroom Vanity So It Lasts
Paint fails in bathrooms for one reason: rushed prep or rushed cure time. Follow these steps for a finish that survives daily splashes.
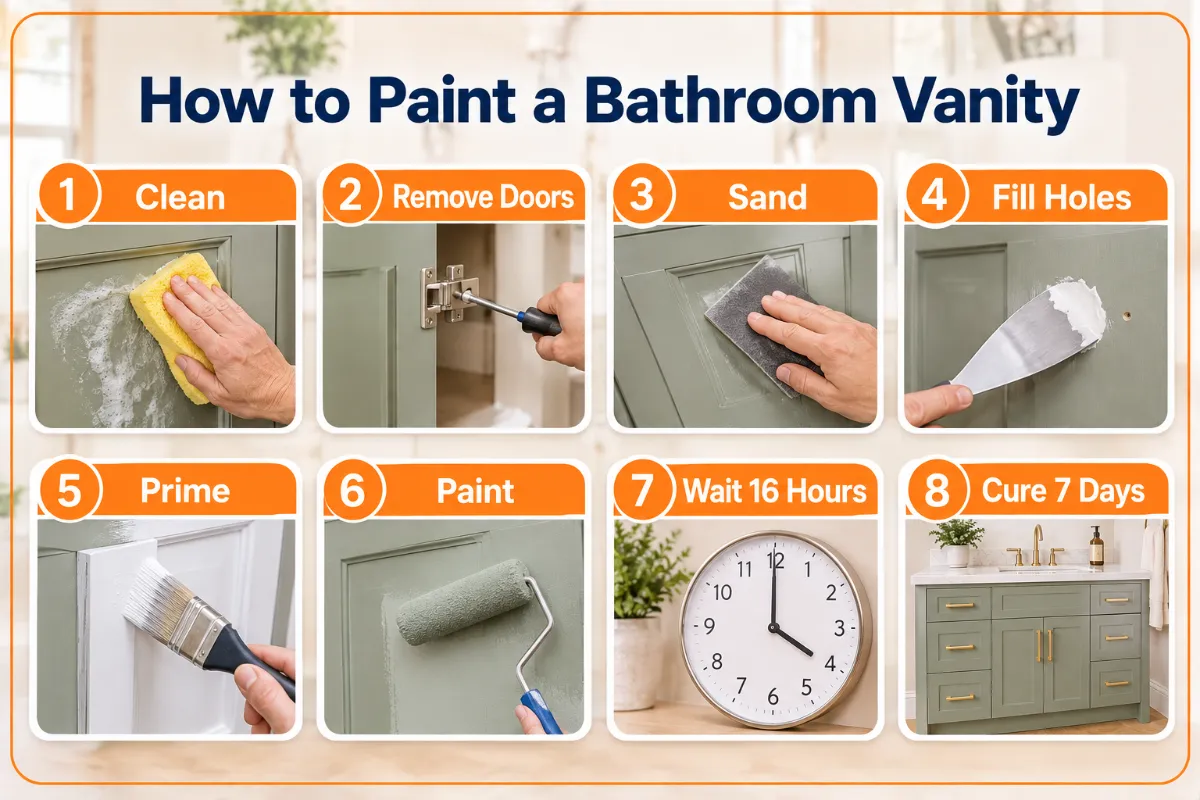
- Empty and clean. Remove everything. Scrub with a degreaser, then rinse with clean water. Residue blocks adhesion.
- Remove doors, drawers, and hardware. Number each piece behind the hinge with a pencil.
- Sand. Scuff finished wood with 120- to 150-grit paper, then smooth with 220. Vacuum and wipe the dust.
- Fill old holes. Fill them only if your new pulls use different spacing.
- Prime. Use a bonding primer on laminate or glossy finishes. Use a shellac-based primer on oak, because it blocks tannin bleed-through.
- Paint. Brush the edges and recessed panels first. Roll the flat areas with a foam roller. Paint the backs of doors first, then the fronts.
- Wait between coats. Follow the label, not your patience.
- Let it cure before you rehang. Cure time is longer than dry time.
Choose a cabinet enamel, not wall paint. Hybrid waterborne alkyd enamels level out well and dry hard. They’re also slow. A typical hybrid enamel dries to the touch in 4–6 hours, needs about 16 hours before recoating, and takes around 7 days to fully cure. A rushed second coat extends the cure time and weakens the finish.
Pick the right sheen. Satin hides brush marks and minor dents. Semi-gloss wipes clean more easily. Avoid flat and eggshell on a bathroom vanity.
Know when not to paint. Thermofoil doors that are peeling at the edges won’t hold paint. Replace the doors instead. Laminate works only with thorough sanding and a bonding primer.
DIY cost: about $30–$90 for enamel, $20–$50 for primer, $20–$40 for sandpaper and rollers, plus hardware.
How to Replace a Bathroom Vanity
A like-for-like swap takes about a day for a confident DIYer. Here’s the condensed process, with checks that save headaches.
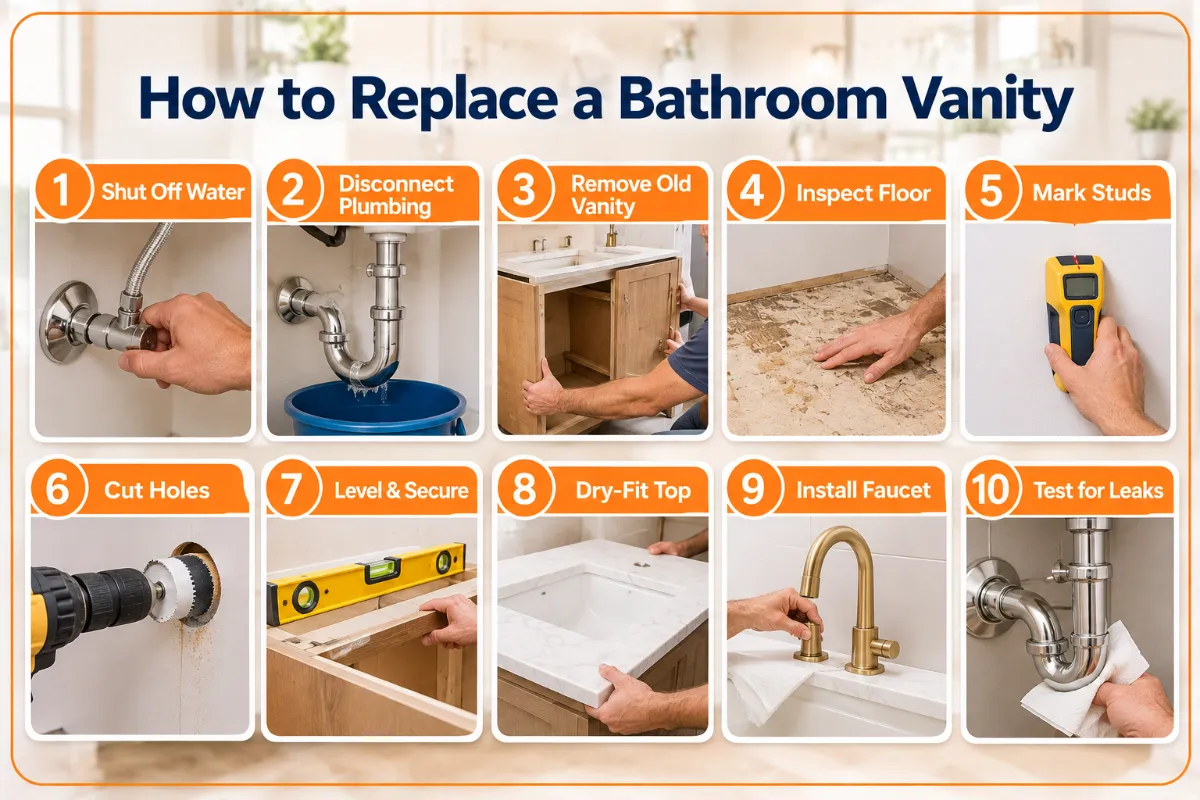
- Shut off the water. Close both valves and open the faucet to confirm the flow stops.
- Disconnect the plumbing. Put a bucket under the P-trap. Loosen the slip nuts and remove the trap. Disconnect the supply lines.
- Remove the old vanity. Cut the caulk along the wall. Unscrew the cabinet from the studs and pull it out.
- Inspect the floor and wall. Probe for soft spots. Fix rot now, not after the new cabinet goes in.
- Mark and locate studs. Draw the new outline on the wall. Mark the studs.
- Cut plumbing holes. For solid-back cabinets, transfer pipe positions to the back panel and cut with a hole saw.
- Set, level, and secure. Shim until level. Screw into studs. An unsecured vanity can tip and tear out the plumbing.
- Dry-fit the top. Check the overhang and backsplash fit before you glue anything. Then set the top with silicone.
- Install the faucet and drain. Do this before final placement when possible. Working on a loose top is much easier than lying under the cabinet.
- Reconnect and test. Turn on the water slowly. Run it for a few minutes and check every joint with a dry paper towel.
Flooring order matters. If you’re installing tile or glued-down engineered wood flooring, lay the floor first. With floating floors like click-lock SPC flooring or vinyl planks, set the vanity first and run the floor around it. A heavy cabinet pins a floating floor and stops it from expanding.
15 Bathroom Vanity Makeover Ideas for 2027
These ideas run from a $50 weekend project to a full luxury build. Each includes a cost range, skill level, and one practical tip.
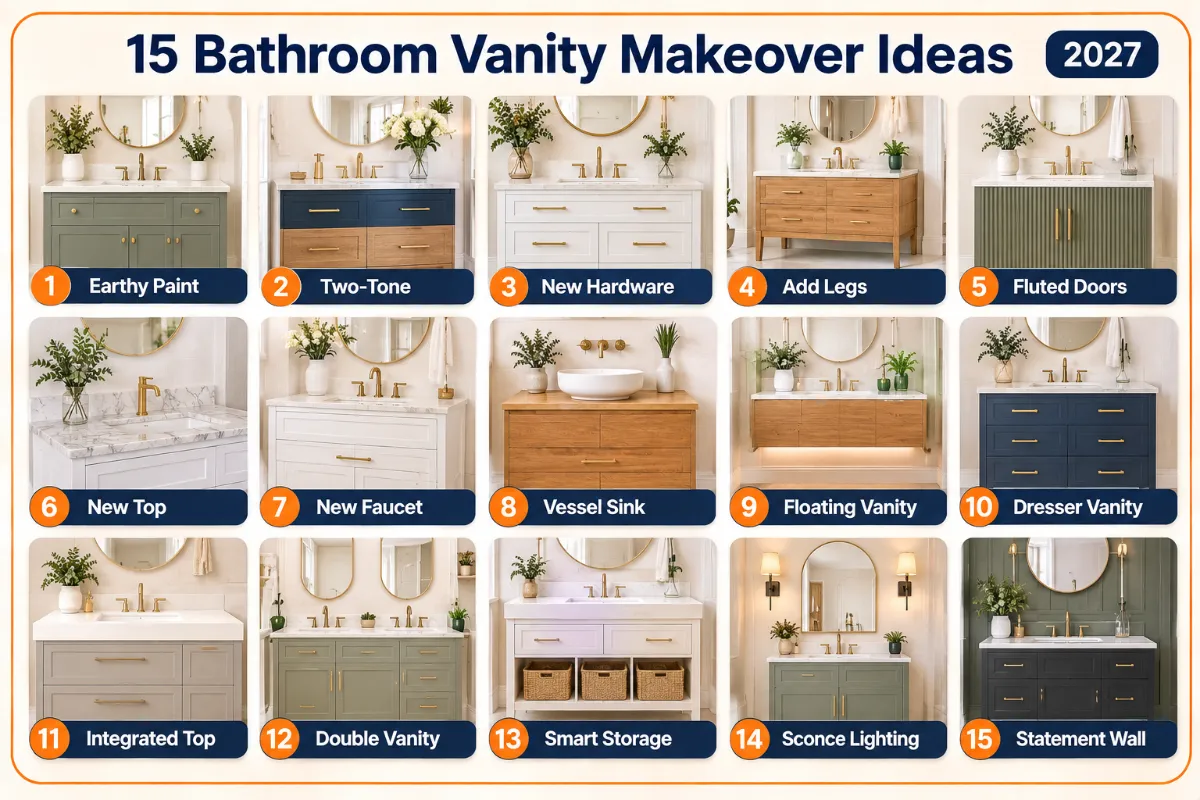
1. Paint It a Deep, Earthy Color
Warm, natural colors now lead vanity design. Earthy greens such as sage, olive, and forest are popular, along with warm neutrals like taupe, greige, and cream. A deep green vanity with brass pulls looks rich and hides minor wear better than white.
Cost: $100–$250 | Skill: Beginner | Tip: Test a sample on the back of a door. Bathroom lighting shifts greens toward gray.
2. Go Two-Tone
Paint the cabinet body one color and the drawers or doors another. Or keep a wood top and paint the base. Two-tone vanities add interest without new materials.
Cost: $100–$300 | Skill: Beginner | Tip: Pick one light and one dark tone from the same color family. Sharp contrasts look busy in a small room.
3. Swap the Hardware (and Size It Right)
New knobs and pulls change the look in under an hour. Size pulls at about one-third of the drawer width. Common center-to-center sizes are 3 inches, 96 mm, 128 mm, and 160 mm. Match the old holes if you don’t want to fill and repaint.
Cost: $30–$200 | Skill: Beginner | Tip: Use a hardware drilling jig so every pull lines up at the same height.
4. Add Legs or Feet for a Furniture Look
Remove the toe kick and add bun feet or tapered legs. The vanity suddenly looks like furniture, not a builder box. This works best on 24- to 48-inch vanities.
Cost: $50–$200 | Skill: Intermediate | Tip: Fasten the legs to a solid base frame, not thin particleboard. Keep the wall screws in place for stability.
5. Reface With Fluted, Cane, or Slab Doors
New doors give a dated vanity a fresh face. Fluted fronts are a top pick right now, often paired with floating vanities for added depth and texture. Cane panels suit coastal and boho rooms. Flat slab doors fit modern spaces.
Cost: $150–$800 for custom-sized doors | Skill: Intermediate | Tip: Check your hinge type before ordering. Concealed European hinges need doors drilled with 35 mm cup holes.
6. Replace or Resurface Only the Top
A solid base with a dated top is the classic partial remodel. Replace the top with quartz or cultured marble. Or resurface it if your budget is tight.
| Resurfacing method | Cost | Durability near a wet sink | Best for |
| Epoxy coating kit | $40–$100 | Fair; chips with heavy use | Laminate in a guest bath |
| Concrete overlay | $50–$100 | Good if sealed well | Modern, matte look |
| Faux-marble paint | $50–$120 | Fair; depends on topcoat | Confident DIYers |
| Contact paper | $10–$40 | Poor; edges lift fast | Renters, short-term fixes |
| Butcher block | $100–$250 | Good if sealed on every face | Warm, farmhouse style |
Tip: Seal butcher block on all six sides, including the sink cutout, with a marine-grade or penetrating oil finish. Reseal yearly.
7. Upgrade the Faucet
A new faucet costs little and changes the whole vanity. Wall-mount faucets free up counter space and look custom. Confirm the faucet’s hole count and spacing match your top.
Cost: $80–$600 plus labor | Skill: Beginner to intermediate | Tip: Wall-mount faucets need in-wall valves. Plan them only when the wall is open.
8. Switch the Sink Style
An undermount sink makes wiping the counter easy. A vessel sink adds sculpture. An integrated sink creates a clean, one-piece look.
Cost: $100–$800 for the sink, plus top fabrication | Skill: Pro for undermount | Tip: For a vessel sink, choose a lower cabinet so the rim lands at a comfortable height.
9. Convert to a Floating Vanity
Floating vanities make bathrooms feel larger and lighter. You gain open floor space for baskets and easier mopping. The exposed floor also becomes part of the design, so a waterproof LVT floor laid in a herringbone pattern turns that gap into a feature.
Cost: $400–$2,500 plus labor | Skill: Intermediate to pro | Tip: Add 2x lumber blocking between studs before mounting. The vanity, top, and sink can easily weigh 150 pounds or more.
10. Repurpose a Dresser or Console
A vintage dresser makes one of the most unique bathroom vanities you can build. Cut out the back and top drawer to fit the plumbing. Keep the drawer fronts as false panels.
Cost: $100–$600 for the piece, plus top and sink | Skill: Intermediate | Tip: Seal the inside and back with polyurethane. Old wood soaks up moisture fast.
11. Choose an Integrated Stone or Solid-Surface Top
An integrated top makes the sink and counter one piece. There’s no rim to collect grime. This look reads clean, modern, and expensive.
Cost: $600–$3,000 | Skill: Pro | Tip: Solid surface can be sanded and repaired. Stone integrated sinks cost more but last decades.
12. Rethink the Master Bathroom Vanity Layout
A master bathroom vanity should serve two people at once. Plan 36 inches between sink centerlines. For real comfort, leave 48 inches of clear floor in front so two people can pass each other. Some designers now skip the shared double vanity and place two single vanities on opposite walls for a boutique-hotel feel.
Cost: $1,500–$8,000+ for a 60- to 72-inch double | Skill: Pro | Tip: Add a center drawer tower between the sinks. It gives each person storage without crowding the counter.
13. Add Smart Storage Inside
Luxury lives inside the drawers. U-shaped drawers wrap around the plumbing. Pull-out organizers keep bottles upright. Plan device storage early so cords, chargers, and grooming tools stay hidden.
Cost: $50–$500 for inserts; $150–$400 for an in-drawer outlet installed | Skill: Beginner for inserts, electrician for outlets | Tip: Measure the space around your P-trap before buying organizers.
14. Upgrade the Mirror and Lighting
Lighting makes or breaks a vanity. Mount damp-rated sconces on both sides of the mirror at roughly face height. Side lighting removes the shadows a single overhead fixture casts. Backlit LED mirrors and toe-kick lights add soft night lighting.
Cost: $150–$1,200 plus electrician | Skill: Electrician recommended | Tip: Choose bulbs around 3000K with a CRI of 90 or higher for accurate makeup and skin tones.
15. Frame It With a Statement Wall
Beautiful vanities look even better against the right backdrop. Try a full-height slab backsplash, handmade-look zellige tile, wood paneling, or bold wallpaper. The wall turns the vanity into the room’s focal point.
Cost: $200–$2,500 | Skill: Intermediate | Tip: Use vinyl or moisture-resistant wallpaper, and seal tile behind the faucet area.
Quick Comparison: All 15 Ideas
| # | Idea | Cost range | Skill | Best for |
| 1 | Earthy paint color | $100–$250 | Beginner | Solid cabinets on a budget |
| 2 | Two-tone finish | $100–$300 | Beginner | Adding contrast |
| 3 | New hardware | $30–$200 | Beginner | Fastest visible change |
| 4 | Legs or feet | $50–$200 | Intermediate | Furniture-style look |
| 5 | New doors | $150–$800 | Intermediate | Dated door styles |
| 6 | New or resurfaced top | $10–$1,500 | Varies | Good base, bad top |
| 7 | New faucet | $80–$600 | Beginner+ | Small-budget impact |
| 8 | New sink style | $100–$800+ | Pro | Function upgrades |
| 9 | Floating vanity | $400–$2,500+ | Pro | Small bathrooms |
| 10 | Repurposed dresser | $100–$600+ | Intermediate | Unique bathroom vanity |
| 11 | Integrated top | $600–$3,000 | Pro | Clean, modern look |
| 12 | Master layout | $1,500–$8,000+ | Pro | Shared bathrooms |
| 13 | Smart storage | $50–$500 | Beginner+ | Cluttered counters |
| 14 | Mirror and lighting | $150–$1,200 | Electrician | Grooming and ambiance |
| 15 | Statement wall | $200–$2,500 | Intermediate | Creating a focal point |
Luxury Bathroom Vanities Ideas: What Makes a Vanity Look Expensive
Luxury comes from details, not price tags. Use these principles to make any vanity look high-end:
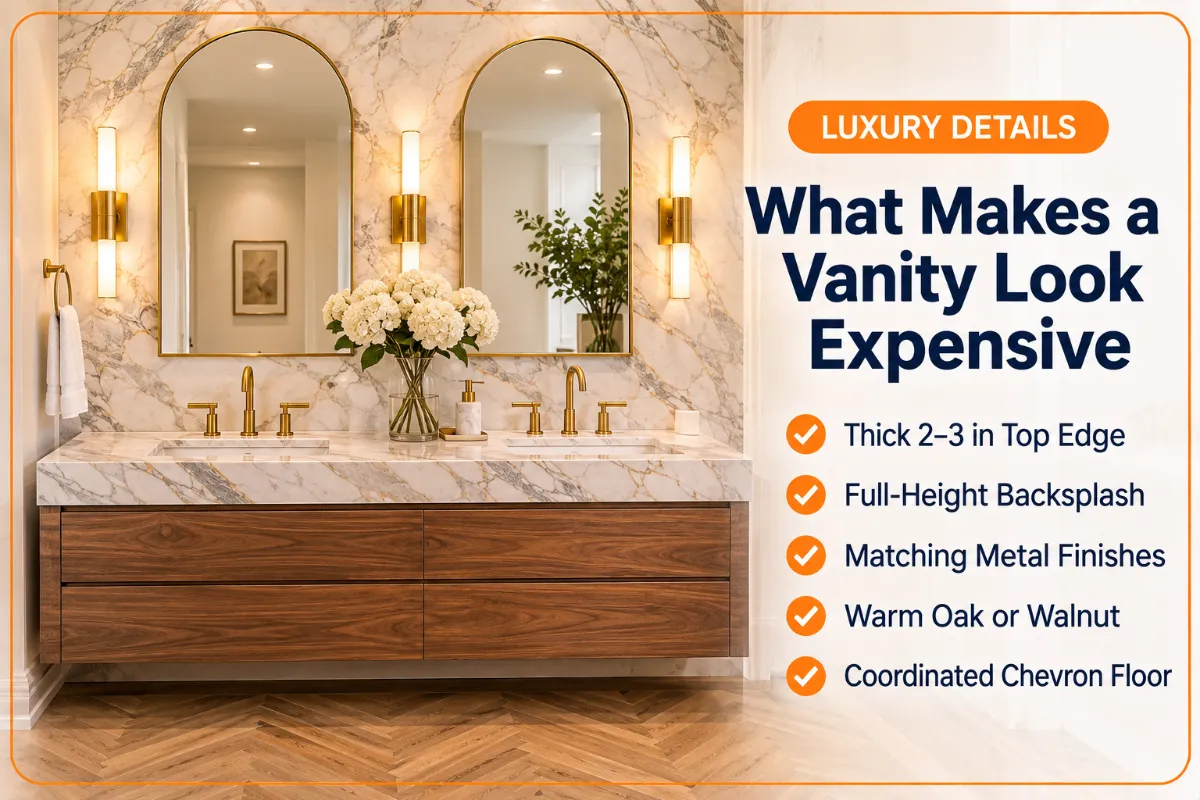
- Use a thicker top edge. A mitered 2- to 3-inch edge makes stone look substantial.
- Run the backsplash to the ceiling. A full-height slab behind the vanity looks custom.
- Match your metals. Keep faucet, pulls, and light fixtures in one finish, or two at most.
- Choose warm wood. White oak and walnut are the leading choices for high-end vanities.
- Coordinate the floor. A wood-look floor in a chevron layout echoes an oak or walnut vanity and ties the room together.
- Keep reveals consistent. Even gaps between doors and drawers signal quality cabinetry.
- Pick plywood or solid wood boxes. They resist moisture far better than particleboard.
Common Vanity Remodel Mistakes to Avoid
- Buying before measuring clearances. A vanity that blocks the door is a costly return.
- Ignoring the drain height. A taller or floating vanity may need the drain moved.
- Rehanging doors too soon. Fresh paint sticks to itself and peels.
- Skipping the floor check. A new cabinet on a rotted subfloor fails fast.
- Mismatching faucet holes. Order the top and faucet together.
- Using contact paper near the sink. Water lifts the edges within weeks.
- Choosing marble without accepting etching. Lemon, vinegar, and some cleaners leave dull marks.
Frequently Asked Questions
How much does it cost to remodel a bathroom vanity?
A paint-and-hardware refresh costs about $100–$400 if you do it yourself. Replacing the top, sink, and faucet costs about $400–$1,500. A full replacement, including installation, typically costs $300–$3,800, and custom vanities can exceed $5,000.
Can I replace a vanity top without replacing the cabinet?
Yes. If the cabinet is solid and level, you can install a new top on it. Measure the cabinet’s outside width and depth. Order a top with about a 1/2- to 1-inch overhang on exposed sides and faucet holes that match your faucet.
Do I need a permit to replace a bathroom vanity?
Usually not, if you reuse the existing plumbing and electrical connections. Moving drains, adding circuits, or relocating supply lines often requires a permit. Check with your local building authority.
What is the best paint finish for a bathroom vanity?
Satin or semi-gloss cabinet enamel works best. Satin hides imperfections. Semi-gloss cleans more easily. Avoid flat or eggshell wall paint, which absorbs moisture and scuffs.
How long does a vanity remodel take?
A like-for-like replacement takes about one day. A painted refresh takes three to five days because of dry and cure times. Custom stone tops add one to three weeks for templating and fabrication.
What is the best size for a master bathroom vanity?
Most double master bathroom vanities run 60 to 72 inches wide. A 72-inch vanity allows 36 inches between sink centers, which is the comfort target. A 60-inch double works but leaves little counter space between sinks.