Peel-and-stick flooring is vinyl tile or plank with the adhesive already on the back. Peel off the liner, press it down, move to the next piece. No mortar, no wet glue, no contractor.
That one detail is why self-adhesive flooring owns the budget makeover. A small bathroom or laundry room is a one-day job. Renters can cover worn vinyl or dated tile without touching what is underneath. Beginners can fix a crooked tile by lifting it, not by redoing the room.
It has limits, though. Thin vinyl shows every bump beneath it, and how long it lasts depends far more on your prep than on the price tag.
Here are 10 ideas by Nova Floor Experts worth doing, followed by the practical parts that decide whether your floor still looks good in two years.
Contents
10 Peel-and-Stick Flooring Ideas for an Easy DIY Makeover
1. Light Oak Wood-Look Plank Flooring
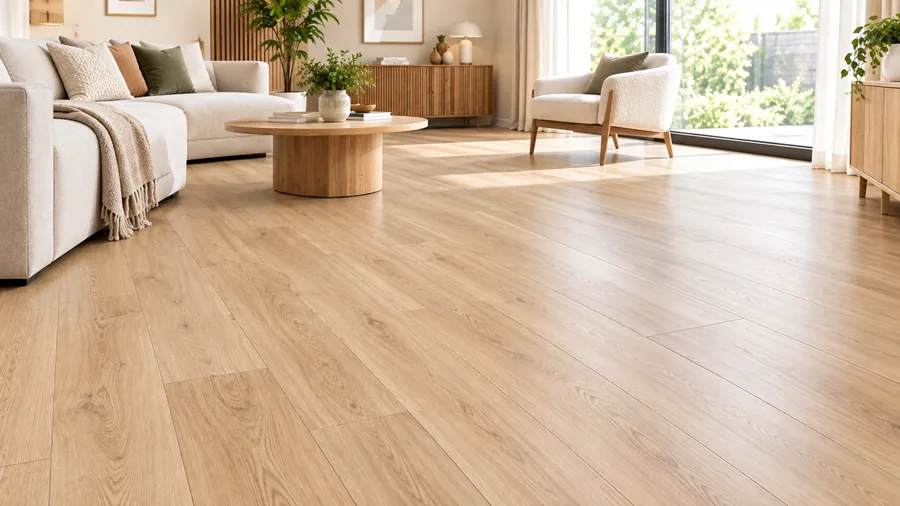
What it looks like: Long, narrow planks in pale to mid oak tones, with embossed grain texture and subtle color variation between boards.
Best room: Living rooms, bedrooms, home offices, and hallways.
Why it works: Long planks pull the eye lengthwise and make a room read bigger. Light oak also bounces light around, which matters in rooms with one small window. Because the tone is neutral, it survives changes in furniture and paint far better than a trendy gray or a very dark stain.
Run planks parallel to the longest wall, or parallel to the main light source, for the most natural look. Stagger the end joints between rows by at least 6 inches so the seams do not line up in a visible ladder.
DIY difficulty: Easy
Best for: Modern interiors, open-plan spaces, renters wanting a warmer base, budget makeovers
2. Marble-Look Tiles With Real Grout Lines
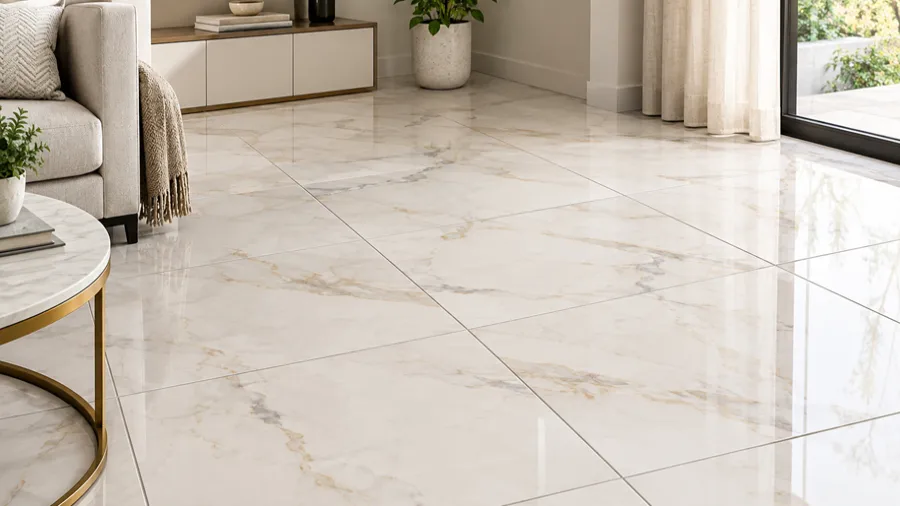
What it looks like: White or soft-gray tiles with veining, installed with narrow gaps that get filled with acrylic grout after the tiles are down.
Best room: Bathrooms, powder rooms, and entryways.
Why it works: Groutable peel-and-stick vinyl tiles are a distinct product category, and they solve the biggest tell of cheap vinyl. Real grout lines add depth and a slight surface break, so the floor stops looking like a printed sheet and starts reading as tile. The grout also fills seams, which helps at the edges where water tends to sit.
Only use grout with tiles specifically sold as groutable. Standard self-adhesive tiles are butted tight and have no channel to hold it.
DIY difficulty: Moderate
Best for: Small bathrooms, traditional homes, anyone who wants the floor to look more expensive than it was
3. Black-and-White Checkerboard
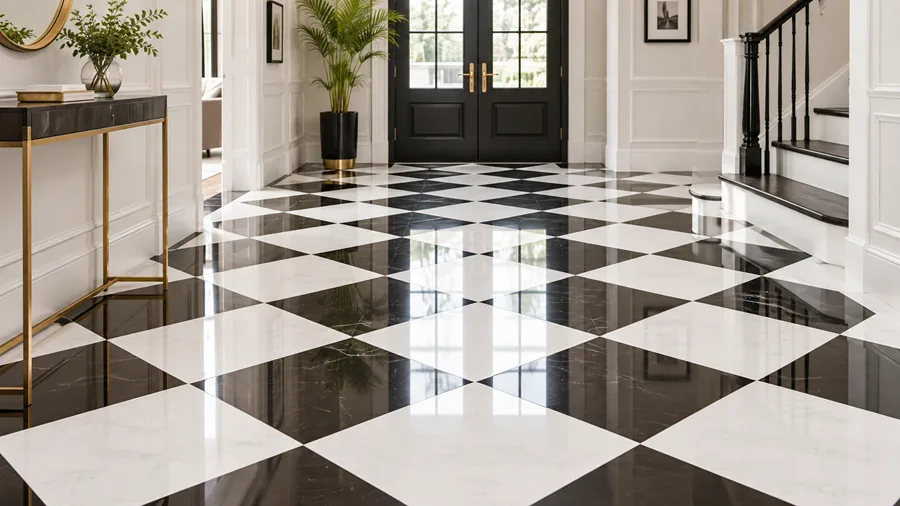
What it looks like: Alternating dark and light squares, either set straight to the walls or turned 45 degrees on the diagonal.
Best room: Kitchens, entryways, laundry rooms, and mudrooms.
Why it works: Checkerboard is one of the few patterns that reads as deliberate rather than as budget flooring. It suits a 1920s bungalow and a modern kitchen equally. The dark squares also hide scuffs and tracked-in grit better than an all-white floor.
The catch is that checkerboard is unforgiving. Any drift in your rows shows immediately because the eye follows the grid. Snap chalk lines both directions before you start and check your alignment every few rows.
DIY difficulty: Moderate
Best for: High-traffic spaces, kitchens, small rooms that need a focal point
4. Herringbone-Style Plank Layout
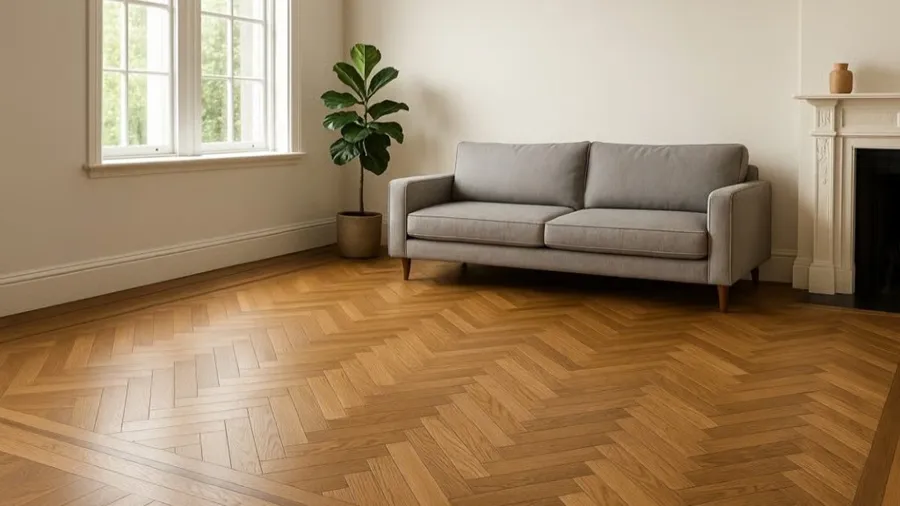
What it looks like: Short wood-look planks set at 45 degrees in an interlocking V, creating a woven zigzag.
Best room: Entryways, powder rooms, small home offices, and dining nooks.
Why it works: Herringbone adds movement and craftsmanship to a small footprint. It is a genuinely upmarket pattern, and executing it in vinyl plank costs a fraction of what a herringbone hardwood or LVT flooring installation would.
Be realistic about the work. Herringbone needs an accurate 45-degree centerline, a lot of angled cuts along every wall, and noticeably more waste than a straight layout. Buy extra material and dry-fit the whole field before you peel a single backing.
DIY difficulty: Moderate
Best for: Small rooms, traditional homes, DIYers who want a project rather than a quick fix
5. Terrazzo-Inspired Speckled Tiles
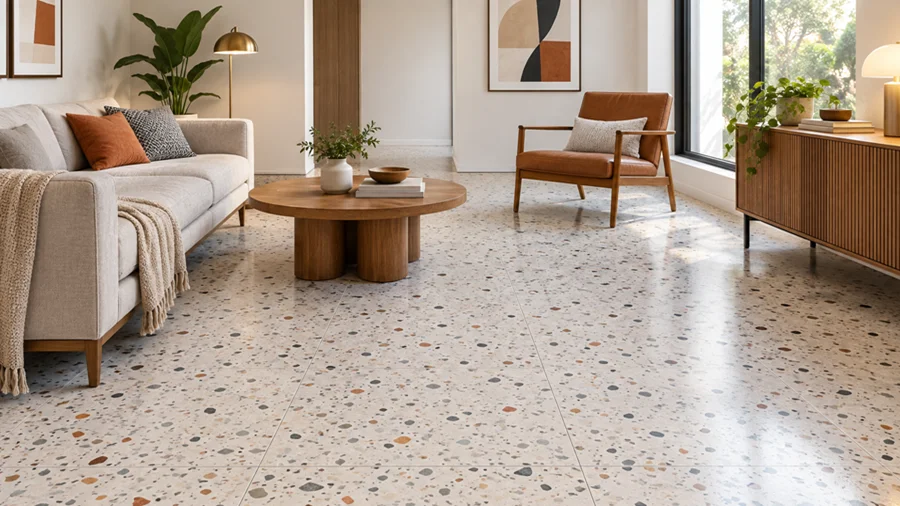
What it looks like: A pale base scattered with chips of color, from soft neutral flecks to bold multicolor confetti.
Best room: Laundry rooms, mudrooms, kids’ bathrooms, and utility spaces.
Why it works: Terrazzo is the most practical pattern on this list. The speckle visually breaks up dust, lint, pet hair, and small scuffs, so the floor looks clean longer between mops. It is also pattern-forgiving during installation. A tile that is a degree off does not announce itself the way a checkerboard square would.
DIY difficulty: Easy
Best for: Busy households, laundry and utility rooms, anyone who hates visible dirt
6. Moroccan-Inspired Patterned Statement Floor
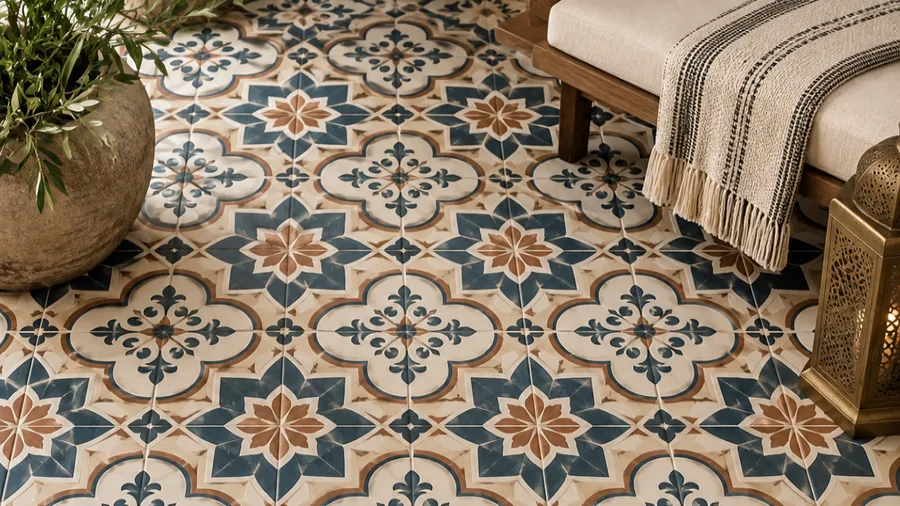
What it looks like: Encaustic-style tiles in blue and white, black and white, or terracotta, with repeating geometric or floral motifs that form a larger pattern across the floor.
Best room: Powder rooms, small bathrooms, and laundry closets.
Why it works: A bold pattern in a tiny room is high impact and low risk. The material cost of a 25-square-foot powder room is small enough that you can commit to something dramatic, and if you tire of it in three years, replacing it is a Saturday.
Keep it contained. Pattern-heavy floors fight with patterned wallpaper and busy tile, so let the floor be the loudest element and keep the walls quiet.
DIY difficulty: Moderate
Best for: Small rooms, renters, statement-makers, budget makeovers
7. Slate and Concrete Stone-Look Large-Format Tiles
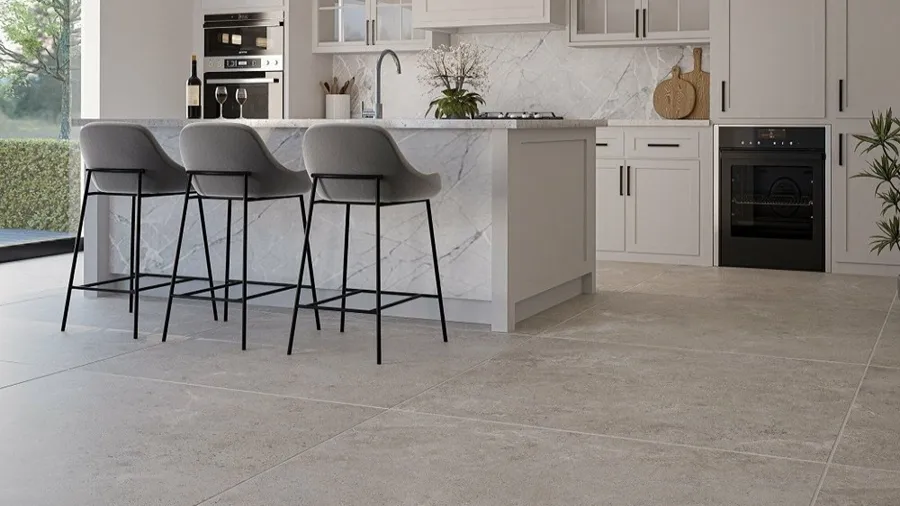
What it looks like: Matte, low-contrast tiles in charcoal, greige, or weathered stone, often with a lightly textured surface.
Best room: Mudrooms, basements, entryways, and utility areas.
Why it works: Stone-look self-adhesive flooring gets you the visual weight of stone without the weight itself, which matters over a wood subfloor that was never engineered for tile. The muted, mottled surface hides dirt exceptionally well at the door, and larger tiles mean fewer seams for grit and moisture to work into.
Matte finishes generally look more convincing than glossy ones in stone patterns. Gloss reads as plastic under direct light.
DIY difficulty: Easy
Best for: High-traffic spaces, entry zones, modern and industrial interiors
8. Quiet Neutral Tiles With Fine Texture
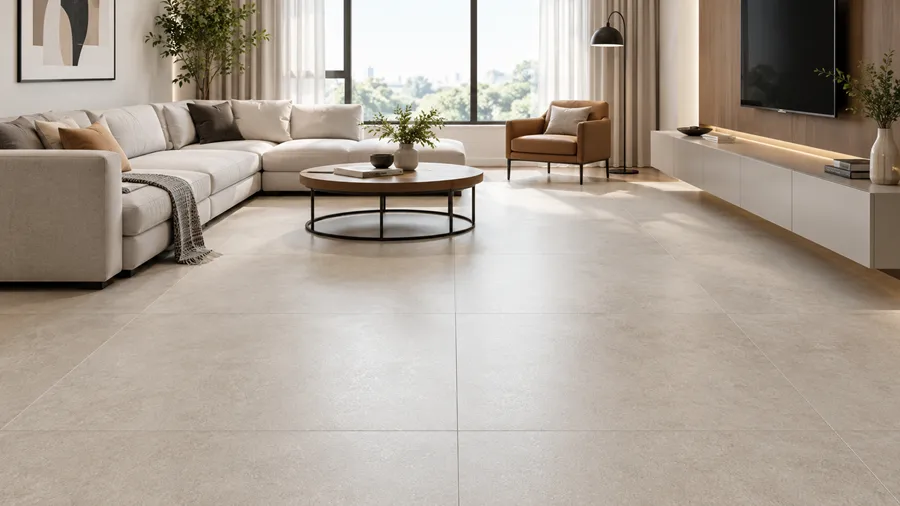
What it looks like: Solid or near-solid tiles in bone, warm gray, sand, or off-white, with a fine linen-like or lightly stippled surface rather than a printed pattern.
Best room: Bedrooms, closets, home offices, and small apartments.
Why it works: Not every floor should be a feature. In a bedroom or a room where you work, a calm floor makes the space feel larger and lets furniture and textiles do the talking. Fine surface texture also scatters light, so scratches and dust are less obvious than on a flat gloss finish.
Skip pure bright white in any room with real traffic. It shows everything.
DIY difficulty: Easy
Best for: Minimalist interiors, small apartments, low-traffic rooms, resale-neutral updates
9. A Bordered “Rug” Inlay
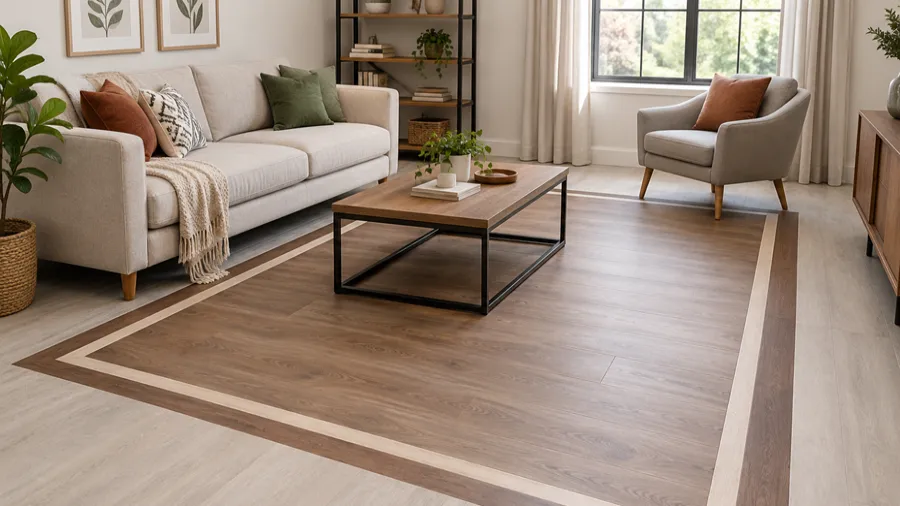
What it looks like: A patterned rectangle framed by a plain border, laid in the middle of a floor, mimicking an inlaid area rug.
Best room: Under a desk, in an entry landing, or centered in a home office or dining area.
Why it works: This is a layout idea rather than a product idea, and it solves a real problem: defining a zone in an open-plan room without buying furniture. It also lets you use a small quantity of an expensive patterned tile, since the border does most of the coverage.
Center the inlay on the furniture it serves, not on the room, or it will look accidental. Plan the full grid on paper first.
DIY difficulty: Moderate
Best for: Open-plan rooms, home offices, renters wanting impact from a small tile order
10. Diagonal Layout in a Narrow Room
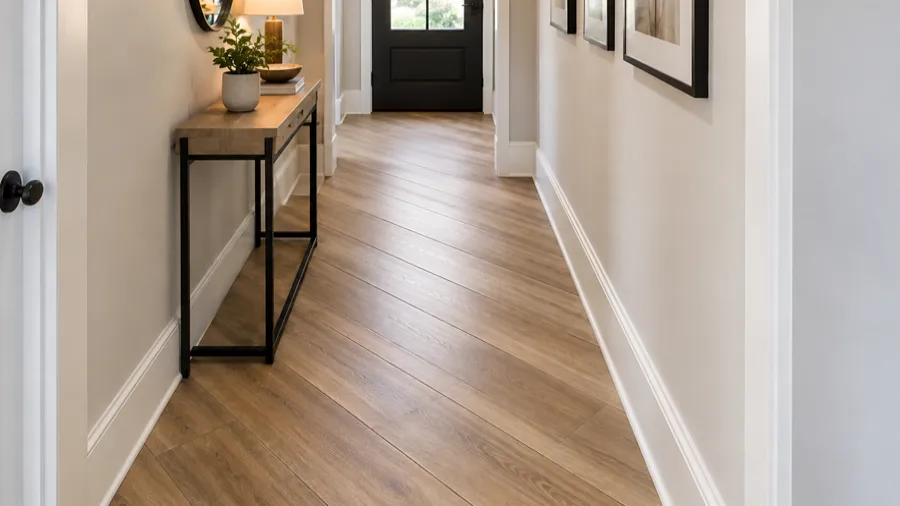
What it looks like: Plain or subtly veined tiles rotated 45 degrees to the walls, so the joints run corner to corner.
Best room: Narrow hallways, galley kitchens, small bathrooms, and long laundry rooms.
Why it works: A diagonal grid pushes the eye toward the corners instead of straight down a tunnel, which visually widens a narrow space. It also disguises out-of-square walls, a genuinely common problem in older homes where a straight layout would reveal a tapering cut line along one wall.
Expect more offcuts. A diagonal layout produces more waste than a straight one, so add roughly 15 percent to your material estimate instead of the usual 10.
DIY difficulty: Moderate
Best for: Small rooms, older homes with out-of-square walls, narrow spaces
How to Choose the Right Peel-and-Stick Flooring
Match the product to the room before you fall in love with a pattern. Seven factors decide whether a floor performs.
Room and traffic. Bedrooms, closets, and home offices see light use, so a thinner, cheaper tile is reasonable. Kitchens, entryways, and hallways take daily abrasion and furniture drag, and they justify a thicker product with a proper wear layer. Wear layer is the clear top coating that takes the scratches so the printed layer underneath survives; a thicker one lasts longer.
Moisture exposure. Water resistance and waterproofing are different claims. A waterproof vinyl tile will not swell if water sits on it, but the seams between tiles are still the weak point, and water that reaches the adhesive can lift edges. Bathrooms, laundry rooms, and mudrooms need a product rated for wet areas and careful attention at the perimeter.
Thickness. Peel-and-stick vinyl commonly runs from about 1 mm to around 2.5 mm. Thinner material conforms to and reveals whatever is underneath, and wears through faster. Thicker material sits more stably and bridges minor texture better. Check the spec sheet rather than guessing from the photo.
Your existing floor. This constrains everything. A smooth, sound, dry surface opens up all your options. A textured, cushioned, or damaged one either needs preparation work or rules out adhesive-backed flooring entirely. Assess it before you shop.
Style and scale. Large patterns overwhelm small rooms unless the room is a powder room where drama is the point. Long planks suit long rooms. Small-scale patterns suit small floors.
Budget, honestly counted. Include the underlayment, leveling compound, floor roller, and spare boxes, not just the tile. A cheap tile plus proper prep beats an expensive tile on a bad surface every time.
Maintenance appetite. Groutable tile looks better and asks for occasional grout care. Textured stone-look surfaces hold a little more dirt in the grain. Smooth matte tiles are the least demanding.
Can You Install Peel-and-Stick Flooring Yourself?
Yes. Self-adhesive vinyl tile and plank is the most beginner-accessible flooring on the market, and most people can do a small room in a day with a utility knife, a straightedge, a tape measure, a chalk line, and a floor roller. The skill is not in sticking the pieces down. It is in preparing the surface and planning the layout before anything gets peeled.
Here is the shape of the job.
Measure the room and calculate square footage, then add 10 percent for waste on a straight layout or about 15 percent for diagonal and herringbone. Buy all your material in one order so the pattern batches match.
Acclimate the flooring in the room where it will be installed, still boxed, laid flat, usually for 24 to 48 hours. Vinyl expands and contracts with temperature. Skipping this is a common cause of gaps appearing at seams weeks later. Check what the manufacturer specifies.
Inspect the existing floor. Look for movement, soft spots, moisture staining, loose edges, and surface texture. Anything that moves, crumbles, or is damp needs solving first.
Clean thoroughly. Sweep, vacuum, then wash with a residue-free cleaner and let it dry completely. Adhesive backing bonds to the surface it touches, so wax, polish, soap film, or fine dust becomes a release layer. This step causes more failures than any other.
Repair and level. Fill low spots, holes, and seams with a patching or self-leveling compound. Sand down ridges. Any imperfection more than a millimeter or so will eventually show through as a bump or shadow in the finished floor.
Find your layout lines. Measure to the center of the room and snap perpendicular chalk lines. Working outward from the center keeps your cut pieces balanced at opposite walls rather than leaving a sliver on one side.
Dry-fit first. Lay a full run in both directions with the backing still on. This tells you whether you will end up with an awkward 1-inch cut at a wall, and lets you shift your starting line to fix it. It also lets you shuffle tiles so similar patterns are not adjacent.
Peel and press. Remove the backing, set the piece against your line and the previously laid piece, and press down. Do not slide it into place once the adhesive touches. Butt each piece tight to its neighbor with no gap.
Cut edges and obstacles. Score vinyl tile face-up with a sharp utility knife against a straightedge and snap it. For pipes and door casings, make a paper or cardboard template and trace it. Undercutting door casings with a jamb saw gives a far cleaner result than cutting the tile around them.
Roll and inspect. Go over the whole floor with a floor roller to force full adhesive contact, paying attention to seams and edges. Then stay off it for as long as the manufacturer specifies before returning furniture.
What Floors Can Peel-and-Stick Tiles Go Over?
You can install peel-and-stick tiles over some existing floors, but the right surface depends on the product. Always check the manufacturer’s instructions first because each product can have different requirements.
Floors That Usually Work
Peel-and-stick tiles usually work well over these surfaces when they are smooth, clean, dry, and in good condition:
- Sheet vinyl or vinyl tile: The existing flooring should stay firmly bonded to the subfloor.
- Ceramic or porcelain tile: You can use peel-and-stick tiles over smooth tile with very thin grout lines. Fill and level deeper grout lines before installation.
- Plywood or approved underlayment: Make sure the surface is stable, smooth, and suitable for the flooring product.
- Cured concrete: Dry, sealed, above-grade concrete can provide a suitable base for peel-and-stick flooring.
Floors to Avoid
Some surfaces can prevent the adhesive from bonding properly. Avoid installing peel-and-stick tiles directly over:
- Cushioned or padded vinyl: It can compress under furniture and cause the new tiles to move or lift.
- Heavily textured vinyl: Deep patterns can show through the thin flooring.
- Tile with deep grout lines: The new tiles can sink into the joints and create visible dips.
- Floating laminate or click flooring: The floor can move as one unit and break the adhesive bond.
- Carpet: Peel-and-stick tiles need a firm, stable surface, so carpet does not provide a suitable base.
- Unsealed particleboard or OSB: These materials can absorb moisture and may not provide a stable surface for strong adhesion.
Check These Four Conditions First
The type of floor is not the only thing that matters. Check the surface carefully before you install the tiles.
Uneven surfaces: Ridges and dips can show through thin vinyl tiles. Level the surface before installation.
Dirt and residue: Dust, wax, grease, and cleaner residue can prevent the adhesive from sticking. Clean the floor thoroughly and let it dry.
Moisture: Moisture can weaken the adhesive from underneath. If you plan to install the tiles over concrete, check the slab for moisture before you start.
Loose or damaged flooring: Repair or remove loose sections first. If the old flooring moves, the new tiles can move with it.
What About Old Vinyl Flooring?
Take extra care with very old vinyl flooring. Vinyl tiles and sheet flooring installed before the 1980s may contain asbestos, including in the black adhesive underneath.
Do not sand, scrape, or break up old flooring if you suspect it contains asbestos. Have the material tested by a qualified professional and follow your local regulations. In some cases, you may be able to cover intact, level flooring, but confirm that approach before starting the installation.
Pros and Cons of Peel-and-Stick Flooring
| Pros | Cons |
| Genuinely DIY-friendly with basic hand tools | Success depends heavily on surface preparation |
| One of the lowest-cost flooring options available | Less durable than LVT, SPC tiles, or hardwood |
| Huge range of wood, stone, marble, terrazzo, and patterned designs | Adhesive performance varies with temperature, humidity, and substrate |
| A small room can be finished in a single day | Bumps, ridges, and texture underneath show through |
| Individual damaged tiles can be lifted and replaced | Not suitable over every subfloor or existing floor |
| Adds no meaningful height, so doors usually still clear | Seams are a weak point around standing water |
| Reversible enough for many rentals | Removal can leave adhesive residue, and may lift finish on some surfaces |
How to Make Peel-and-Stick Flooring Last Longer
Over-prepare the surface. Every extra hour spent leveling, cleaning, and drying pays back in years of adhesion. If you only do one thing well, do this.
Install in the right conditions. Adhesive is temperature-sensitive. A cold garage floor in winter or a humid, unconditioned room gives you a weak initial bond. Get the room to normal living temperature and keep it there through the install and for a day or two after.
Roll the whole floor, not just the seams. Pressure-sensitive adhesive needs pressure to activate properly. A hand roller works for a small bathroom; a weighted floor roller is better for anything larger.
Control water at the edges. Run a bead of caulk where the floor meets a tub, shower base, or toilet flange. Wipe standing water rather than letting it sit on seams. Use a damp mop, never a soaking wet one, and avoid steam mops entirely; heat and forced moisture are the fastest way to release adhesive.
Manage grit and furniture. Sand and grit act like sandpaper underfoot, so put a mat at every exterior door. Fit felt pads to chair and table legs, and use wide load-spreading cups under heavy furniture instead of narrow feet that dent the vinyl.
Protect the paths that take the beating. A washable runner in a hallway or in front of a sink takes the wear that would otherwise land on the wear layer.
Read the manufacturer’s instructions and keep them. Acclimation time, approved substrates, cure time, and cleaning restrictions differ between products, and those documents are also what a warranty claim gets measured against.
Keep a spare box. Store leftover tiles flat. Being able to swap one damaged piece years later, from the same batch, is one of the real advantages of this flooring.
Is Peel-and-Stick Flooring Good for Renters?
Often yes, with conditions. A temporary floor can transform a dated rental at low cost, and many products are designed to be removed. But “removable” is a product claim, not a guarantee about your particular floor.
Check the lease first. Many leases require written permission before you apply any adhesive to the floor. Ask your landlord before you install the tiles, and get the approval in writing. This simple step can help you avoid a deposit dispute later.
Check what lies underneath. Adhesive-backed vinyl usually works well over a sound, intact floor. However, be careful with sealed or finished hardwood. The adhesive can stick to the finish or damage it when you remove the tiles. Old, brittle, or damaged flooring can also break apart during removal.
Choose a repositionable product. Some tiles use low-tack adhesive that makes them easier to remove and reposition. These products may not last as long as permanent adhesive tiles, but they can reduce the risk of floor damage. Always check the product instructions before you buy.
Test one tile first. Place one tile in a hidden area, such as inside a closet or under an appliance. Leave it there for a few weeks, then remove it. Check the floor for damage or adhesive residue. This test can help you avoid problems before you cover the entire room.
Prepare for some residue. Even careful removal can leave adhesive behind. Use gentle heat from a hair dryer to soften the adhesive. Then use a remover that works safely on your existing floor. Allow extra time for cleanup when you move out.
Try a floating floor instead. Click-lock vinyl plank does not need adhesive. You simply install it over the existing floor. It usually costs more and takes more work to install, but you can remove it later without leaving adhesive behind.
Quick Comparison | Which Idea Fits Your Room?
| Flooring Idea | Best For | Style | DIY Difficulty | Maintenance |
| Light oak wood-look plank | Living rooms, bedrooms, offices | Modern, warm neutral | Easy | Low |
| Marble-look groutable tile | Bathrooms, entryways | Classic, upscale | Moderate | Medium |
| Black-and-white checkerboard | Kitchens, entries, laundry | Retro, graphic | Moderate | Low |
| Herringbone plank layout | Entries, powder rooms, nooks | Traditional, tailored | Moderate | Low |
| Terrazzo-inspired speckle | Laundry, mudrooms, kids’ baths | Playful, contemporary | Easy | Very low |
| Moroccan-inspired pattern | Powder rooms, laundry closets | Bold, eclectic | Moderate | Low |
| Slate or concrete stone-look | Mudrooms, basements, entries | Industrial, understated | Easy | Very low |
| Quiet neutral textured tile | Bedrooms, closets, offices | Minimalist | Easy | Low |
| Bordered rug inlay | Offices, open-plan zones | Custom, decorative | Moderate | Low |
| Diagonal layout | Hallways, galley kitchens | Space-expanding | Moderate | Low |
Frequently Asked Questions
Is peel-and-stick flooring easy to install?
Yes, it is one of the easiest flooring types for a beginner. The adhesive is already on the back, so there is no mixing, spreading, or curing, and the tools are basic: utility knife, straightedge, tape measure, chalk line, and roller. The difficulty sits in preparation and layout, not application. A small, square, smooth room is easy. A room with an uneven subfloor or a pattern-critical layout is a bigger commitment.
How long does peel-and-stick flooring last?
Lifespan varies enormously and depends more on installation than on the product. Thin budget tiles in a busy entryway may show wear within a couple of years, while a quality tile with a proper wear layer, installed on a well-prepared surface in a low-traffic room, can last far longer. Check the manufacturer’s stated expected life and warranty terms for the specific product, since these differ widely.
Can you put peel-and-stick flooring over existing flooring?
Often, but not always. Smooth, clean, dry, well-bonded surfaces such as existing vinyl, level tile, or plywood underlayment are usually suitable. Cushioned vinyl, textured or embossed floors, floating laminate flooring, carpet, and anything loose or damp generally are not. Always check the specific product’s approved substrate list, because manufacturer requirements vary and installing outside them can void the warranty.
Is peel-and-stick flooring waterproof?
Some products are waterproof, others are only water-resistant, and the label matters. Waterproof vinyl will not swell or degrade when water sits on the surface. However, the seams between pieces are still a vulnerability, and water penetrating to the adhesive can lift edges regardless of how the tile itself is rated. Caulking the perimeter and wiping spills promptly matters more than the rating alone.
Is peel-and-stick flooring good for bathrooms?
It can work well in bathrooms if you choose a product rated for wet areas and pay attention to the perimeter. Powder rooms are the easiest case. Full bathrooms with a shower or tub demand more care: seal the edges where the floor meets fixtures, avoid steam mops, and make sure the subfloor is completely dry before installing. Persistent moisture is the main cause of failure here.
Can renters use peel-and-stick flooring?
Usually, but check the lease before buying anything. Many leases classify adhesive applied to floors as an alteration needing written approval. Beyond permission, consider what is underneath. Removal from sound existing vinyl or tile is typically straightforward, while removal from finished hardwood or fragile old flooring carries real risk. Testing a single tile in a hidden area first is worth the wait.
Does peel-and-stick flooring damage the floor underneath?
It depends on the adhesive strength and the surface. Over intact, sealed, sound flooring, damage is unlikely and residue is the usual worst case. Over finished hardwood, painted surfaces, or already-deteriorating material, the adhesive can bond too well and lift finish or fragments during removal. No product can promise damage-free removal from every surface, which is why a small hidden test patch is the sensible first step.
How do you clean peel-and-stick flooring?
Sweep or vacuum regularly to remove grit, then damp-mop with a pH-neutral cleaner made for vinyl floors. Wring the mop well; standing water works into seams and attacks the adhesive. Avoid steam mops, abrasive pads, wax, and harsh solvents, all of which can damage the wear layer or release the bond. Wipe spills promptly rather than letting them sit at joints.