Noah Williams is an interior designer and flooring expert at Nova Floor. In Dubai, he helps people pick the right floor, get it installed, and keep it looking good. He also writes simple, practical flooring and home care guides for readers in Dubai and around the world.
Floor Transition Strips | Types, Uses, Installation, and Buying Guide
Noah Williams
A floor transition strip is a narrow molding that covers the joint where two floor surfaces meet. It bridges the gap, hides cut edges, levels small height differences, and protects the expansion gap that floating floors need. The correct profile depends on the height difference between the two floors.
Contents
What Is a Floor Transition Strip?
A floor transition strip is a narrow molding installed at the joint between two floor surfaces. Installers also call it transition molding, a transition bar, a threshold, or a saddle.
The strip performs three functions. It covers the gap between two floors. It conceals the cut edges of both materials. It smooths out height differences that would otherwise create a trip point.
Floor transition strips also serve a structural role. Floating floors such as laminate and luxury vinyl plank expand and contract with humidity. Installers leave an expansion gap at every edge, including doorways. The transition strip covers that gap while allowing the floor to move freely.
Why Do You Need Floor Transition Strips?
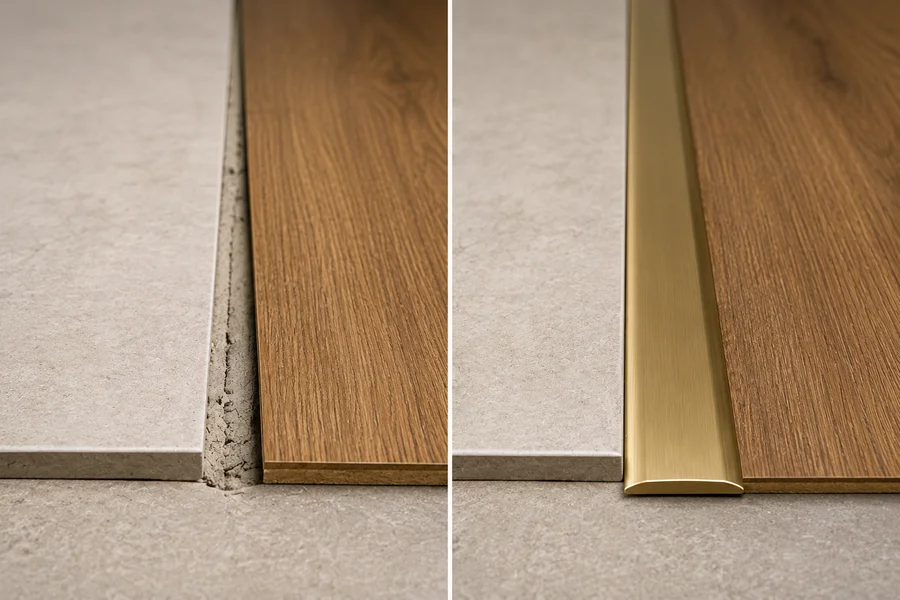
Floor transition strips prevent buckling, trips, and edge damage. They are functional hardware, not decoration.
Six specific reasons justify a transition strip:
- Expansion protection. Floating floors need room to move. Without that room, planks peak or buckle at the seams.
- Trip prevention. A raw height change catches shoe toes, walker tips, and caster wheels.
- Edge protection. Tile edges chip. Carpet frays. Laminate cores swell when water reaches an exposed edge.
- Run length control. Many floating floor brands limit how far a floor may run without a break. A T molding creates that break.
- Visual separation. In open plan layouts, a clean seam marks where one zone ends and the next begins.
- Draft and moisture control. Door thresholds work alongside sweeps and weatherstripping at exterior openings.
What Are the Main Types of Floor Transition Strips?
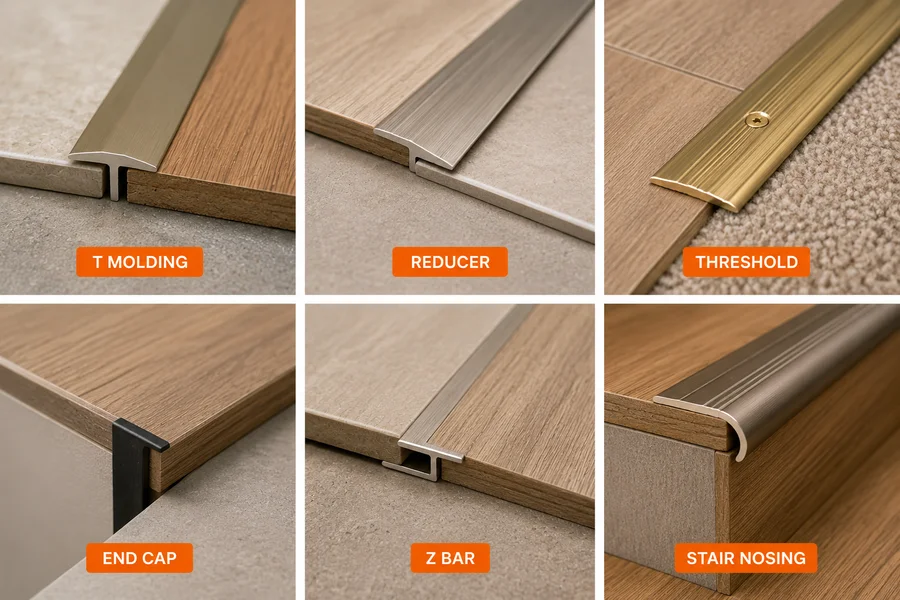
The main types are T molding, reducer, threshold, end cap, seam binder, Z bar, carpet edge gripper, stair nosing, multi purpose 4 in 1 strips, and sloped tile profiles. Each solves a different height and material condition.
| Profile | Use it when | Height situation | Common materials |
| T molding | Two hard floors meet at a doorway | Equal, or within 1/8 inch | Wood, MDF, vinyl, aluminum |
| Flush reducer | Fixed floors differ in height | Up to 1/2 inch difference | Wood, aluminum |
| Overlap reducer | A floating floor meets a lower surface | Up to 1/2 inch difference | Laminate, wood & vinyl flooring |
| Threshold or saddle | The joint sits in a door opening | Varies by opening | Aluminum, brass, hardwood |
| End cap | A floor ends at a vertical surface | Any | Wood, vinyl, metal |
| Seam binder | A wood floor meets another wood floor | Equal | Solid wood |
| Z bar | Carpet meets a hard floor | Carpet sits slightly higher | Aluminum |
| Carpet edge gripper | A stretched carpet edge needs anchoring | Carpet to hard surface | Aluminum |
| Stair nosing | A step edge needs protection | Step edge | Wood, vinyl, aluminum |
| 4 in 1 multi purpose | The condition is unknown or mixed | Adjustable | Wood, vinyl, MDF |
| Sloped tile profile | Tile meets a lower floor | 3/16 inch to 3/4 inch | Anodized aluminum, brass, stainless |
What Is a T Molding Transition Strip?
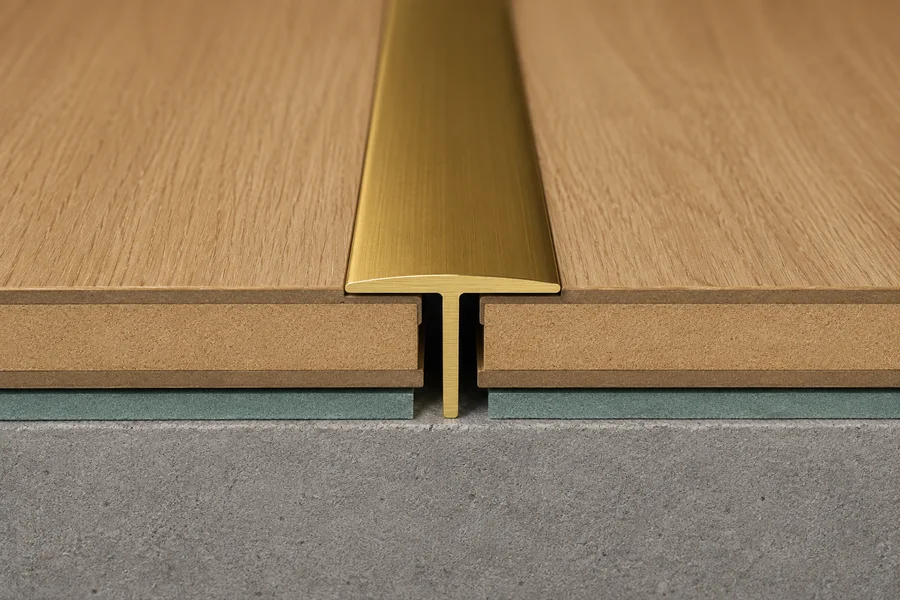
A T molding is a transition strip shaped like the letter T. The flat top rests on both floors, and the stem drops into the gap between them.
Use a T molding when both floors finish at the same height, or within roughly 1/8 inch. It suits laminate to laminate, vinyl plank, and vinyl plank to tile of matching thickness.
The stem requires space. Leave a gap of about 1 to 1.5 inches between the two floor edges so the track and stem fit without pinching the planks.
What Is a Reducer Transition Strip?
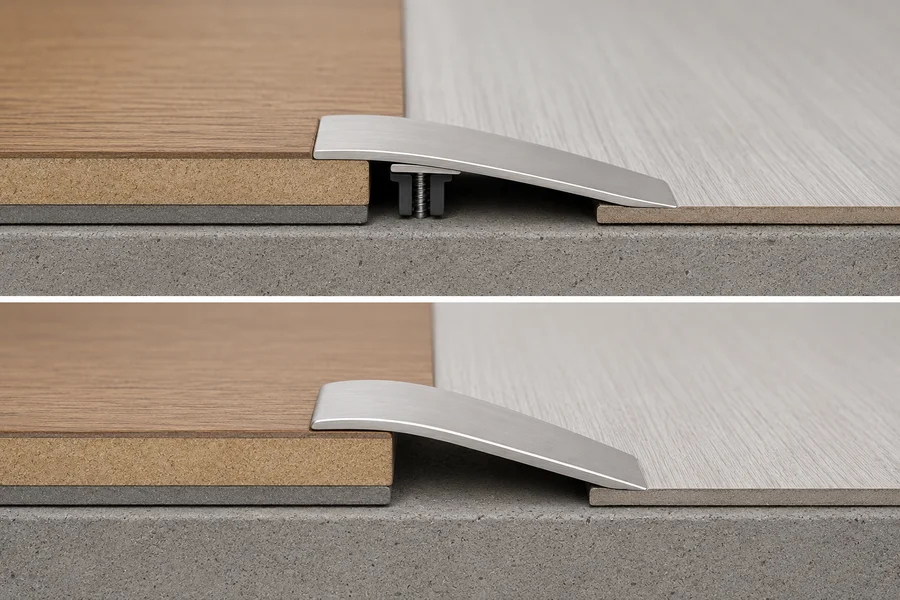
A reducer transition strip is a profile with one thick edge and one thin edge. It ramps from a higher floor down to a lower one.
Two versions exist, and the difference matters:
- Flush reducer. Sits level with the surface of both floors. Use it with nailed or glued floors that cannot move.
- Overlap reducer. Rests on top of the lower floor and overlaps the edge of the higher one. Use it with floating floors, because the overlap hides the expansion gap and still permits movement.
A common scenario is 3/4 inch solid hardwood meeting 5 mm vinyl plank. A reducer converts that abrupt lip into a safe slope.
What Is a Threshold Strip?
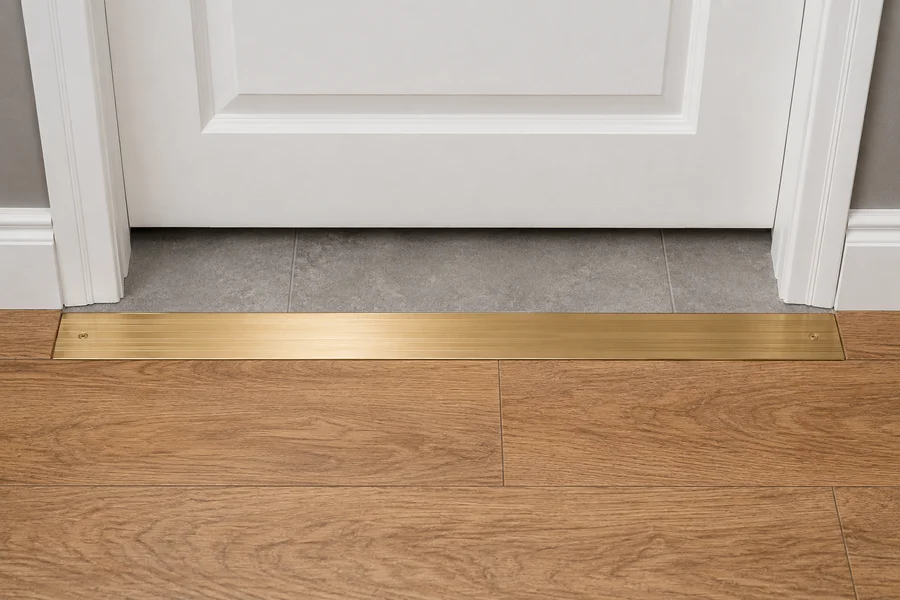
A threshold strip is a transition profile installed in a door opening. Interior thresholds cap a floor where it meets a sliding door track, a fireplace hearth, or an adjoining room.
Exterior thresholds carry an extra function. They pair with a door sweep and weatherstripping to seal against drafts, rain, and dust. Many include an adjustable top so the installer can fine tune the seal.
What Is an End Cap?
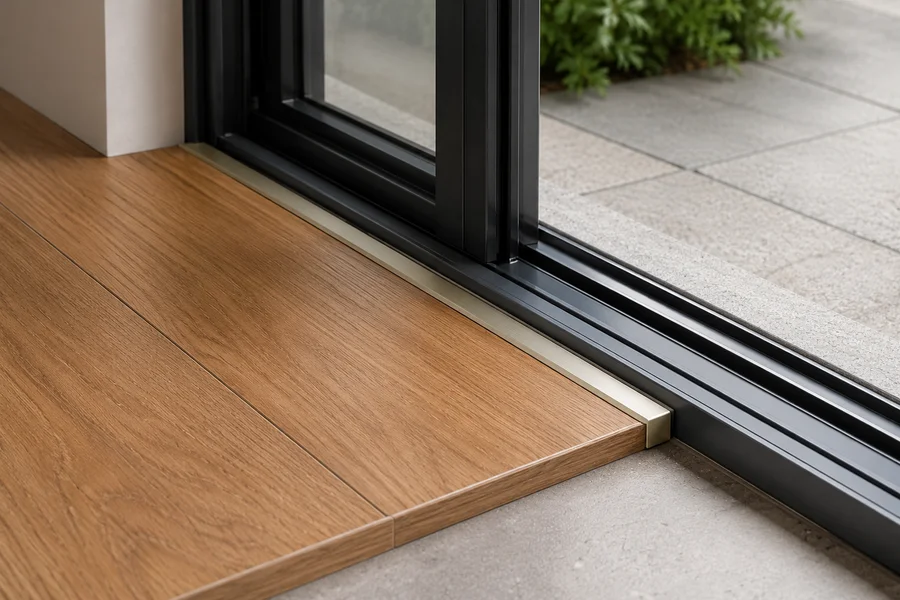
An end cap is a transition profile that finishes a floor against a vertical surface. Manufacturers also call it a square nose or a baby threshold.
Use an end cap where flooring stops at a patio door track, a hearth, or a step down. The profile covers the raw plank edge and curves toward the subfloor, producing a clean line where the floor cannot continue.
What Is a Seam Binder?
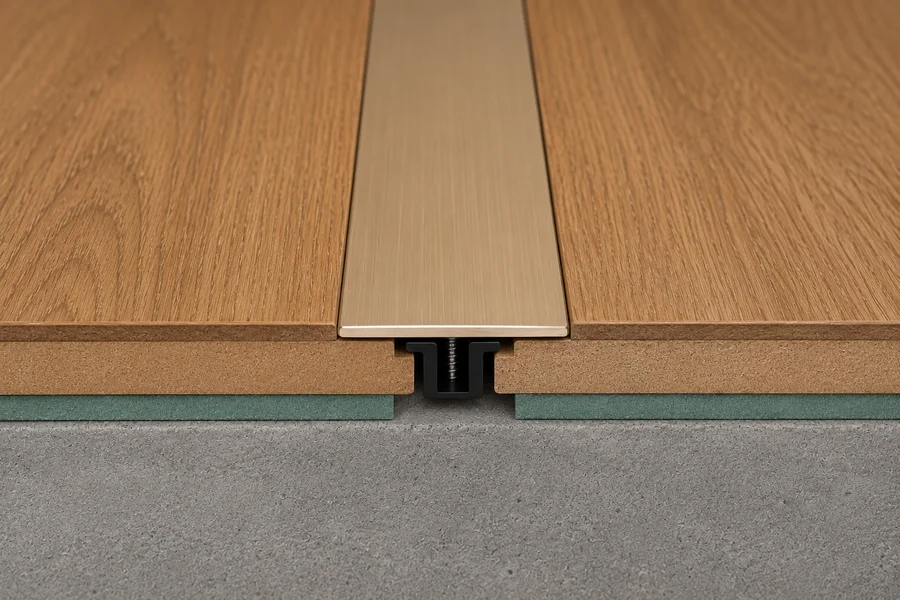
A seam binder is a flat wood strip with beveled edges that joins two wood floors of the same height. Installers screw it over the joint and into the subfloor.
Seam binders suit wood to wood joints in long hallways or where two separate installations meet. Each floor then moves independently without cracking at the seam.
Which Transition Strips Work With Carpet?
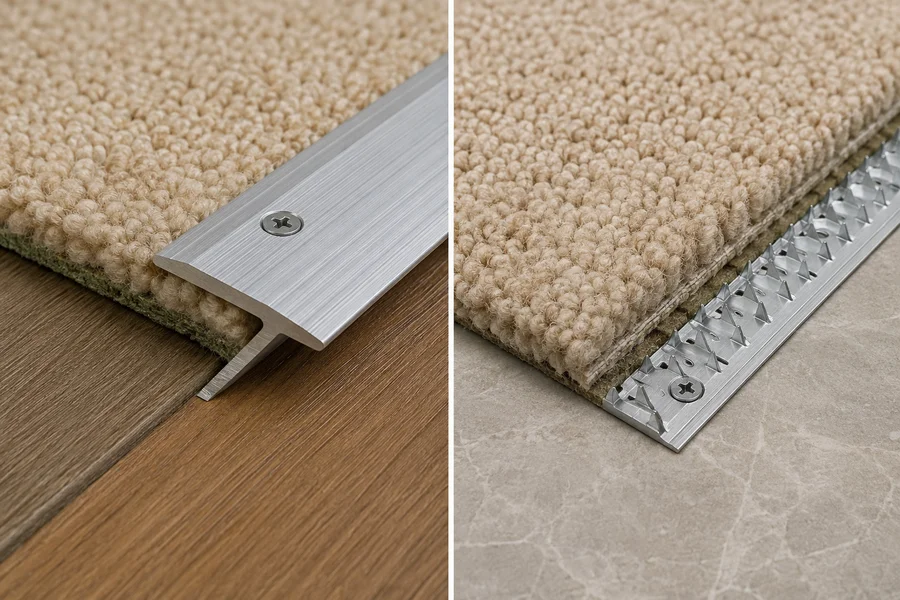
Carpet requires dedicated hardware because the edge must stay under tension. Three components handle carpet edges:
- Z bar. A metal profile shaped like a Z. One leg tucks under the hard floor edge, and the carpet folds over the other leg. The result hides all hardware.
- Carpet edge gripper. Also called a nap lock or clamp down bar. Teeth grip the carpet backing, and the installer hammers the top lip down to clamp the edge.
- Tack strip. Not a transition strip, but the anchor behind most carpet edges. Set it about 1/4 inch from the hard floor edge, then trim the pad to meet it.
What Is Stair Nosing?
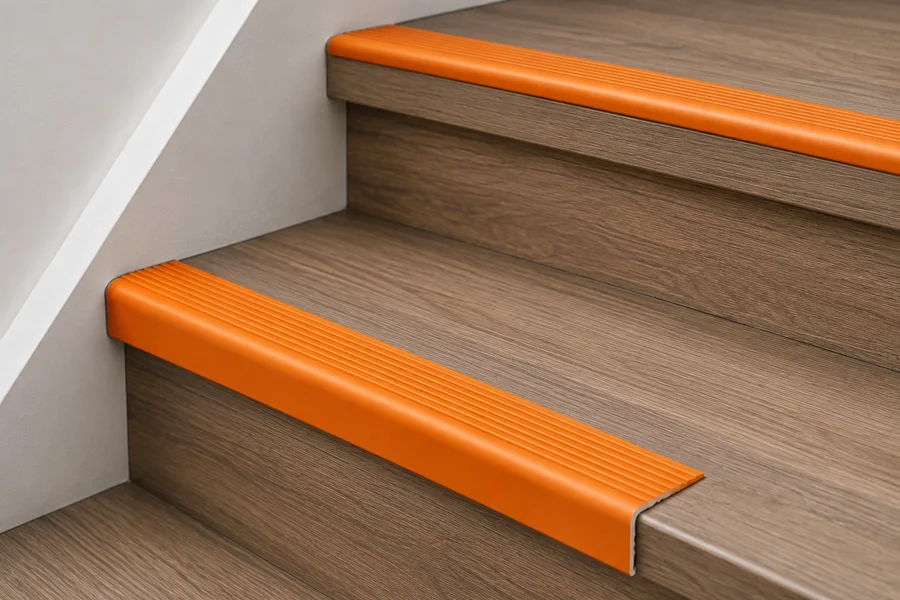
Stair nosing is a profile that wraps the front lip of a step. It protects the most worn part of a staircase and defines the edge underfoot. Many products carry a textured or grooved face for grip.
What Is a 4 in 1 Transition Strip?
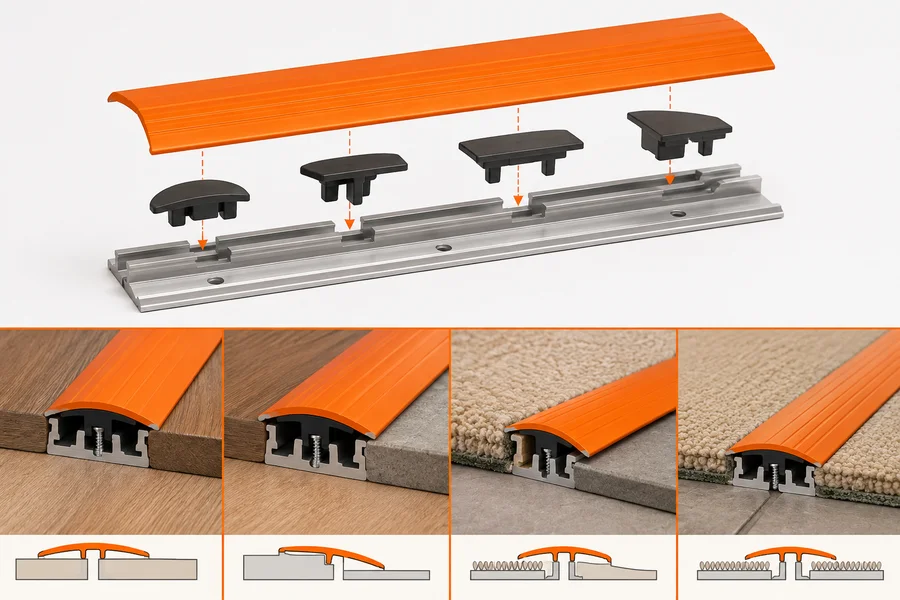
A 4 in 1 transition strip is a kit with one base track and several interchangeable inserts. The same kit converts into a T molding, a reducer, an end cap, or a carpet transition.
Choose a 4 in 1 strip when the opening condition is uncertain. You can test the fit on site and configure the correct profile without a second trip to the store.
What Are Sloped Tile Edge Profiles?
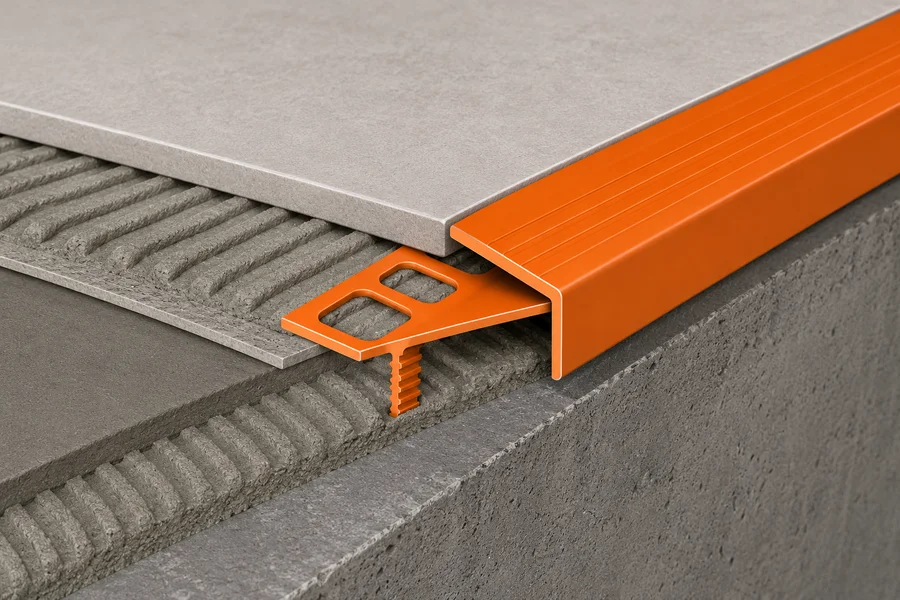
Sloped tile edge profiles are metal transitions installed while the tile is being laid. A perforated anchoring leg sets into the thin set mortar beneath the tile, and a sloped face runs from the tile surface down to the adjacent floor.
This produces the strongest tile transition available, because the profile supports the tile edge from below. Retrofit versions also exist and bond to an existing floor with adhesive.
Threshold vs Transition Strip | What Is the Difference?
A transition strip is any profile that joins two floor surfaces. A threshold is a transition strip located specifically in a door opening. The terms overlap because retailers list many products under both names.
| Factor | Transition strip | Threshold |
| Meaning | Umbrella term for all joint profiles | A transition strip in a door opening |
| Location | Anywhere two floors meet | Door openings only |
| Weather sealing | Not a function | Exterior versions seal against drafts and rain |
| Typical width | 1 to 2 inches | Often wider and heavier |
| Common materials | Wood, MDF, vinyl, aluminum | Aluminum, brass, hardwood |
A simple rule resolves the confusion. If the profile sits inside a door opening, call it a threshold. If it sits anywhere else, call it a transition strip. Search using both terms when shopping.
What Material Should a Floor Transition Strip Be Made Of?
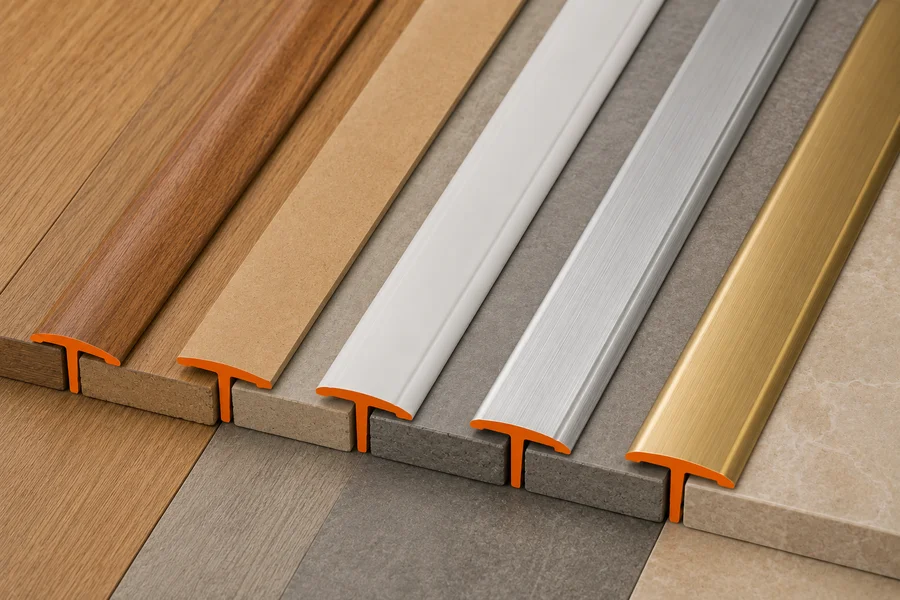
The best material depends on moisture exposure and traffic level. Solid wood suits dry living areas, aluminum suits tile and high traffic zones, and PVC suits bathrooms and laundries.
| Material | Best use | Strengths | Limitations |
| Solid wood | Hardwood and engineered floors | Stains or paints to match, warm appearance, cuts easily | Swells in damp areas |
| MDF with laminate wrap | Laminate floors | Color matched to plank ranges, low cost | Fails quickly if water reaches the core |
| PVC and vinyl | Bathrooms, laundries, budget projects | Waterproof, flexible, cuts with a knife | Printed grain can look flat beside real wood |
| Aluminum | Tile, high traffic, commercial spaces | Slim profile, strong, wide finish range | Polished finishes show scratches |
| Anodized aluminum | Tile edges and vinyl edges | Corrosion resistant, consistent color | Abrasive cleaners damage the finish |
| Brass and stainless steel | Premium and heavy traffic areas | Very durable, upmarket appearance | Highest cost |
| Rubber and thermoplastic | Commercial floors and curved joints | Slip resistant, bends around shapes | Limited residential styling |
How Do You Choose the Right Floor Transition Strip?
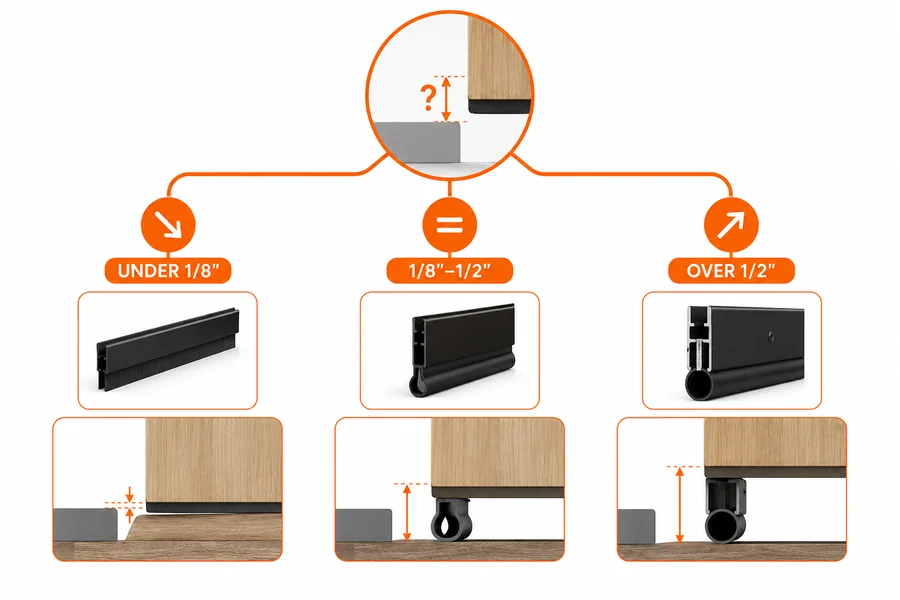
Measure the height difference first, then select the profile that matches it. Lay a straightedge across both finished floors and measure the gap beneath it at the joint.
Apply this rule:
- Under 1/8 inch. Use a T molding or a flat divider.
- 1/8 inch to 1/2 inch. Use a reducer or a sloped profile.
- Over 1/2 inch. Level the subfloor first, or install a ramp style profile.
How Thick Is Each Flooring Type?
Finished floor thickness determines the height difference at every joint. These are the standard ranges.
| Flooring type | Usual finished thickness |
| Solid hardwood | 3/4 inch |
| Engineered wood | 3/8 inch to 3/4 inch |
| Laminate | 7 mm to 12 mm, plus underlayment |
| Luxury vinyl plank and tile | 2 mm to 8 mm, most homes use 4 mm to 6 mm |
| Ceramic and porcelain tile | 8 mm to 12 mm, plus the mortar bed |
| Carpet with pad | 1/2 inch to 3/4 inch |
Which Transition Strip Works for Tile to Vinyl?
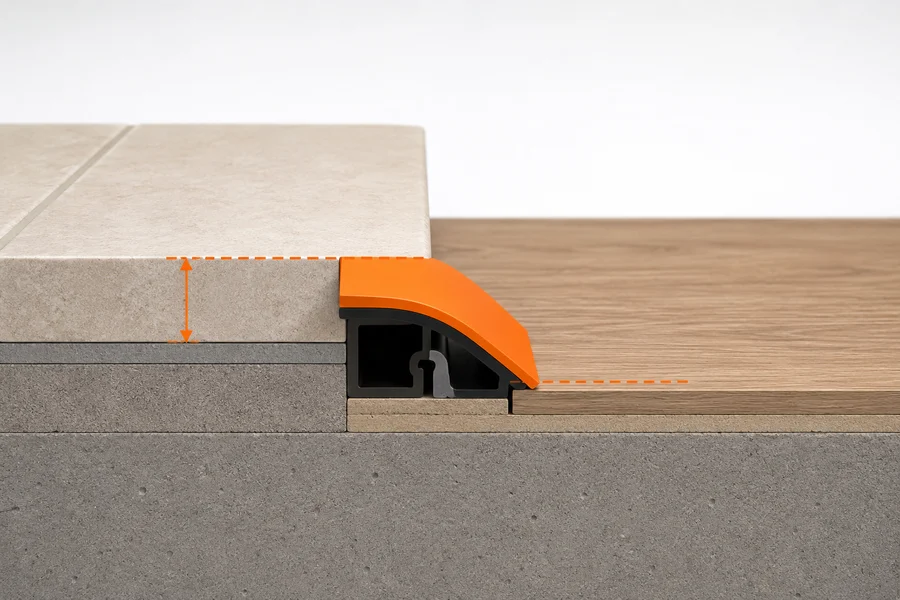
A reducer or a sloped metal profile works for tile to vinyl. Tile almost always finishes higher than vinyl, because the mortar bed adds thickness.
If the tile is not yet laid, use a sloped metal profile set into the mortar. It delivers the cleanest slope and the strongest tile edge. If the tile is already down, choose a surface mounted reducer that bonds to the vinyl and butts against the tile face.
Which Transition Strips Work for Vinyl and LVP Flooring?
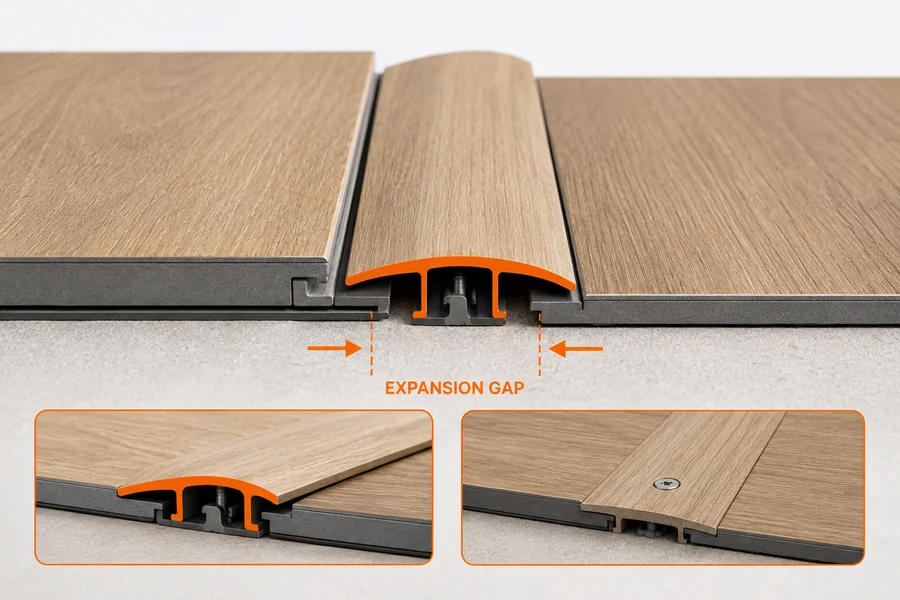
Floating vinyl plank requires an overlap reducer or a track based T molding. Both protect the expansion gap. Never fasten anything through the plank itself.
Glue down vinyl behaves differently. Because the floor cannot move, flush profiles work well and produce a lower, sleeker result.
For bathrooms and laundries, select aluminum or PVC rather than MDF. Slim aluminum edge profiles suit vinyl well, because they finish the plank edge at a matched height.
Which Transition Strip Works for Laminate Flooring?
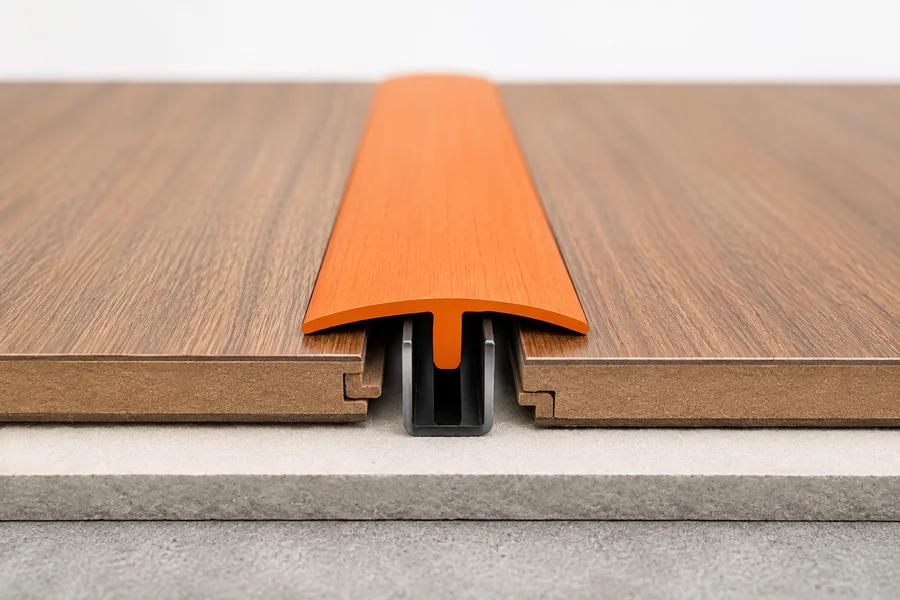
A track based T molding is the standard laminate flooring transition strip. Screw the metal or plastic track to the subfloor inside the expansion gap, then snap the molding into the track.
Two details decide the outcome. Center the track so the stem presses neither plank. Check the maximum continuous run length in the installation instructions, then add a T molding at doorways to stay within that limit.
Which Transition Strips Work for Ceramic Tile?
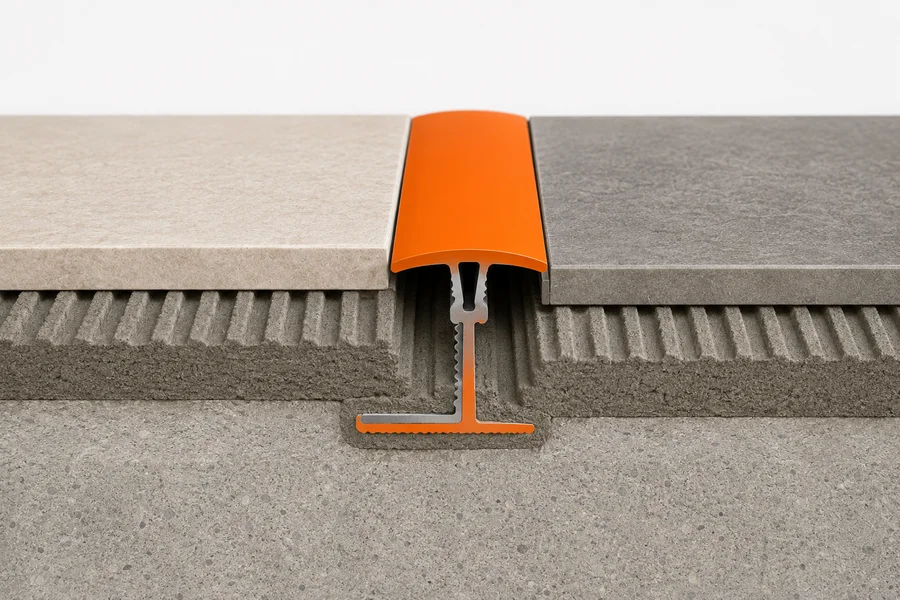
A profile installed with the tile is the best ceramic tile transition strip, because the anchoring leg carries the edge from below. Tile edges are brittle, and any strip that leaves the glazed edge unsupported will eventually chip.
For existing tile, select a metal transition with a wide flange. Bed it in adhesive, then seal the joint with a color matched sealant to keep water out.
Which Transition Strips Work for Wood Floors?
A seam binder joins two wood floors of equal height. A reducer or threshold joins hardwood to tile, since tile usually finishes higher than 3/4 inch hardwood once the mortar bed is included.
Solid wood moves seasonally across its width. Give the floor room at the joint, and avoid pinning plank ends beneath a fixed strip.
How Do You Transition From Carpet to a Hard Floor?
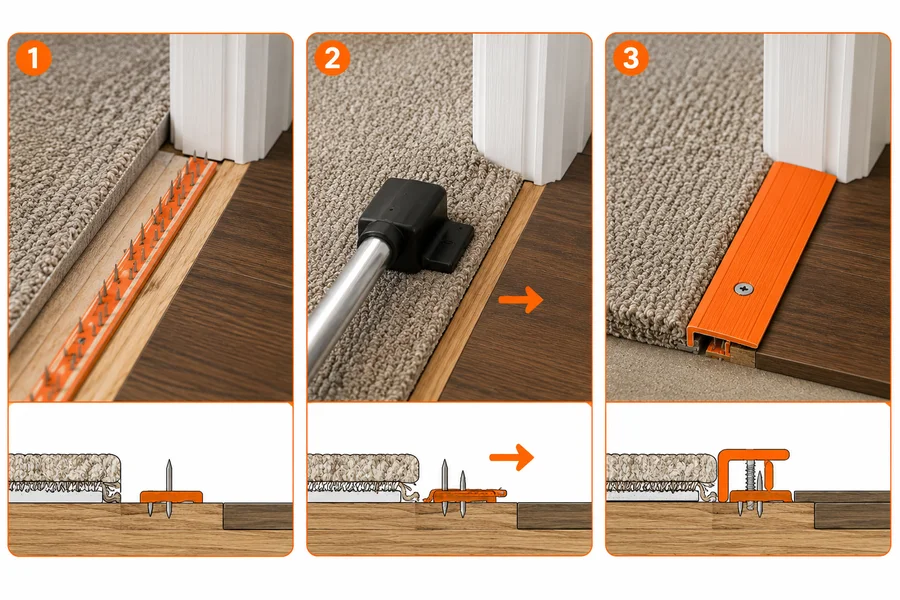
Set the tack strip about 1/4 inch from the hard floor edge, then trim the pad so it stops at the tack strip. Stretch the carpet with a knee kicker, hook it over the pins, and tuck the edge into the Z bar or clamp the gripper down over it.
If the carpet keeps releasing, the tack strip usually sits too far from the joint, or the carpet needs a firmer stretch.
How Do You Install a Floor Transition Strip?
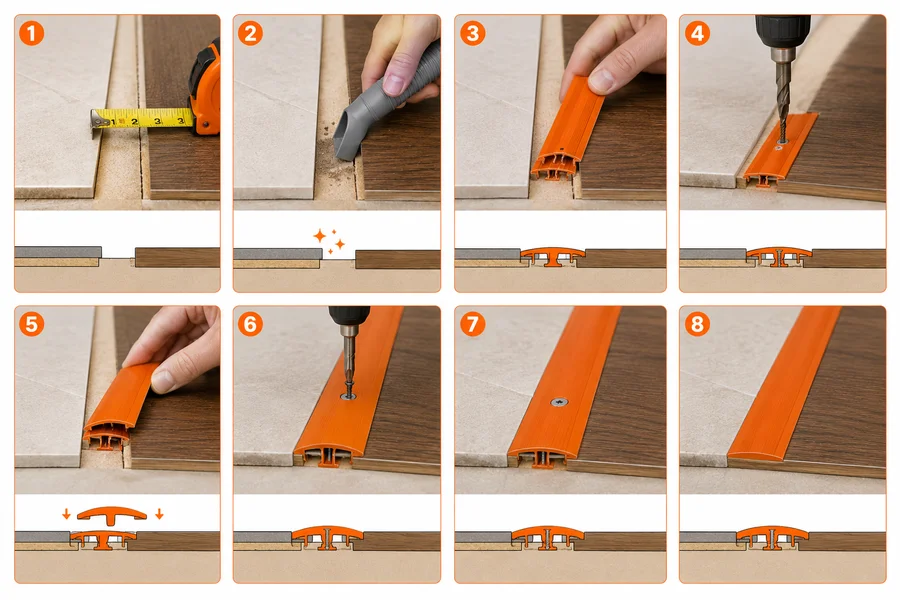
Most doorway strips take under an hour to install. The process runs from subfloor preparation through cutting, fastening, and finishing.
What Tools Do You Need?

- Tape measure and pencil
- Speed square
- Miter saw for wood, or a fine tooth hacksaw for metal and PVC
- Drill with bits sized to the supplied screws
- Masonry bit and anchors for concrete subfloors
- Rubber mallet and a scrap wood block
- Utility knife
- Construction or flooring adhesive
- Painter’s tape and a weight
- Color matched caulk
- Safety glasses
- Oscillating multi tool for undercutting door casings
Installation Steps
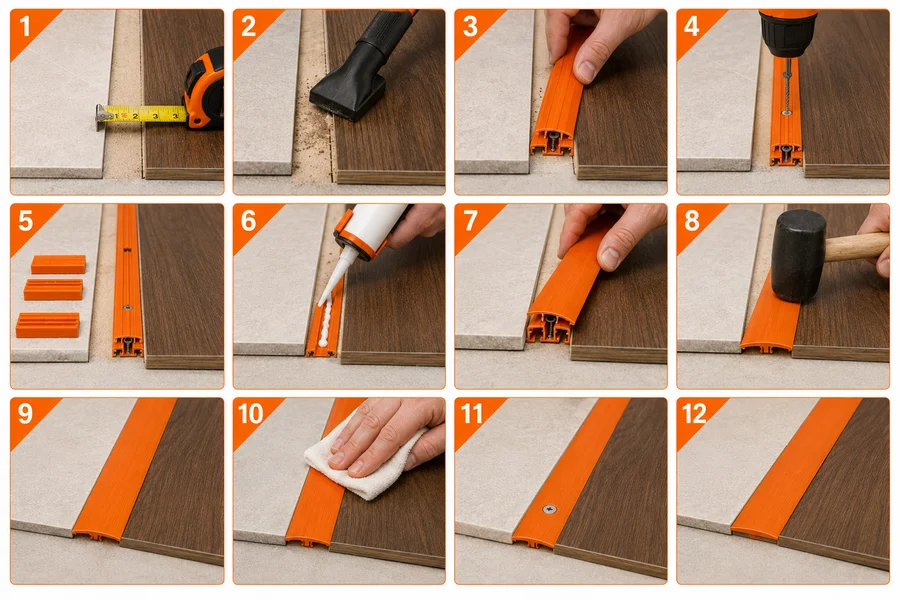
- Prepare the joint. Remove the old strip and every leftover fastener. Vacuum the gap. Confirm the subfloor is clean, flat, and dry. Skipping this step causes most strips to loosen within months.
- Dry fit the profile. Hold the strip in place and confirm it bridges both floors without rocking. Change profiles now, not after cutting.
- Measure the opening. Measure jamb to jamb at the narrowest point, then measure again to confirm.
- Cut to length. Mark the line with a speed square. Cut about 1/16 inch short at each end so the strip does not bind against the jambs. Support PVC and laminate wrapped strips with a scrap board while cutting to prevent chipping.
- Position the track. Center it in the gap between the two floors, then mark each screw point through the pre-made holes.
- Fasten the track. Drill pilot holes every 8 to 12 inches. Use short screws, around 3/4 inch, into a wood subfloor. On concrete, use anchors or switch to adhesive.
- Seat the molding. Hook one edge into the track, then tap the strip down with a rubber mallet through a scrap block until it snaps home.
- For adhesive installations, apply the adhesive in blocks or a serpentine bead inside the channel rather than one continuous line. That reduces squeeze out. Press the strip down, tape it, weight it, and wipe any excess with a damp rag before it cures.
- For nail down installations, drill pilot holes, use finish nails, set the heads, and fill the holes with matching putty.
- Finish the joint. Fill any hairline gap with color matched caulk, then open and close the door to confirm clearance.
Throughout the job, keep about 1/4 inch of free space between the edge of a floating floor and any fixed or glued part of the strip.
How Do You Install a Transition Strip at a Doorway?
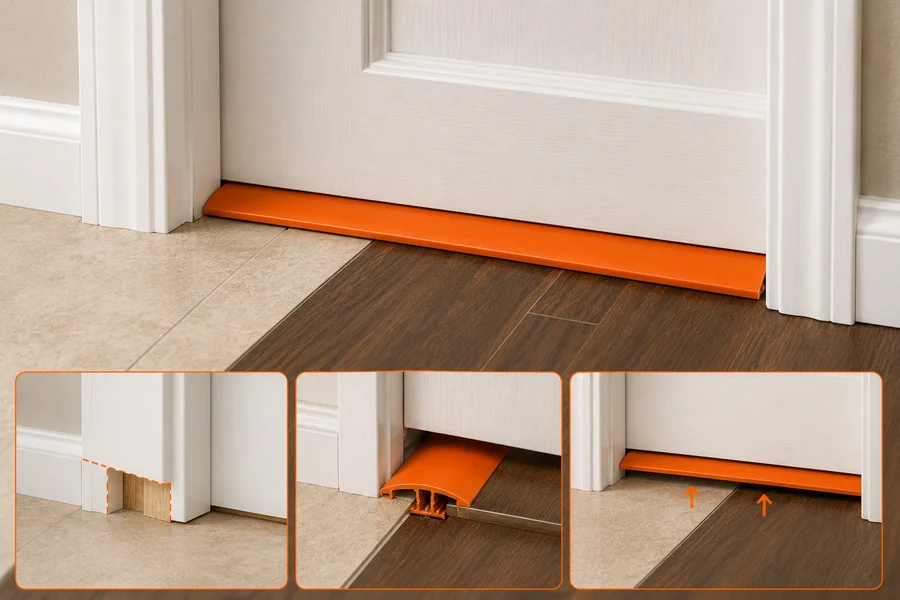
Undercut the door casing with an oscillating multi tool so both the flooring and the strip slide underneath. This looks far better than scribing planks around the trim.
Position the strip so it sits directly under the door when the door is closed. Each room then displays only its own flooring.
What Mistakes Should You Avoid?
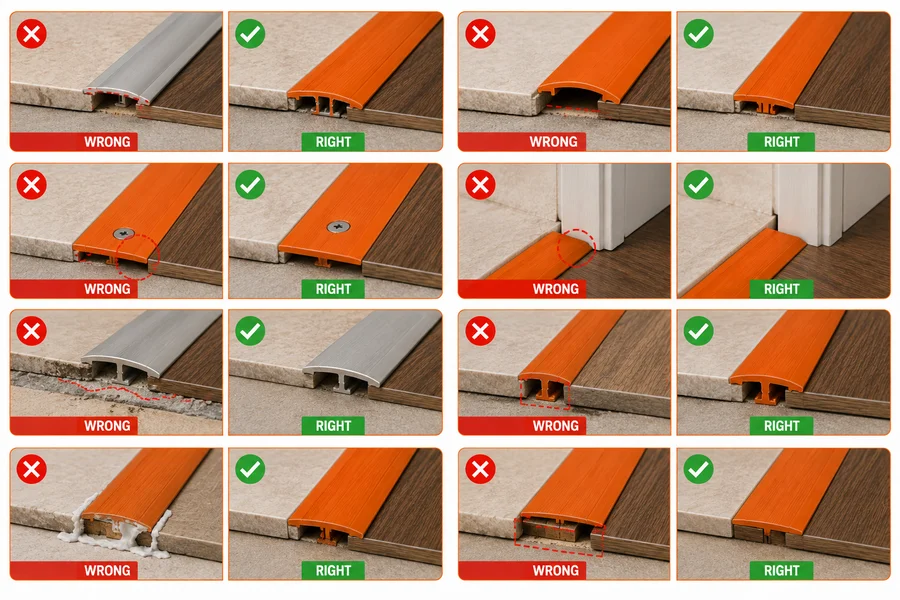
These eight errors account for most failed transition strip installations:
- Screwing or nailing through a floating floor, which locks it in place and causes buckling
- Cutting the visible molding too short, which leaves a permanent gap at the jamb
- Selecting the profile before measuring the height difference
- Skipping subfloor cleaning and leveling
- Using screws long enough to reach radiant heating pipes or wiring
- Installing MDF strips in bathrooms, laundries, or entryways
- Placing the strip where the door swing strikes it
- Ignoring color match, which makes the strip read as an afterthought
What Should You Check Before Buying a Transition Strip?
Check eight specifications before purchase:
- Profile type. T molding, reducer, threshold, end cap, or multi purpose.
- Height rating. Metal tile profiles sell by height, commonly 3/16 inch through 3/4 inch. Match this to tile thickness plus mortar.
- Top face width. Wider faces cover larger gaps and slope more gently.
- Length. Common lengths include 36 inch, 48 inch, 72 inch, 78 inch, and roughly 94 to 98 inch.
- Fastening method. Track, glue down, nail down, or self adhesive.
- Material and finish. Prefinished, unfinished, ready to paint or stain, or a metal finish such as brushed nickel, satin brass, bronze, chrome, or matte black.
- Water resistance. Look for waterproof or water resistant ratings near bathrooms and exterior doors.
- Accessibility rating. Commercial projects often require a compliant profile.
How Many Transition Strips Do You Need?
Measure each opening, then add roughly 10 percent for waste. Buy at least one spare length.
Order all pieces at the same time. Finishes and stains vary between production batches, so a later purchase may not match.
How Much Do Floor Transition Strips Cost?
Cost depends mainly on material. Prices vary by region, retailer, and finish, so treat these as relative bands rather than fixed figures.
| Type | Relative cost |
| Aluminum carpet bar or Z bar | Lowest |
| PVC and vinyl strips | Low |
| Laminate wrapped MDF strips | Low to moderate |
| Solid wood strips | Moderate |
| Anodized aluminum tile profiles | Moderate to high |
| Brass and stainless steel profiles | Highest |
What Are the Accessibility Rules for Floor Transitions?
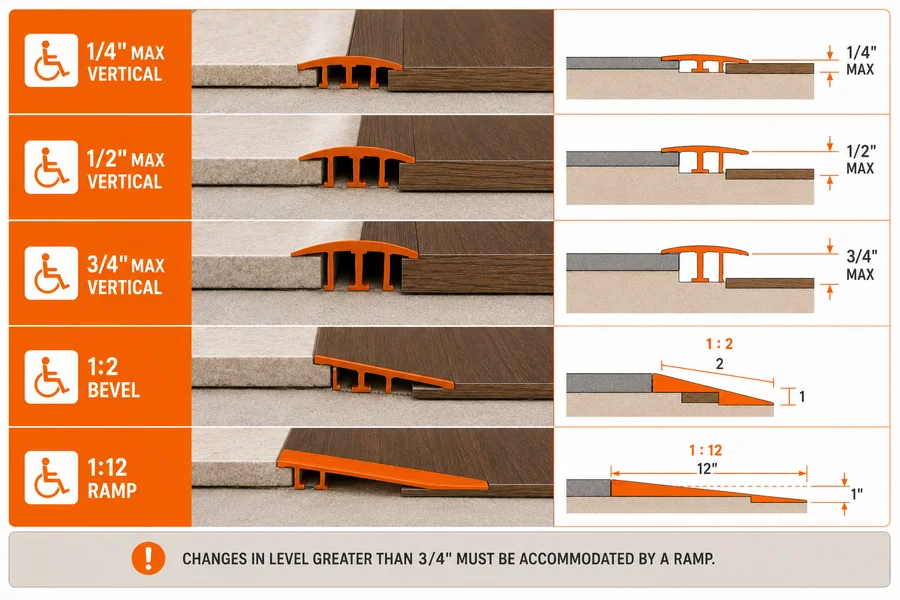
Accessible routes follow defined height and slope limits. These figures also make sense in any home where someone uses a wheelchair, a walker, or a cane.
- A change in level of 1/4 inch or less may be vertical, with no bevel required.
- A change between 1/4 inch and 1/2 inch must be beveled, at a slope no steeper than 1:2.
- Thresholds at doorways are limited to 1/2 inch in new construction.
- Existing or altered thresholds may reach 3/4 inch if both sides are beveled at a slope no steeper than 1:2.
- A change greater than 1/2 inch must be treated as a ramp, at a slope no steeper than 1:12.
If you are planning for aging in place, keep floor heights consistent between rooms during the design stage. That single decision removes the need for tall thresholds later.
How Do You Maintain Floor Transition Strips?
Transition strips need very little upkeep. Five habits keep them secure and presentable:
- Wipe them with a damp cloth and a neutral cleaner.
- Avoid abrasive pads and strong acids or bleach on metal profiles.
- Recaulk the edges when a gap appears, especially in bathrooms.
- Check the screws in busy doorways once a year and retighten as needed.
- Refinish wood strips at the same time you refinish the floor.
When Do You Not Need a Transition Strip?

You can skip the strip when the same flooring continues into the next room at the same height, and the total run stays within the manufacturer limit.
Tile to tile joints at a matching height also work without one. So do carefully leveled flush joints, though these demand accurate subfloor preparation.
Check the run length limit before deciding. Many floating floors require a break after a set distance, regardless of how the joint looks.
Frequently Asked Questions
What is the difference between a threshold and a transition strip? A transition strip joins any two floors. A threshold is a transition strip located in a door opening. Exterior thresholds add a weather sealing function that standard transition strips do not have.
Do I need a transition strip between two rooms with the same flooring? Not always. You need one if the run exceeds the manufacturer’s maximum length, or if the two areas were installed separately and each needs its own expansion gap.
Which transition strip works for tile to vinyl? A reducer or a sloped metal profile. Tile usually sits higher than vinyl once the mortar bed is included, so the joint needs a ramp rather than a flat cover.
Can I install a transition strip without drilling? Yes. Self adhesive strips and construction adhesive both work on clean, smooth surfaces. Adhesive suits concrete and radiant heated floors well, but it holds less reliably in very high traffic doorways.
How wide should the gap be for a T molding? Aim for about 1 to 1.5 inches between the two floor edges. Keep roughly 1/4 inch of free movement on each side so the planks never press against the stem.
What is a reducer transition strip? A reducer is a profile with one thick edge and one thin edge. It ramps from a higher floor down to a lower one, which removes the trip point at the joint.
Which strip suits LVP meeting carpet? A carpet edge gripper or a Z bar, paired with a tack strip. Add a reducer if the carpet and pad finish noticeably higher than the vinyl plank.
Can I paint or stain a transition strip? Unfinished wood strips accept stain or paint. Laminate wrapped MDF and printed vinyl do not, because the surface is a printed film. Metal requires a suitable primer first.
How do I fix a loose transition strip? Lift it, clean out the old adhesive, and check whether the subfloor is flat. Then refasten with new screws in fresh pilot holes, or apply new adhesive and weight the strip while it cures.
Do transition strips work over radiant heated floors? Yes, but avoid screws unless you know the pipe or cable depth. Adhesive fixed strips are the safer choice over radiant systems.
What size transition strip do I need for a doorway? Measure jamb to jamb at the narrowest point, then cut about 1/16 inch short at each end. That clearance stops the strip from binding as the opening moves seasonally.
Are transition strips waterproof? Metal and PVC strips are waterproof. Solid wood and MDF are not. Check the product rating before using one in a bathroom, laundry, or entryway.
How long do floor transition strips last? A correctly installed metal or solid wood strip lasts as long as the floor it serves. MDF strips in damp areas fail much sooner, usually once water reaches the core.
Summary Table: Match the Strip to the Job
| Your situation | Correct profile |
| Laminate meets laminate at a doorway | T molding on a track |
| Hardwood meets vinyl plank | Overlap reducer |
| Tile meets vinyl | Sloped tile profile or reducer |
| Carpet meets tile | Z bar or carpet edge gripper |
| Floor ends at a patio door track | End cap |
| Two wood floors meet in a hallway | Seam binder |
| Floor meets a step edge | Stair nosing |
| Exterior door opening | Adjustable threshold with a sweep |
| Condition unknown before purchase | 4 in 1 multi purpose kit |
Final Thoughts

A transition strip is a small part with a large effect. Measure the height difference first, choose the profile that matches it, then pick a material suited to the room’s moisture level and traffic.
Get those three decisions right, and the joint disappears into the floor. That is exactly what a good transition should do.

Noah Williams
Interior Designer & Flooring Expert
Related Posts