
Noah Williams is an interior designer and flooring expert at Nova Floor. In Dubai, he helps people pick the right floor, get it installed, and keep it looking good. He also writes simple, practical flooring and home care guides for readers in Dubai and around the world.
How to Install Vinyl Plank Flooring in 8 DIY Steps (Installer’s Guide)
Noah Williams
Vinyl plank has become a popular flooring choice for homeowners who want the look of wood with better durability and easier maintenance. According to Grand View Research, luxury vinyl tile accounted for 49.5% of resilient flooring revenue in 2024, making it the largest product segment in the category.
A big reason for that growth is simple. Most people can install it themselves in a weekend.
This guide comes from the Nova Floor installation team, which has completed 3,100+ flooring installations across homes and commercial spaces. It walks you through the full process, from subfloor prep to the last piece of trim, along with the things we see go wrong on real jobs. It also gives you an honest picture of how vinyl plank performs over time, what it costs, and when hiring a pro makes more sense.
Contents
How to Install Vinyl Plank Flooring
- Plan your layout and plank direction.
- Dry lay a few rows and snap chalk lines.
- Set expansion spacers and start your first row.
- Build three to five locked rows as a working foundation.
- Cut and fit planks around doorways, vents, and cabinets.
- Work across the room with staggered end seams.
- Rip the final row to width and pull it tight.
- Reinstall trim, add transitions, and clean the floor.
Expect four to eight hours for a standard bedroom, and a full weekend for an open living area.
From our installation team: On most jobs, prep takes longer than laying the planks. Once the subfloor is ready, a standard bedroom is a few hours’ work for an experienced crew. If it’s your first floor, give yourself a full day and take your time on the first rows.
What Is Vinyl Plank Flooring?
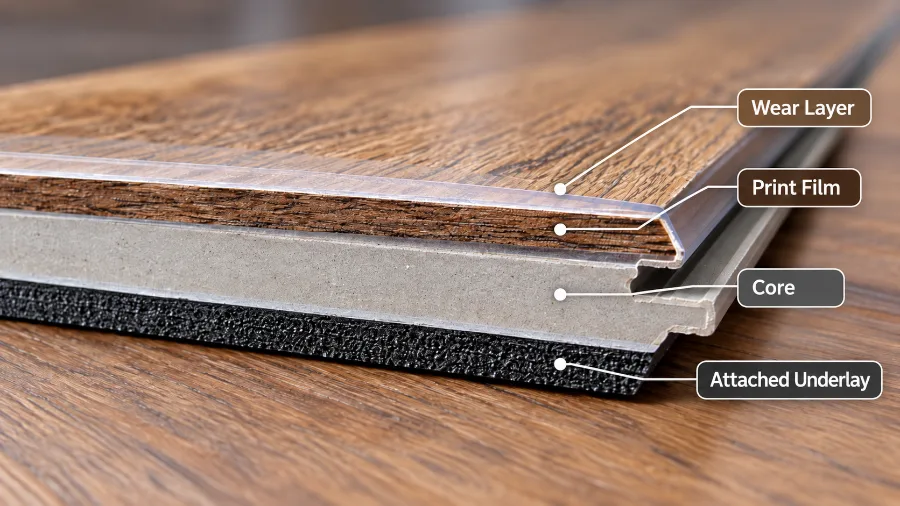
Vinyl plank flooring is a multi-layer type of vinyl flooring pressed into long boards that mimic hardwood. A printed film layer creates the wood grain, while a clear wear layer protects the surface. A dense core underneath gives the plank its stiffness. Rigid core products come in two main types: SPC flooring, with a stone-plastic core, and WPC, with a softer wood-plastic core.
LVP, LVT, and Sheet Vinyl
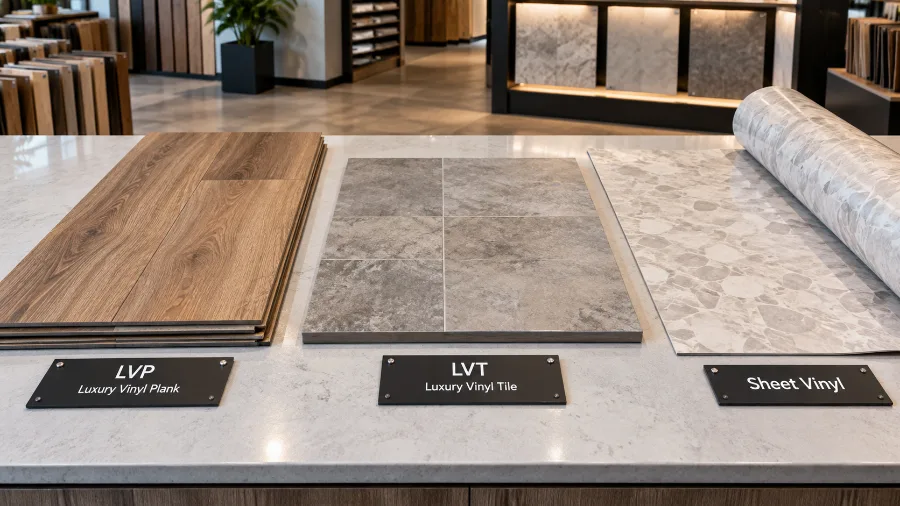
LVP comes in plank shapes sized like wood boards, usually 15 to 23 cm (6 to 9 inches) wide and 122 to 152 cm (48 to 60 inches) long. LVT uses square or rectangular tiles that copy stone and ceramic. Sheet vinyl arrives in a single roll and suits large open rooms on a tight budget.
Three Installation Methods of LVP Flooring
| Method | How it works | Best for |
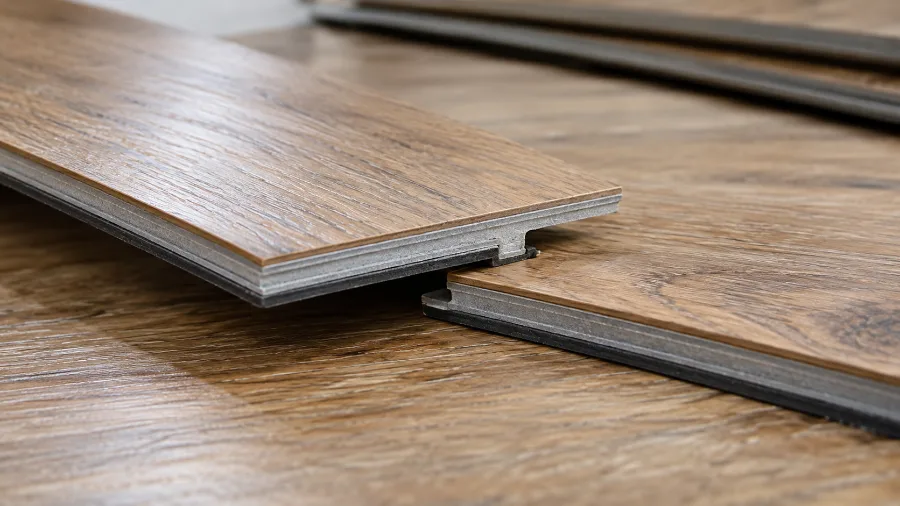
| Click-lock (floating) | Tongue-and-groove edges snap together over the subfloor | Most DIY projects, waterproof rigid core products |
| Glue-down | Planks bond directly to the subfloor with adhesive | Large commercial spaces, rooms with heavy rolling loads |
| Grip strip | A factory adhesive strip joins plank to plank | Thin flexible planks, small budget rooms |
Click-lock dominates the DIY market for good reason. It creates a floating floor that never fastens to the subfloor, so the planks expand and contract freely with temperature and humidity. This guide focuses on the click-lock method and notes where glue-down differs.
Tools and Materials You Need
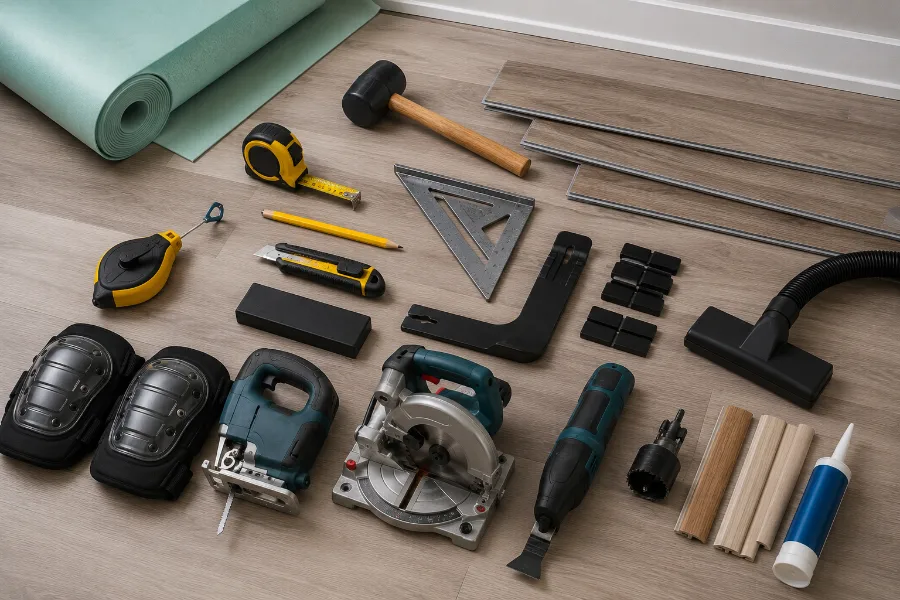
You do not need a full carpentry shop. Here is the working list.
Essential tools: tape measure and pencil, utility knife with spare blades, speed square or straightedge, chalk line, rubber mallet, tapping block, pull bar, spacers (6 mm / 1/4 inch is standard), shop vacuum, and knee pads.
Cutting tools: jigsaw with a fine-tooth blade for curves and notches, miter saw for clean crosscuts on rigid core planks, oscillating multi-tool for undercutting door jambs, and hole saw for pipe penetrations.
Materials: vinyl planks plus 10% overage, underlayment (unless your planks have it pre-attached), transition strips for doorways, quarter round or shoe moulding, and color-matched caulk.
Glue-down installs also need vinyl floor adhesive, a notched trowel, and a 34 to 45 kg (75 to 100 lb) floor roller. You can usually rent the roller by the day.
From our installers: The tool DIYers most often skip is the pull bar. Without one, the last row and the end joints near walls are very hard to close properly, and that’s where gaps show up first.
Preparation | The Part That Decides Everything
In our experience, most vinyl plank failures trace back to prep, not to the planks. Do not rush this section.
From our installers: When we’re called in to fix a failing vinyl floor, the planks are rarely the problem. The cause is usually something that happened before the first plank went down: a subfloor that wasn’t flattened, a slab that was never moisture tested, or boxes that weren’t given time to acclimate.
Measure the Room and Order Overage
Multiply length by width for each room. Add 10% for straight layouts and 15% for diagonal patterns or rooms with lots of angles. Order from a single batch or dye lot so color and gloss stay consistent.
Keep two or three leftover planks after the job. Product lines get discontinued, and a stored spare saves you from replacing a whole room over one damaged board.
Acclimate the Planks
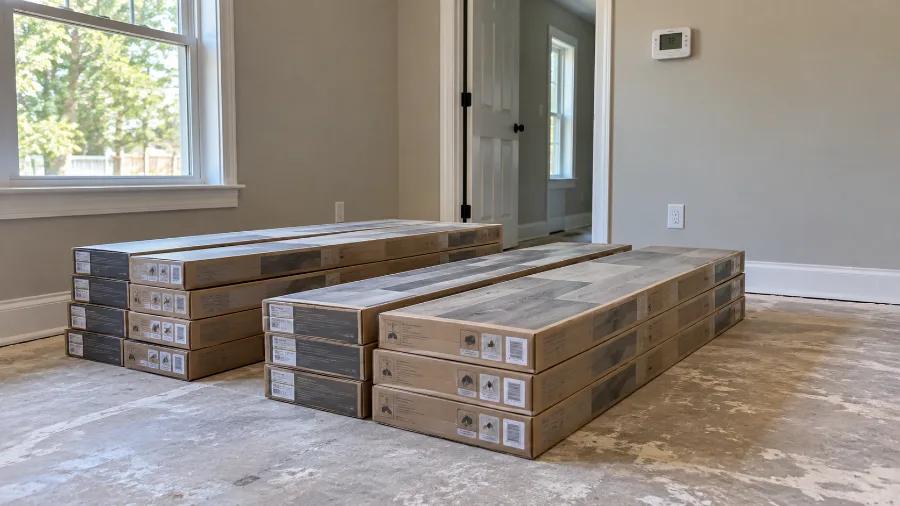
Stack the unopened boxes flat in the installation room for 48 hours. Never stand boxes on their sides. Keep the heating or air conditioning running at a normal living temperature, roughly 18 to 29°C (65 to 85°F), before and after the install.
Rigid core planks move less than older flexible vinyl, but they still move. Skipping acclimation causes gaps at the seams weeks later.
Check and Prepare the Subfloor
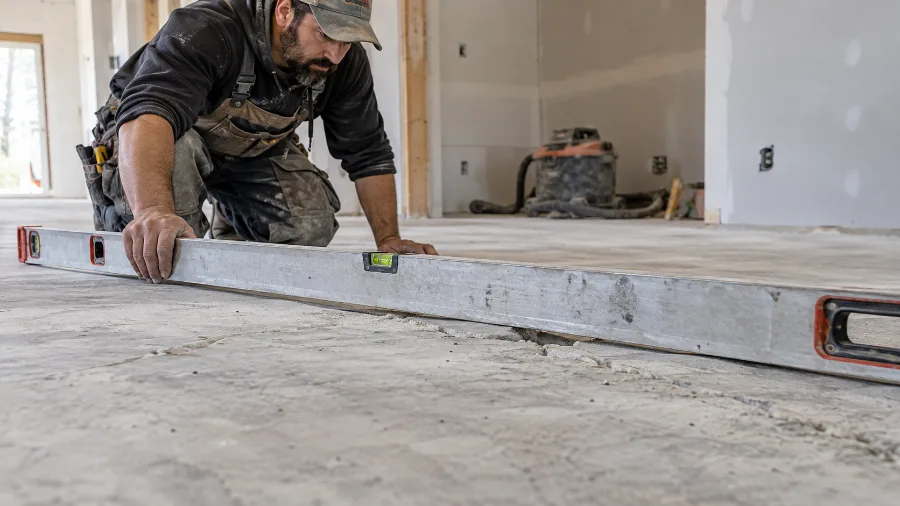
Your finished floor can only be as flat as what sits under it. Aim for a variance no greater than about 5 mm across 3 m (3/16 inch across 10 feet).
Run a straightedge across the room and mark trouble spots. Fill low areas with a cement-based self-leveling compound. Grind or sand down high spots. Secure any loose plywood with screws, and set popped nail heads below the surface.
Then vacuum thoroughly. A single grain of grit under a plank telegraphs through the surface and wears it from below.
If you are covering old sheet vinyl, do not sand it. Vinyl manufactured before the 1980s may contain asbestos. Cover it or have it professionally removed.
Test for Moisture
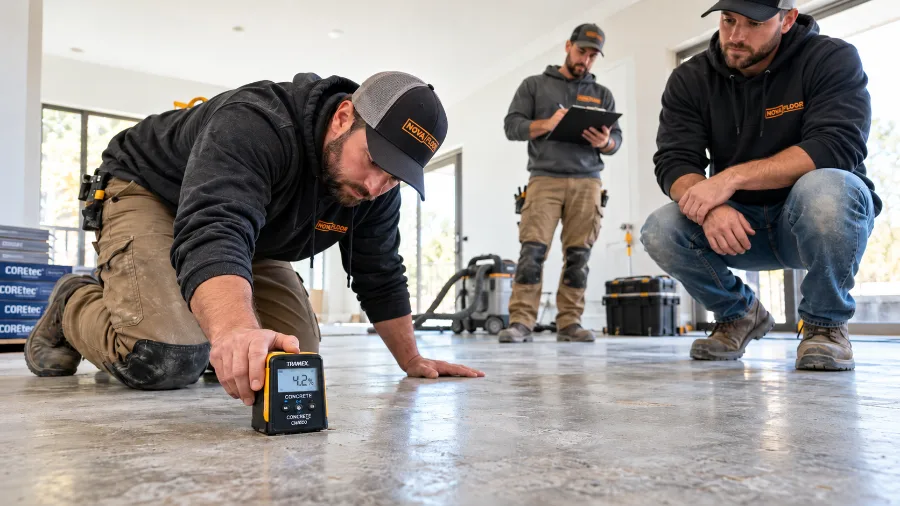
Concrete slabs need moisture testing before any resilient floor goes down. Let new concrete cure for at least 60 days first.
Two standard tests apply. The calcium chloride test (ASTM F1869) should read no more than 5 pounds per 1,000 square feet in 24 hours. The in-slab relative humidity test (ASTM F2170) should stay at or below 80%, though some waterproof rigid core products tolerate up to 85%. Always check your product data sheet.
For wood subfloors, use a pin meter and confirm the reading falls within the manufacturer’s range. Crawl spaces below need 0.15 mm (6-mil) polyethylene sheeting over the ground and adequate ventilation.
Pull the Baseboards and Undercut the Jambs
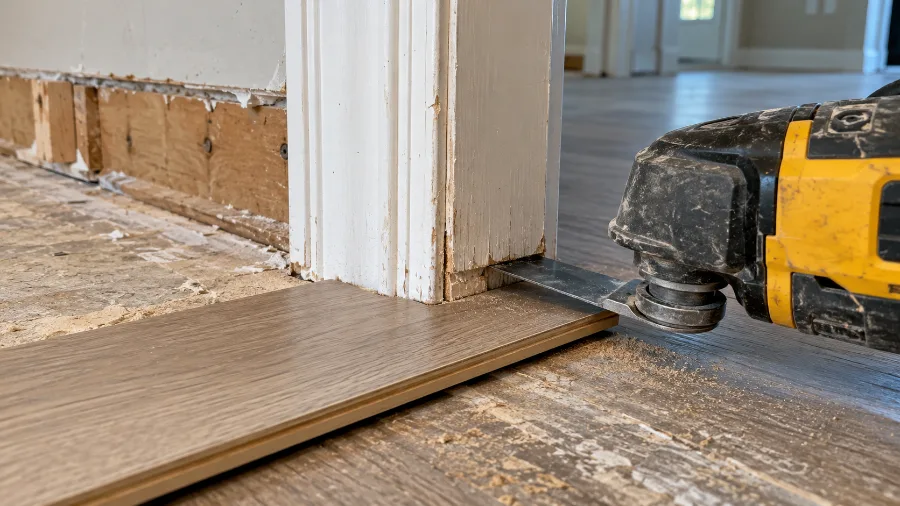
Score the caulk line with a utility knife, then pry the baseboards off with a pry bar and a scrap block to protect the wall. Number the back of each piece so reinstallation goes fast.
Undercut every door jamb and casing. Lay a scrap plank on the subfloor as a height guide, then cut through the trim with an oscillating tool. Sliding a plank under the jamb looks far better than notching a plank around it.
How to Install Vinyl Plank Flooring in 8 DIY Steps
Step 1: Plan Your Layout and Plank Direction
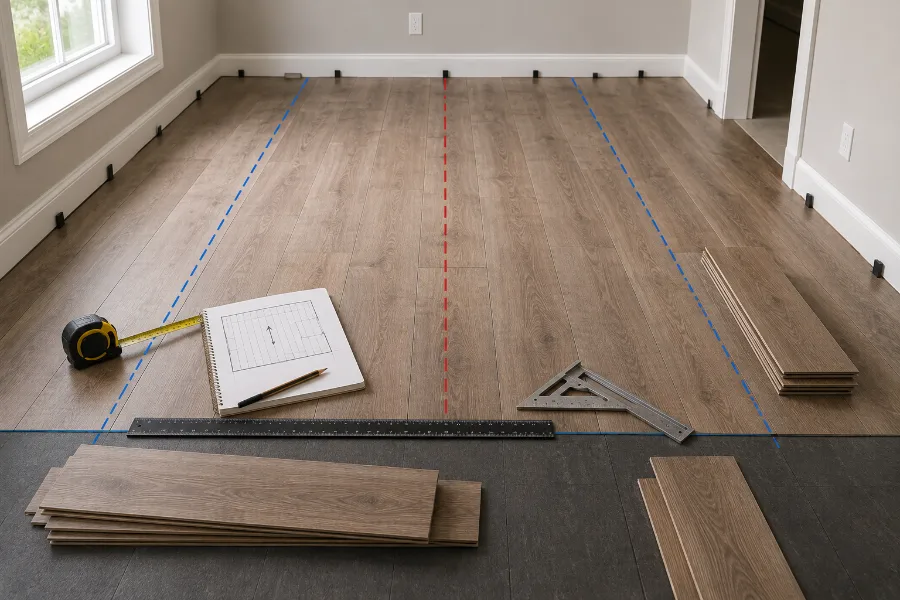
Run planks parallel to the longest wall in the room. In a hallway, always run them lengthwise down the hall. Planks laid crosswise in a narrow hallway create a weak line in the floor that can buckle later, especially in humid conditions.
If you are flooring multiple connected rooms, plan the whole job around the hallway. Every room feeds off that line. Getting it right there keeps seams aligned as you move through doorways.
Also plan your working direction. Planks lock most easily when you insert a tongue into a groove moving forward. Working backwards into closets or under cabinets is slower and harder, so map a route that minimizes it.
One more layout tip: run planks parallel to the main light source when possible. Grain lines that follow incoming light look more natural.
Step 2: Dry Lay and Snap Chalk Lines
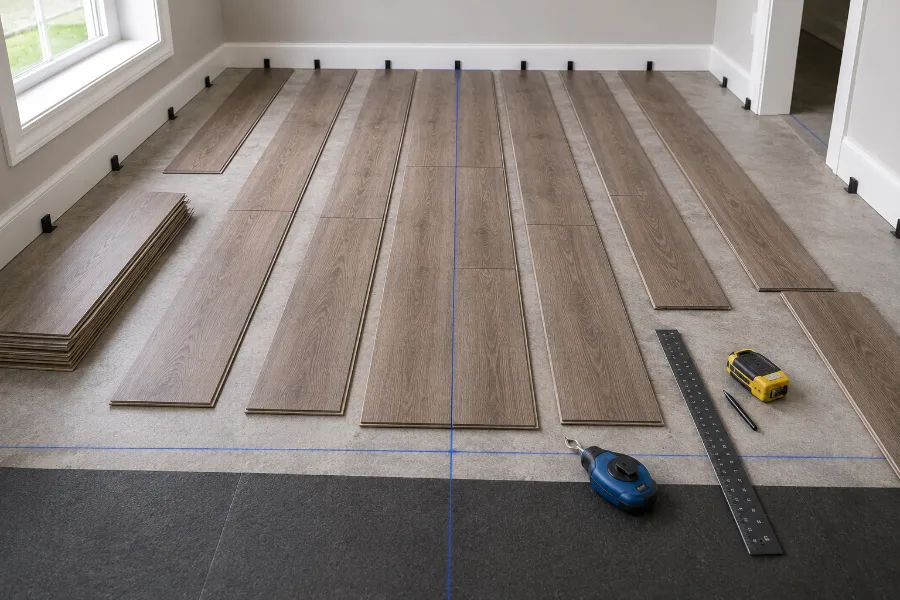
Divide the room width by the plank width to see how wide the final row lands. If that last row comes out narrower than half a plank, trim the first row to split the difference. Two 10 cm (4-inch) rows on both walls look far better than one full row and a 2.5 cm (1-inch) sliver.
Lock together 10 planks and use them as a measuring gauge. Write down the total length, then double and triple it on a note sheet. That cheat sheet saves you from repeating the same math all day.
Snap a chalk line along your starting row. Snap a second line to mark the expansion gap at the wall. These lines keep the floor straight even when the walls are not.
Open several boxes at once and shuffle the planks. Each box carries slightly different shade and pattern variation. Mixing them avoids visible color blocks in the finished floor.
Step 3: Set Spacers and Lay the First Row
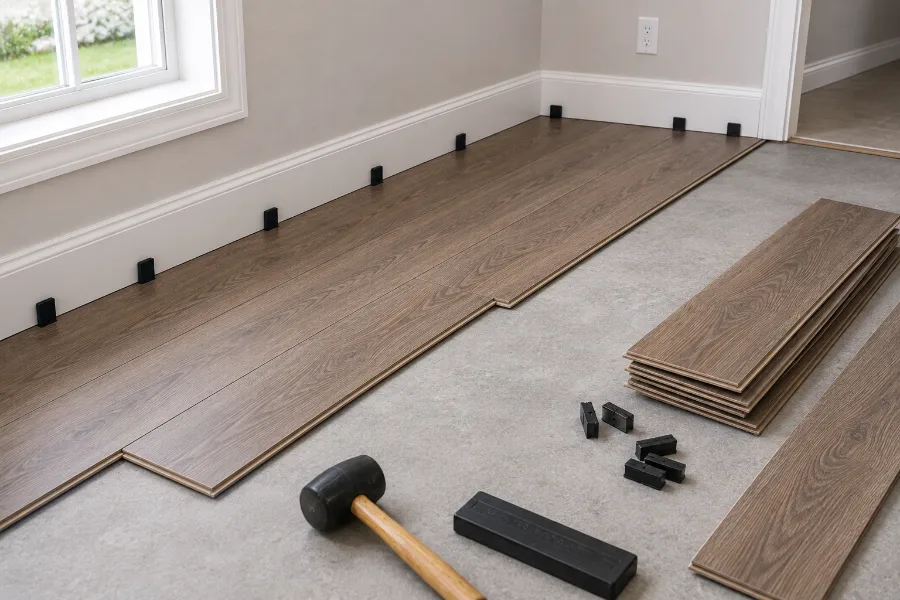
Place 6 mm (1/4 inch) spacers along the starting wall. Check your manufacturer’s spec, since some products call for 10 mm (3/8 inch) on runs longer than about 9 m (30 feet).
Trim the tongue off the long edge of the first row with a utility knife. The cut edge faces the wall and disappears behind the baseboard.
Set the first plank against the spacers with the cut edge toward the wall. Add the second plank end to end by holding it at a low angle, sliding the tongue into the groove, and lowering it flat until it clicks. Repeat across the wall.
Measure and cut the last plank in the row, remembering to subtract the expansion gap. If the offcut is longer than 15 cm (6 inches), start the next row with it.
Step 4: Build a Solid Foundation of Three to Five Rows
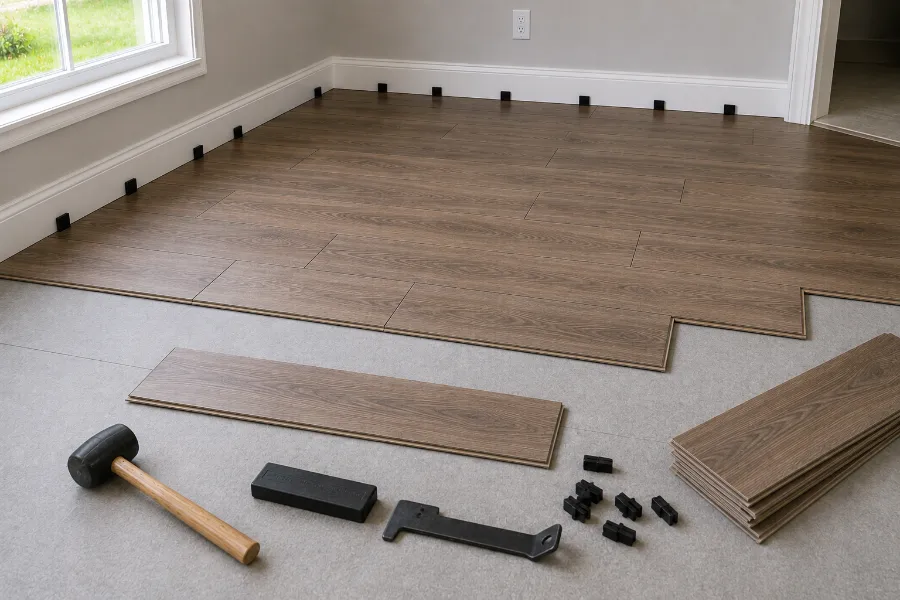
This step separates a smooth install from a frustrating one.
Lock together three to five full rows before you worry about final positioning. Extend them wall to wall. Then slide the whole assembly into place against your chalk line and wedge it firmly with spacers.
A foundation that shifts under you makes every following plank fight the lock. A foundation that holds still turns the rest of the room into simple repetition.
Many experienced installers save the actual first row against the wall for the very end. That lets you skip vents, cabinet toe kicks, and fireplace hearths until you have solid floor to work from.
From our installers: In smaller rooms, we start along the longest, straightest wall. In large open areas, we snap a chalk line through the middle and work outward in both directions, which keeps the floor straighter than following an uneven wall.
Step 5: Cut and Fit Around Obstacles
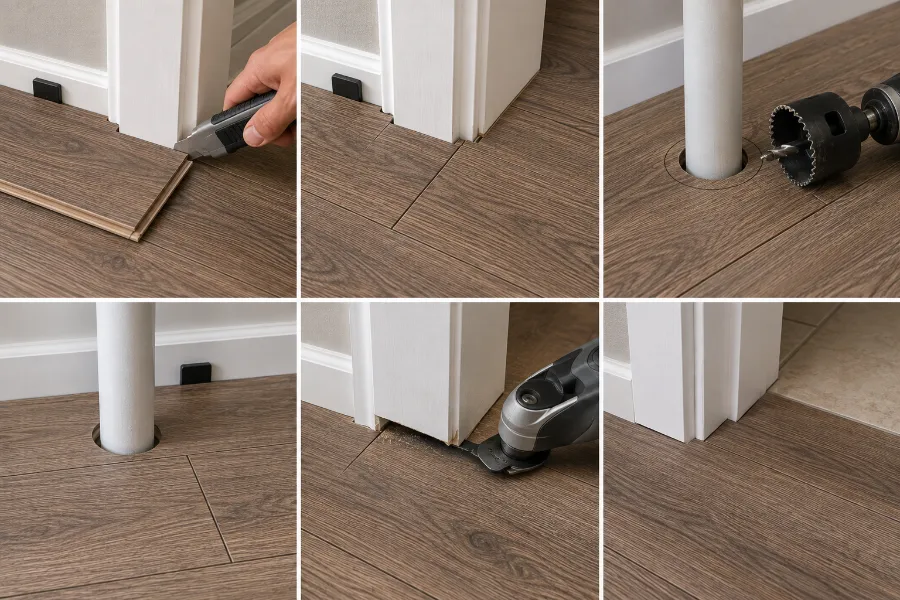
Handle the tricky cuts while your foundation is locked and stable.
For straight cuts, score the plank face several times with a utility knife against a square, then snap it along the line. Rigid core SPC often resists a clean snap, so a miter saw gives better results.
For notches, curves, and pipe cutouts, use a jigsaw with a fine-tooth blade. Cut with the finished face up and move slowly to avoid chipping the wear layer.
For pipes, drill a hole 12 mm (1/2 inch) wider than the pipe. Then cut a wedge from the plank edge to the hole, install the plank, and glue the wedge back in place.
For irregular shapes such as a stone hearth or a curved threshold, trace the shape onto cardboard and cut a template. Transfer the template to the plank. This takes five extra minutes and saves a wasted board.
Around a toilet flange, cut a full circle with a jigsaw, leaving about 3 mm (1/8 inch) clearance. A wax ring and the toilet base will hide the edge.
Step 6: Work Across the Room With Staggered Seams
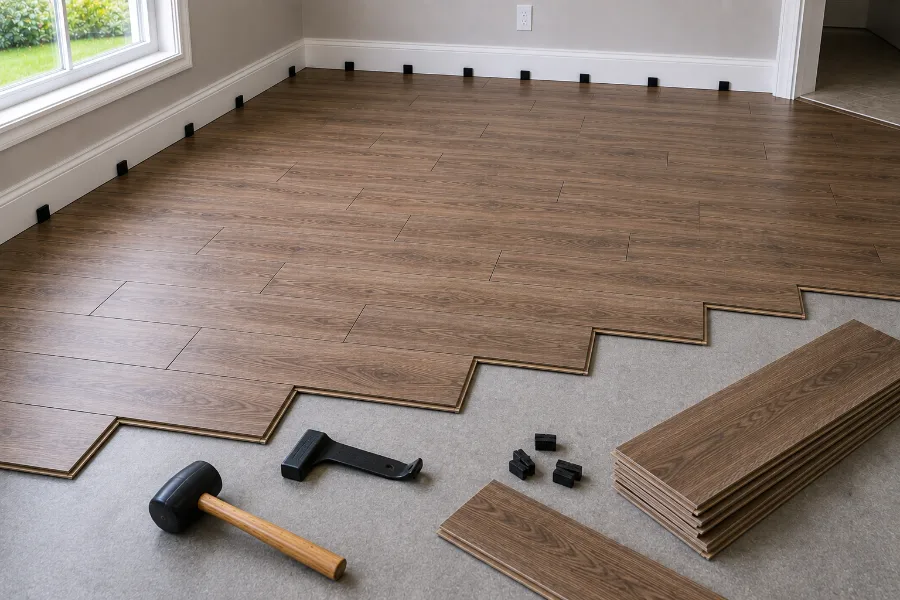
Continue row by row, angling each plank into the groove of the row before it and clicking it down.
Stagger end seams by at least 15 cm (6 inches); 20 to 25 cm (8 to 10 inches) looks better on wide planks. Never let end joints in adjacent rows land closer than that. Repeating a stair-step pattern across three or four rows also looks artificial, so vary the offsets.
Use the tapping block and rubber mallet to close any gap you see at a seam. Tap the block, not the plank edge, or you will mushroom the locking profile and ruin the board. A pull bar closes end seams where a block will not fit.
Check your progress against the chalk line every few rows. Small drifts compound fast.
Keep the expansion gap continuous around every fixed object: walls, columns, pipes, and door frames. The floor needs room to move on all sides.
Step 7: Fit the Final Row
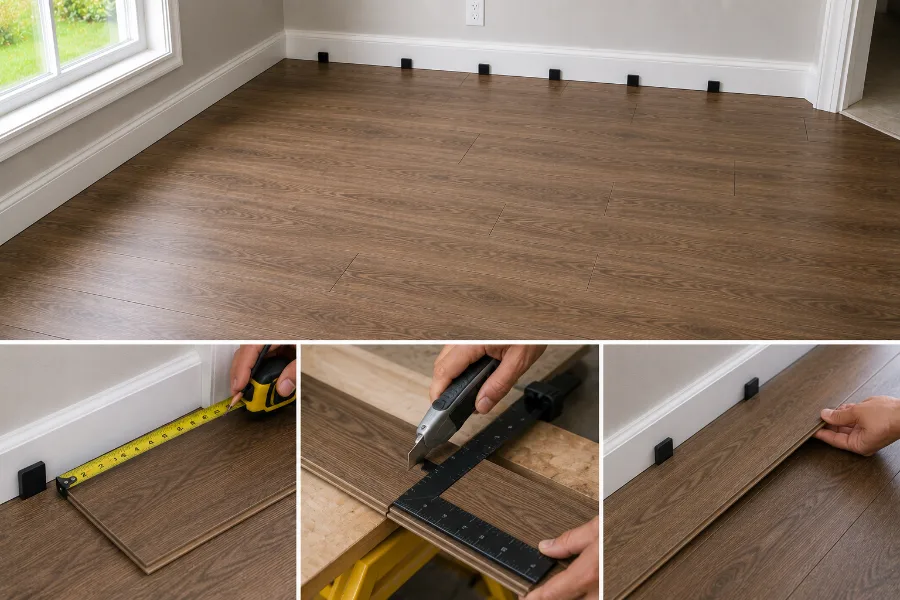
The last row almost never lands at full width, and walls are almost never perfectly straight.
Measure the gap at several points along the wall. Subtract the expansion gap. Mark those measurements on the plank and connect them with a straightedge, since the cut may be slightly tapered.
Rip the plank to width, then use the pull bar to draw the final row tight into the previous one. Leave the spacers in until the whole room is finished.
For glue-down installs, roll the entire floor in both directions with a floor roller now, and wipe any adhesive squeeze-out before it cures.
Step 8: Finish With Trim, Transitions, and Cleanup
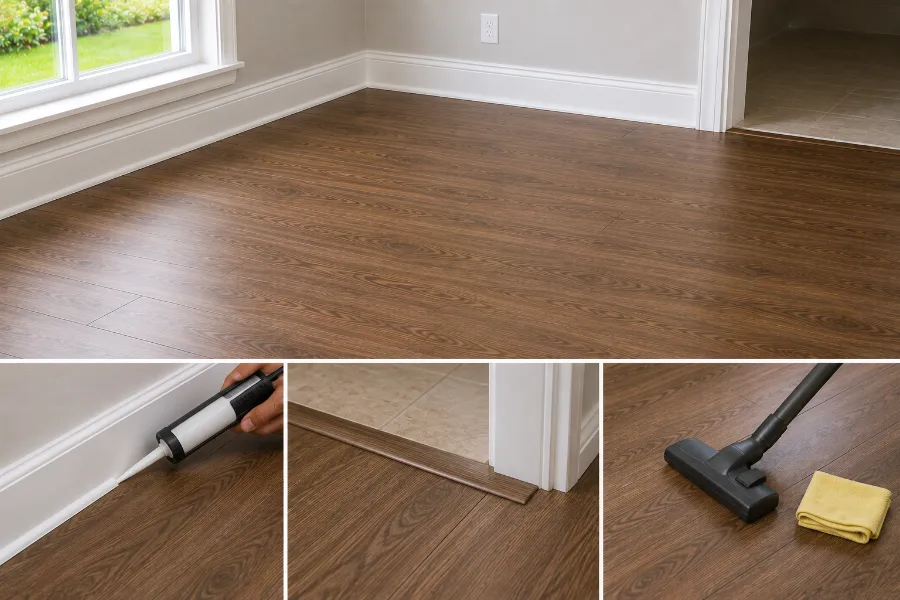
Remove all spacers. Reinstall the baseboards, nailing into the wall studs and never into the floor. A floating floor pinned by trim will buckle.
Add quarter round or shoe moulding if the expansion gap still shows. Fasten it to the baseboard, not to the planks.
Install transition strips at every doorway where the vinyl meets another surface. T-molding handles equal heights, and reducers handle a step down to tile or sheet vinyl.
Vacuum the floor, then damp mop with a pH-neutral cleaner. Attach felt pads to furniture legs before moving anything back in, and wait 24 hours before placing heavy items on a glue-down floor.
Prefer to have it done for you? If you’re in the UAE, Nova Floor’s installers can supply and fit your vinyl or SPC flooring. Get a free estimate
9 Common Vinyl Plank Flooring Mistakes to Avoid
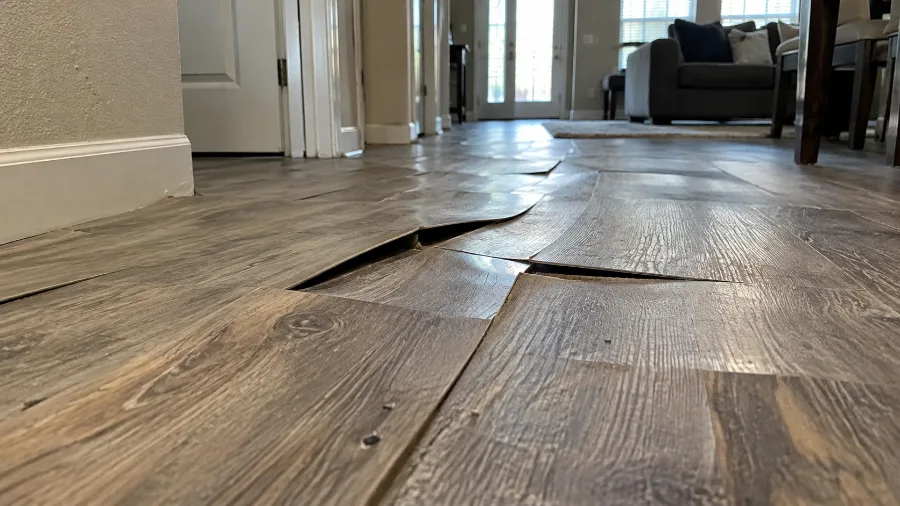
- Skipping the expansion gap. Floors that touch the wall on all four sides have nowhere to go. They peak and buckle with the first big swing in temperature or humidity.
- Installing over an uneven subfloor. Dips create flex, and flex breaks locking edges.
- Nailing baseboards into the planks. This pins a floating floor and guarantees failure.
- Not shuffling boxes. Unmixed planks create obvious dark or light patches.
- Staggering seams too closely. End joints under 15 cm (6 inches) apart weaken the floor and look wrong.
- Tapping the plank edge directly. Always use a tapping block to protect the lock.
- Running planks the short way down a hallway. This creates a buckling point.
- Installing cabinets on top of a floating floor. The weight restricts movement. Set cabinets first, then floor around them.
- Ignoring the manufacturer’s instructions. Expansion gaps, acclimation times, and moisture limits vary by product, and warranty claims depend on them.
From our installers: The mistake we’re called in to fix most often is a floor with no room to move: laid tight to the walls, or pinned down by skirting, cabinets, or heavy fixtures. Fixing it means removing trim and often relaying whole sections, which costs far more than leaving the gap would have.
How Vinyl Plank Performs Over Time
Durability
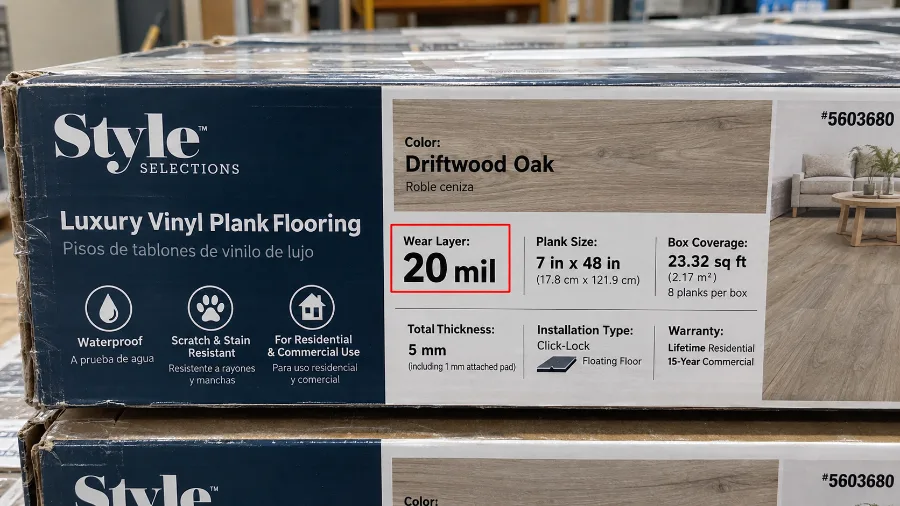
Durability comes down to the wear layer, measured in mils or millimetres. A 6 mil (0.15 mm) wear layer suits low-traffic bedrooms. A 12 mil (0.3 mm) layer handles families and pets. A 20 mil (0.5 mm) layer holds up in kitchens, entryways, and light commercial spaces.
Quality LVP resists scratches from dog claws and dropped keys well. It resists dents less well. Furniture legs, appliance rollers, and high heels can leave permanent impressions in softer WPC cores. Strong direct sunlight over years can fade darker colors, so UV-resistant products matter for rooms with large windows.
Expect 15 to 25 years from a mid-grade floor in a normal household.
From our installers: The floors that age best have three things in common: a thick enough wear layer for the room, felt pads under the furniture, and a mat at the door. Most of the wear we see on older floors comes from grit and dragged furniture, not everyday foot traffic.
Water Resistance
Rigid core products are genuinely waterproof at the plank level. Spills, pet accidents, and mop water do no damage. This makes LVP a strong choice for bathrooms, laundry rooms, and kitchens.
The important limit: waterproof planks do not make a waterproof floor system. Standing water can still travel through seams and sit on the subfloor. Fix leaks promptly rather than trusting the flooring to solve them.
Comfort and Sound
Vinyl plank feels warmer and quieter than tile. It falls short of carpet for comfort and short of solid hardwood for the sound underfoot. An acoustic underlayment reduces hollow echo noticeably, and it matters more on concrete than on plywood. In apartments, building rules often require a minimum acoustic rating, so check before you buy.
Appearance
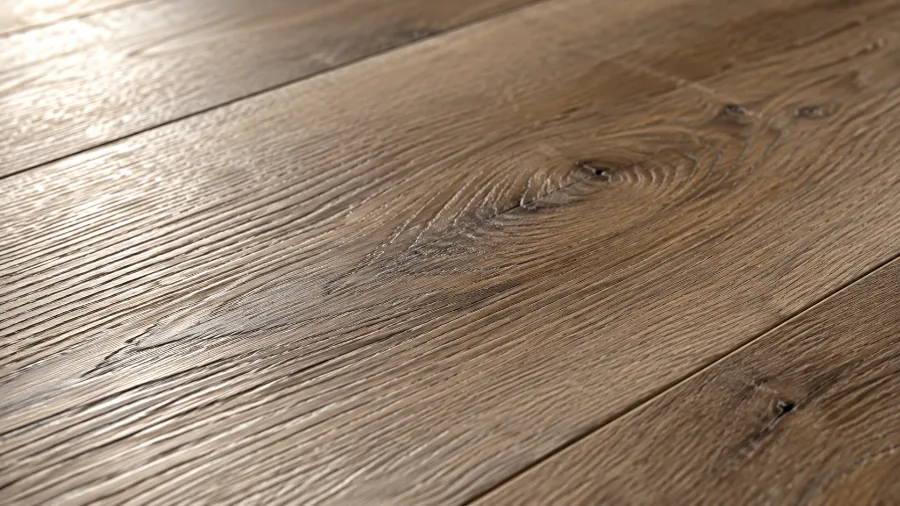
Embossed-in-register texture, where the surface grain aligns with the printed grain, looks convincingly like wood. Cheaper products with repeating patterns and flat surfaces do not. Look at how many unique plank designs a product offers. Twelve or more keeps the repeat from being obvious.
Vinyl plank does not add resale value the way solid hardwood does. It does make a home show better than worn carpet or dated tile.
Pros and Cons of Vinyl Plank Flooring
Pros
- Waterproof rigid core suits nearly every room in the house
- Costs a fraction of hardwood
- Installs over concrete, plywood, and most existing hard surfaces
- Click-lock systems need no adhesive and no drying time
- Individual planks can be replaced if damaged
- Low maintenance with no refinishing, sealing, or waxing
- Comfortable and quiet compared to tile
- Compatible with underfloor heating within temperature limits
Cons
- Softer cores dent under heavy furniture and appliances
- Cannot be refinished once the wear layer wears through
- Adds less resale value than hardwood
- Cheaper products look artificial in bright light
- Petroleum-based product with limited recycling options
- Off-gassing in low-quality imports, so look for FloorScore certification
- Requires a flat subfloor, and correcting a bad one adds real cost
How to Maintain Vinyl Plank Flooring
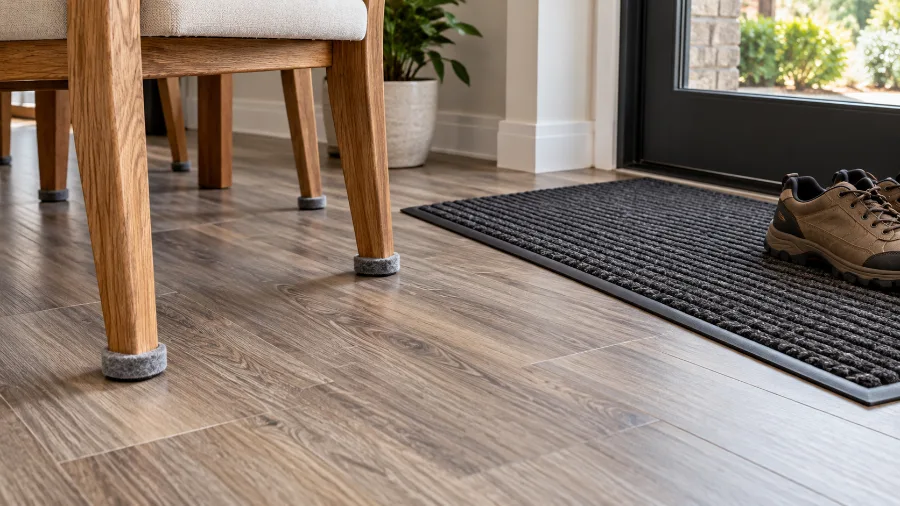
Daily care is simple. Sweep or vacuum with a hard-floor setting to remove grit and sand, which are the main causes of wear. Wipe spills as they happen.
Weekly, damp mop with a pH-neutral vinyl floor cleaner. Wring the mop well. Excess water helps nothing and can seep into seams.
Protect the surface with felt pads under furniture legs and wide caster wheels on rolling chairs. Place walk-off mats at exterior doors to catch grit and sand.
Avoid steam mops, which can force moisture into seams and soften the wear layer. Skip abrasive pads, wax, oil soaps, and bleach-based cleaners. Never drag appliances across the floor. Lay down hardboard and walk them over it instead.
Vinyl Plank Flooring Cost Factors
Current cost guides put standard vinyl plank materials at about $2 to 7persqft(22 to $75 per m²), and premium luxury vinyl plank at $3 to 10persqft(32 to $108 per m²) . Professional labor typically adds $2 to 5persqft(22 to $54 per m²) for straightforward click-lock work, and more for glue-down or complex layouts. Installed totals commonly land between $4 and 12persqft(43 to $129 per m²).
What moves the number:
Wear layer and core. A 20 mil SPC plank costs roughly double a 6 mil entry-level board.
Subfloor condition. Self-leveling compound, plywood underlayment, and moisture mitigation can add $1 to 6persqft(11 to $65 per m²). This is the most common budget surprise.
Old flooring removal. Carpet runs about $1 to 2persqft(11 to $22 per m²) to pull up. Tile or glued-down wood runs $3 to 4(32 to $43 per m²).
Room complexity. Bathrooms, kitchens, and rooms with angled walls take far longer per square metre than an empty rectangle.
Installation method. Glue-down costs more in labor and requires adhesive plus roller rental.
Trim and transitions. Budget $150 to $700 for transition strips, quarter round, and thresholds on a typical multi-room job.
DIY installation removes the labor line entirely. On a 46 m² (500 sq ft) project, that saves roughly $1,000 to $2,500. Factor in tool purchases or rentals, and allow for one or two wasted planks while you learn.
Frequently Asked Questions
Do you need underlayment under vinyl plank flooring? Only if your planks do not have it pre-attached. Adding a second underlayment under an attached-pad product creates too much cushion and stresses the locking joints. Over concrete, a 0.15 mm (6-mil) vapor barrier is usually required regardless.
Can you install vinyl plank over existing flooring? Yes, over one layer of hard, flat, well-bonded material such as tile, sheet vinyl, or hardwood. Fill tile grout lines first. Never install over carpet, or over floors with cushion backing.
Which direction should vinyl plank flooring run? Parallel to the longest wall, and parallel to the main light source when both work. In hallways, always lengthwise.
How long does vinyl plank flooring last? Fifteen to 25 years with a mid-grade wear layer and normal use. Thick 20 mil (0.5 mm) products in low-traffic rooms can exceed 30.
Can vinyl plank flooring get wet? Rigid core planks are waterproof. Wipe standing water promptly anyway, since it can reach the subfloor through seams.
Do you install vinyl plank under cabinets or around them? Around them. Cabinets sitting on a floating floor prevent it from expanding, which causes buckling.
How much expansion gap does vinyl plank need? Typically 6 mm (1/4 inch), increasing to 10 mm (3/8 inch) on runs over about 9 m (30 feet). Check your product specification, since warranty coverage depends on it.
How long does it take to install vinyl plank flooring? A professional team typically installs 30–50 m² per day. A first-time DIYer should allow four to eight hours for a standard bedroom.
Final Thoughts
Installing vinyl plank flooring is one of the highest-value DIY projects available to a homeowner. The material is forgiving, the tools are affordable, and the click-lock system does most of the precision work for you.
Success comes from the parts nobody photographs: a flat subfloor, a tested slab, acclimated planks, a straight chalk line, and a consistent expansion gap. Get those right and the planks almost install themselves. Skip them and no amount of careful clicking will save the floor.

Noah Williams
Interior Designer & Flooring Expert




)