
Noah Williams is an interior designer and flooring expert at Nova Floor. In Dubai, he helps people pick the right floor, get it installed, and keep it looking good. He also writes simple, practical flooring and home care guides for readers in Dubai and around the world.
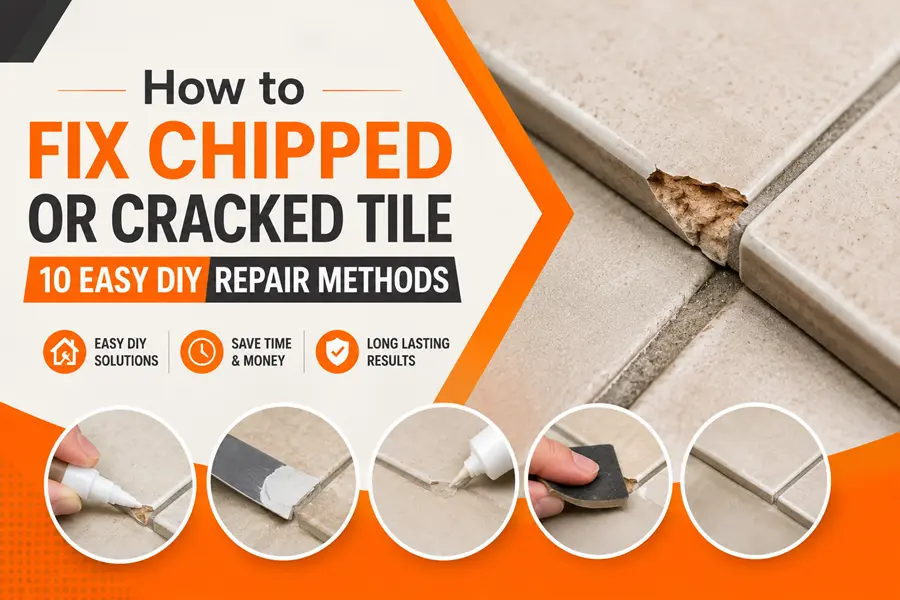
How to Fix Chipped or Cracked Tile | 10 Easy DIY Repair Methods
Noah Williams
To fix a chipped tile, clean the chip, fill it with two-part epoxy, sand it flush once cured, then color-match and seal it. A small chip takes 30 to 60 minutes of hands-on work and $10 to $35 in materials. A cracked tile is different: fillers can hide a crack but cannot restore the tile’s strength, so a crack that reaches the tile edge usually means replacement.
This guide from the Nova Floor experts installation team covers both. You will learn how to diagnose the damage in two minutes, choose the right filler, match difficult colors, and read what a crack pattern says about the floor underneath.
Contents
Quick Answers
- A tile chip is missing surface material while the tile body stays whole. Most chips can be repaired.
- A tile crack is a split through the glaze or body. A crack that reaches an edge usually means replacing the tile.
- Two-part epoxy is the best all-round filler for chipped ceramic and porcelain tile.
- Corner chips are the easiest to hide. Chips in the middle of the tile face are the hardest.
- Cracks running in a straight line across several tiles point to movement in the slab or subfloor, not a faulty tile.
- Nail polish and super glue are temporary cosmetic fixes for tiny wall-tile chips only, never for floors.
Should You Repair or Replace a Chipped Tile?
Repair any tile that is still firmly bonded and not split into pieces. Replace any tile that is cracked edge to edge, broken, or sounds hollow across its whole surface.
| Damage | Repair or replace? | Best method |
| Scratch or nick smaller than a grain of rice | Repair | Tile repair pen or touch-up glaze |
| Pinhead chip on porcelain | Repair | Cyanoacrylate and filler powder |
| Chip deeper than 1/16 in (1.5 mm) | Repair | Two-part epoxy fill |
| Chip wider than a dime, or a gouge | Repair | Polyester filler, then paint and seal |
| Missing corner or broken edge | Repair | Taped mold with stiff epoxy |
| Chip beside a grout line | Repair | Color-matched grout or flexible sealant |
| Static hairline crack in the glaze only | Repair (cosmetic) | Low-viscosity epoxy or flexible urethane |
| Crack that reaches the tile edge | Replace | Remove and reset the tile |
| Tile broken into separate pieces | Replace | Remove and reset the tile |
| Loose or hollow-sounding tile | Investigate first | Re-bed if the substrate is sound |
| Cracks across several tiles in a line | Investigate first | Fix the slab or subfloor cause, then replace |
How Do You Diagnose Tile Damage?
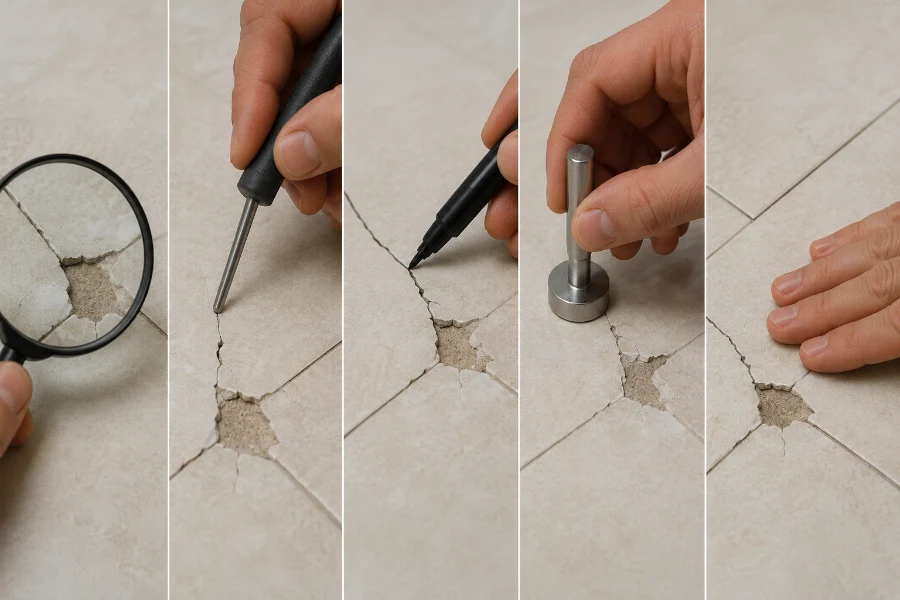
Five quick tests tell you whether you have a cosmetic chip, a structural crack, or a problem under the floor. Run them before you buy any product, because the result decides the method.
- Fingernail test (depth). Drag a fingernail across the damage. A shallow catch means a surface chip. A nail that drops into a groove means real depth. Chips under 1/16 in (1.5 mm) take a thin fill; deeper chips need a structural filler that will not shrink.
- Coin tap test (bond). Tap the tile with a coin at the center and near each corner. A sharp click means the tile is bonded. A dull, hollow sound means a void under the tile. ANSI A108.5 calls for at least 80% mortar coverage in dry interior areas and 95% in wet or exterior areas. A hollow tile falls short and will likely crack again under a point load.
- Trace the line (pattern). Check whether the damage runs edge to edge and whether it continues into the next tile. A crack that crosses grout lines in a straight run through three or four tiles almost always mirrors a crack in the concrete slab or a moving subfloor.
- Press test (deflection). Stand near the damage and shift your weight. The TCNA Handbook limits subfloor deflection to L/360 for ceramic and porcelain tile and L/720 for natural stone. If you can feel the floor flex underfoot, it exceeds both.
- Tape movement test (active cracks). Press a strip of painter’s tape across the crack and walk the area normally for a week. If the crack has opened, shed dust, or torn the tape, it is still moving and no filler will hold it.
We call the last one the tape movement test. It is the fastest way to tell a harmless static crack from an active one before you spend money on a repair.
Corner, Edge, or Face Chip: Which Is Easiest to Fix?
Where the chip sits matters as much as how big it is. Corner and edge chips hide well; face chips are the hardest to make disappear.
| Chip location | Difficulty | Why |
| Corner chip | Easiest to hide | Two grout lines frame the patch and break up the eye’s view of it. It is harder to fill, though, because nothing holds the filler in place, so use a taped mold. |
| Edge chip along a grout line | Easy | The grout joint disguises the join. Use flexible filler if the joint moves. |
| Face chip in the middle of the tile | Hardest | Surrounded by original surface on every side, so any color or gloss mismatch stands out. Spend most of your time on color. |
How Does Tile Material Change the Repair?

The same filler behaves differently on ceramic, porcelain, and stone, so identify your tile first. If you are unsure which you have, see our guide to porcelain vs ceramic tile differences.
Glazed ceramic tile carries its color in a thin glaze layer over a paler clay body called the bisque. When the glaze chips, the bisque shows through. The filler rebuilds the shape, but you must also rebuild the color and the gloss on top, or the patch will stay visible.
Porcelain tile is dense, with water absorption of 0.5% or less under ANSI A137.1. Full-body (through-body) porcelain carries its color all the way through, so a chip often shows a shade close to the surface and is easier to match. Because porcelain barely absorbs anything, fillers grip mechanically rather than soaking in. Scuff the chip cavity lightly with a rotary tool or coarse sandpaper so the filler has something to key into.
Natural stone such as marble, travertine, or granite has grain, depth, and translucency that flat paint cannot copy. Use a color-matched stone epoxy, or a knife-grade polyester tinted with dust from an offcut. Marble stains easily, so seal the repair and the surrounding area together.
Wood-look and patterned tile usually carries three or four tones, not one. Match the grain direction as well as the base color; the color-matching section below explains how.
What Is the Best Filler for a Chipped Tile?
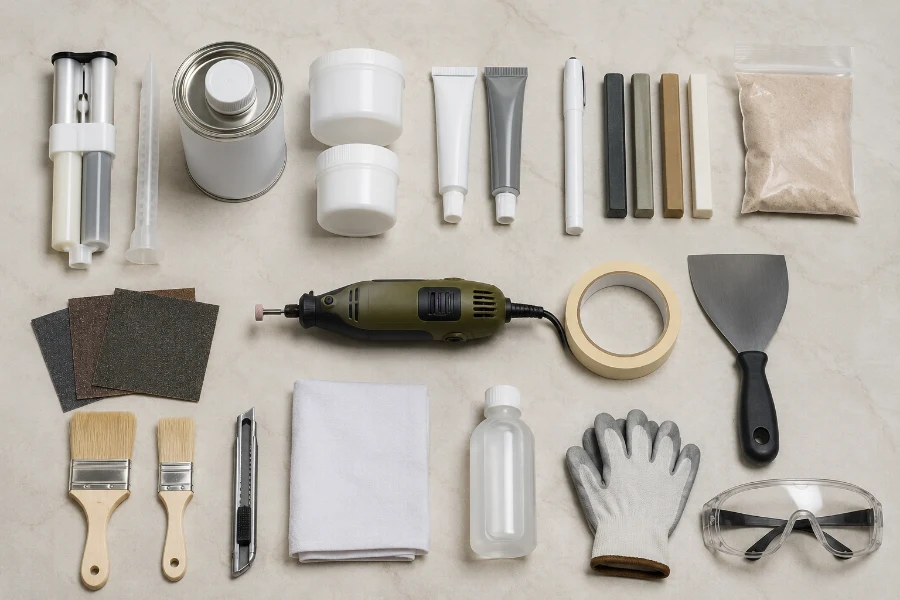
For most chips on ceramic and porcelain, choose two-part epoxy: it bonds strongly, resists water, and cures hard enough for foot traffic. Choose a different filler only when the chip size, location, or sunlight exposure calls for it.
| Filler | Best for | Working time | Water resistance | Watch out for |
| Two-part epoxy | Most chips on ceramic and porcelain, floors and showers | 5 min to several hours, by product | High | Standard epoxy yellows in sunlight; use a UV-stable grade outdoors or by windows |
| Polyester filler | Large chips, gouges, missing corners | About 5 min; sands in about 30 min | Low until sealed | Shrinks slightly and is porous; always paint or seal; avoid in showers |
| Thin cyanoacrylate + filler powder | Pinhead chips and edge nicks on porcelain | Seconds | Moderate | Build thin layers; a thick pour gets hot and can craze the glaze |
| Flexible urethane or low-viscosity epoxy | Static hairline cracks | Varies | High | Cosmetic only; does not restore strength |
| Color-matched grout or flexible sealant | Chips at grout lines and joints | 10 to 20 min | High (sealant) | Rigid fillers crack where joints move |
| Tile repair pen or touch-up glaze | Scratches and tiny nicks | Minutes | Low to moderate | Not for chips with depth or on high-traffic floors |
Tools you will need (buy only for your chosen method): the filler, sandpaper from 220 to 800 grit, a plastic spreader or putty knife, painter’s tape, fine artist brushes, isopropyl alcohol with a lint-free cloth, and gloves with safety glasses. A rotary tool with a small carbide bit helps clean and key the cavity.
How to Fix a Chipped Tile Without Replacing It (Step by Step)
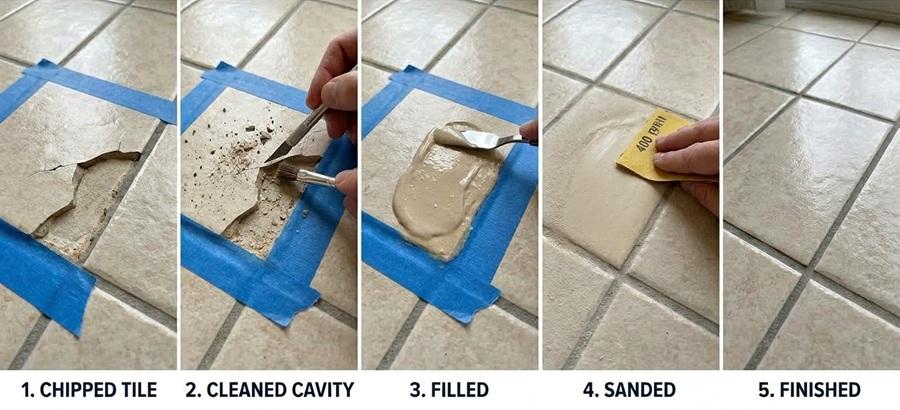
This 7-step epoxy process repairs most chipped floor and wall tiles in about 30 minutes of work plus cure time. It works on ceramic and porcelain; stone and special cases follow in the next section.
- Clean out the chip. Pick out every loose fragment with a pin or a rotary bit, then vacuum the cavity. On porcelain, scuff the cavity walls lightly so the filler can grip.
- Degrease with alcohol. Wipe the chip with isopropyl alcohol on a lint-free cloth and let it evaporate. Soap leaves a film that stops the bond; alcohol does not.
- Tape off the tile. Run painter’s tape around the chip, leaving a little original surface visible so you can blend the repair.
- Mix and fill. Mix resin and hardener in the ratio on the label (often 1:1) for a full 30 seconds. Press the mix into the chip with a plastic spreader, working it against the cavity walls to push out air. Overfill very slightly, and wipe any epoxy off the glaze immediately with alcohol, because cured epoxy is very hard to remove.
- Let it cure fully. Five-minute epoxy can be touched after about an hour and reaches strength in around 24 hours. Slow-set epoxy needs 24 to 72 hours. Always follow the cure time on the label, not the touch-dry time.
- Sand flush. Sand level with 400-grit paper, then polish with 800-grit. The patch should be impossible to feel with a fingertip.
- Color, gloss, and seal. Paint the patch in thin coats to match the tile, add clear glaze on glossy tile, and seal the repair. Keep foot traffic off a floor repair until the full cure time has passed.
Special Repair Methods for Difficult Chips
Use these methods when the standard epoxy process does not fit the chip’s size, location, or color.
Tinted Epoxy With Your Own Tile Dust (Discontinued or Unusual Colors)
This is the most accurate way to match a tile color, because the pigment comes from the tile itself. Sand a hidden edge of a spare tile over a sheet of paper to collect fine dust. On glazed tile, sand the glazed face rather than the bisque, since the two colors differ sharply. Stir a pinch of dust into clear two-part epoxy, test the cured color on scrap, adjust, then fill as in the 7-step process. Cost: under $12.
Cyanoacrylate and Filler Powder (Pinhead Chips)
Pack the chip with tile dust or fine filler powder, then touch a drop of thin cyanoacrylate glue to it. The glue wicks through the powder and sets within seconds. Build in thin layers, because a thick pour generates heat that can craze the surrounding glaze. Sand level with 400-grit paper. This holds well on dense porcelain, where slower fillers struggle to grip.
Polyester Filler (Large Chips and Gouges)
Polyester body filler suits chips wider than a dime (about 18 mm) and sands in about 30 minutes. Mix filler and hardener to an even color with no streaks, then press it in firmly. It shrinks slightly as it cures, so plan on two passes: sand the first flat, then add a skim coat. Polyester is porous, so always paint or seal it, and use epoxy instead in showers.
Taped Mold (Missing Corners and Broken Edges)
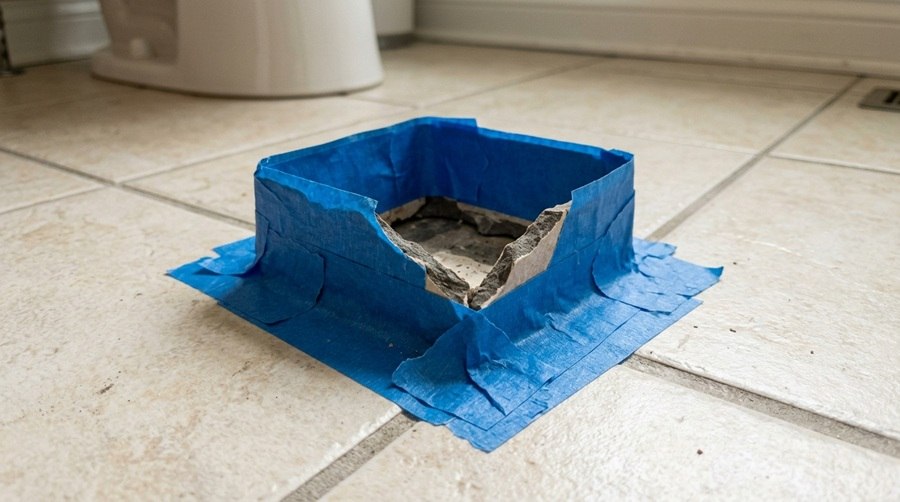
A corner chip has nothing to hold the filler in place, so you build the backing yourself. Press painter’s tape flat against both clean faces of the corner to form a right-angle wall. Pack stiff epoxy or polyester into the void, pushing it hard against the tape. When the filler firms to a cheese-like state, trim the excess with a blade and remove the tape. Sand the cured corner and round the edge very slightly, because a razor-sharp rebuilt edge chips again quickly.
Chips at a Grout Line
Rigid filler cracks at grout lines because the joint moves. Rake out loose grout to about 1/8 in (3 mm), vacuum, and press in color-matched sanded grout or a flexible sealant. Tool it flush and wipe the haze with a damp sponge within 10 minutes. Use flexible sealant rather than grout at inside corners, wall-to-floor junctions, and around tubs.
Repair Pens (Scratches and Tiny Nicks)
A tile repair pen carries pigment and sealer in one tip. Shake it, press the tip into the mark, and wipe any bleed off the surrounding glaze before it sets. Pens work best on wall tiles and backsplashes, where damage is visible but carries no load.
How to Fix Chips in Mosaic, Backsplash, and Shower Tile
The basic epoxy process works everywhere, but each of these areas has one rule that changes the job.
Mosaic Tile
With small mosaics, replacing one piece is often easier than patching it. Grind out the grout around the damaged piece, lift it with a thin chisel, and glue a spare piece in with epoxy or thinset before regrouting. Patch in place only when you have no spare pieces, and use a thin tip or toothpick to apply the filler.
Kitchen Backsplash
Backsplash chips carry no load, so a repair pen or thin epoxy fill is usually enough. Degrease thoroughly first, because cooking oil on the tile will stop any filler from bonding. Near a cooktop, choose an epoxy rated for heat.
Shower and Bathtub Surround Tile
Use only waterproof epoxy, and let the area dry completely, ideally 24 hours with no showers, before you start. Allow the full cure before water touches the repair, then seal around it. If a crack reaches the tile edge in a shower, replace the tile rather than fill it, because water behind the tile damages the wall.
Are Tile Repair Kits Worth It?
A tile repair kit is worth it for one to three chips, because it bundles the filler, tints, and applicators you would otherwise buy separately. Choose the kit type by the job, not the brand.
| Kit type | What’s inside | Best for | Limitations |
| Epoxy repair kit with tints | Two-part epoxy, several tint colors, mixing tray, spreader | Most chips on ceramic and porcelain | Limited color range; deep chips may need two fills |
| Porcelain and ceramic touch-up kit | Paste filler plus brush-on glaze | Small chips and glaze damage on walls and tubs | Too soft for deep chips on floors |
| Tile repair pen | Pigment and sealer in one tip | Scratches and tiny nicks | Cosmetic only; no fill depth |
| Stone repair kit | Knife-grade polyester or epoxy with stone tints | Marble, travertine, granite | Needs sealing; matching veining takes practice |
Does Nail Polish or Super Glue Fix a Chipped Tile?
Nail polish and super glue work only as temporary cosmetic fixes for very small, shallow chips on wall tiles. Neither belongs on a floor, and neither fills a chip with real depth.
Nail polish can seal and disguise a tiny chip on a backsplash or bathroom wall if you find a close shade. It does not bond like a filler and wears quickly underfoot, so treat it as a stopgap until you do a proper repair.
Super glue on its own is thin and brittle and will not fill a cavity. It becomes useful only when combined with filler powder, as in the cyanoacrylate method above.
How to Color-Match a Tile Repair
Color matching decides whether a repair disappears or stands out, so give it more time than the fill itself. A good repair should be invisible from standing height and only faintly visible up close.
- Count the tones in daylight. Most tiles carry three or four tones, not one. Note each before you mix.
- Test before you commit. Try your mix on a scrap tile or a hidden spot and let it fully cure, because many fillers and paints change shade as they dry.
- Build from light to dark. Apply the lightest tone first with a fine artist brush, then layer darker tones on top in thin coats.
- Feather the edges. Fade each coat outward so it blends into the tile rather than ending at a hard border.
- Match the sheen. Finish glossy tile with a drop of clear urethane glaze. Without it, the patch reads matte under raking light.
For wood-look tile, fill and level first, then paint the base tone. Load a fine liner brush with the darkest grain color and draw veins that follow the grain already in the tile, varying the line width as real wood does. If the chip interrupts a strong grain line, carry that line straight through the patch. The eye follows the grain across the tile and skips over the repair.
For grout near the repair, cure a test smear on card before choosing a shade, because wet grout looks noticeably darker than cured grout.
Can a Cracked Tile Be Repaired?
A cracked tile can be disguised and sealed, but it cannot be made structurally whole again. Repair only static hairline cracks that sit in the glaze and stop short of the tile edge; replace any tile whose crack reaches an edge, because water can travel through it into the substrate.
First confirm the crack is static with the tape movement test from the diagnosis section. Then:
- Open the crack slightly with the corner of a blade so the filler can enter.
- Clean and dry it with alcohol and let it evaporate fully.
- Work in the filler. Press a thin, flexible urethane or a low-viscosity epoxy into the line, wiping across the crack rather than along it.
- Cure, sand lightly, and seal.
This repair restores appearance and blocks water. It does not restore strength, so expect to replace the tile if the crack grows. Cost: $12 to $25; time: about 30 minutes plus cure.
How to Fix a Loose or Hollow-Sounding Tile
A single loose tile is fixed by lifting it, cleaning off the old mortar, and re-bedding it with fresh thinset. Filling a chip on a loose tile will not last, because the tile will keep moving and crack again.
- Remove the grout around the tile with a grout saw or oscillating tool.
- Lift the tile gently with a flat pry bar or chisel, working from a corner. If it breaks, follow the replacement steps in the next section.
- Clean both surfaces. Scrape old mortar off the back of the tile and off the floor until both are flat and sound.
- Re-bed it. Spread fresh thinset on the floor, back-butter the tile, and press it into place. Check it sits level with its neighbors using a straightedge.
- Grout after 24 hours, or when the mortar label allows.
If several tiles in the same area sound hollow or feel loose, stop and investigate the substrate before re-bedding them one by one. Widespread hollow spots usually point to poor mortar coverage, moisture, or subfloor movement, and the surrounding tiles will keep failing until the cause is fixed.
How to Replace a Cracked Tile
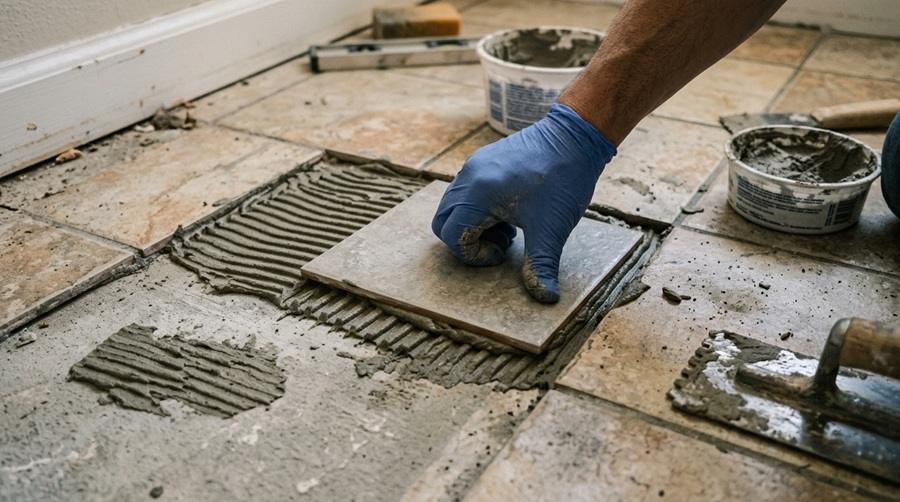
Replace a tile when its crack runs edge to edge, when it sounds hollow across its whole surface, or when it has broken into pieces. Expect 2 to 4 hours of work plus cure time, and $25 to $70 in materials plus the replacement tile.
- Protect the neighbors. Cover the surrounding tiles with painter’s tape and cardboard.
- Remove the grout around the damaged tile with an oscillating tool or manual grout saw.
- Break the tile from the center out. Wear safety glasses and gloves, because broken tile throws sharp shards. Drill several holes in the middle of the tile, then chisel outward toward the edges. Working outward keeps the shock away from the tiles you want to keep.
- Scrape the old mortar down to a flat, sound base. In showers, check for a waterproofing membrane first; cutting through it turns a small repair into a major one.
- Dry-fit the new tile to confirm it sits flush with its neighbors.
- Set the tile. Back-butter it, press it into fresh thinset, and check the height with a straightedge.
- Grout and cure. Wait 24 hours before grouting and 24 to 72 hours before heavy traffic. Wet areas need longer, so follow the mortar label.
Matching a replacement tile: tile color varies between production batches. Order a full box rather than a single piece, and compare it to your floor in daylight before you commit.
Why Do Tiles Crack? What the Crack Pattern Tells You
A cracked tile is rarely a defect in the tile itself. The shape and location of the crack usually point straight to the cause, and fixing that cause is what stops the next crack.
| Crack pattern | Likely cause | What to do |
| Straight line across several tiles | A crack or joint in the concrete slab below | Reinstall over a crack isolation membrane meeting ANSI A118.12 |
| Cracks near walls or doorways | Missing movement joints; the floor has no room to expand | Add soft joints at the perimeter and every 20 to 25 ft (6 to 7.6 m) indoors (TCNA EJ171) |
| Cracks radiating from one point | Impact from a dropped object, or a void under the tile | Tap the tile; a hollow sound confirms a void |
| Single crack on a springy floor | Subfloor deflection between joists | Stiffen the subfloor before replacing the tile |
| Cracks in sunny rooms or outdoors | Thermal stress from rapid temperature swings | Space movement joints 8 to 12 ft (2.4 to 3.7 m) apart in sun-exposed or exterior areas (TCNA EJ171) |
| Cracks appearing soon after installation | Tile laid on concrete that had not finished curing and shrinking, or poor mortar coverage | Check workmanship; may be covered by warranty |
Repair the tile in every case. But the second and third failures cost far more than investigating the first one.
Too Many Damaged Tiles? Consider Covering Them Instead
When chips and cracks are spread across a whole room, repairing each tile often costs more time and money than replacing the floor surface. Rigid-core SPC or LVT flooring can often be installed directly over existing tile, with no demolition, dust, or tile disposal.
Overlay works when the existing tiles are firmly bonded and the floor is flat within the flooring manufacturer’s tolerance. Deep grout lines may need a skim coat of floor leveler first, and any loose or hollow tiles must be fixed before covering them. Check door clearances too, because a new layer raises the floor height by several millimeters
When Should You Call a Professional?
DIY handles most single chips well. Call a tile contractor or inspector when any of these five warning signs appear:
- New cracks keep appearing after each repair.
- Several tiles sound hollow across a wide area.
- The floor flexes noticeably underfoot.
- Cracks appear within a year of installation, which usually points to workmanship and may still be under warranty.
- The tile is natural stone, large-format, or expensive enough that a failed repair costs more than a professional visit.
How to Prevent Chipped and Cracked Tiles
Most chips come from impact and dragged furniture, so a few habits prevent the majority of damage.
- Fit felt pads to chair and table legs, and replace them before they wear through.
- Lift furniture instead of dragging it across the tile.
- Put mats at entrances so grit never reaches the glaze; grit under a shoe acts like sandpaper.
- Use a mat at the kitchen sink, where dropped pans and dishes concentrate.
- Reseal natural stone once a year and check grout lines every spring.
- Keep spare tiles from every installation in a labeled box. It turns a future replacement from a hunt into an afternoon.
Frequently Asked Questions
Is a chipped tile dangerous to walk on? A small surface chip is not usually dangerous. A tile that is cracked through or has a sharp broken edge can cut bare feet or become a trip hazard, so replace it rather than fill it.
How long does a chipped tile repair last? A well-prepared epoxy repair lasts for years under normal foot traffic. Most failures come from dust left in the cavity, moisture during the cure, or a hollow tile underneath.
How do I fix a chipped floor tile that gets daily foot traffic? Use a rigid two-part epoxy, not paint alone. Sand the patch perfectly flat so no edge stands proud, and keep traffic off it for the full cure time on the label.
Can I repair a chipped tile in a shower? Yes, with waterproof epoxy. Dry the area completely first, let the repair fully cure before water touches it, and seal the edges. A rushed shower repair lets water behind the tile and causes more damage than the chip.
Why did my tile repair turn yellow? Standard epoxy yellows under ultraviolet light. Use a UV-stable epoxy or urethane on patios, windowsills, and any floor in direct sun.
How much does it cost to fix a chipped tile? DIY materials cost about $10 to $35 for a single chip. A professional repair usually costs more because of the call-out and labor; get a quote for your specific tile.
Is a cracked tile a sign of foundation problems? Not usually. A single cracked tile is most often impact or a void underneath. Cracks running in a straight line across several tiles, however, often mirror a crack in the slab and are worth having inspected.
Final Words
Diagnose first, then repair. A clean, degreased cavity, a full cure, and patient color work are what make a Saturday repair still look right years later.

Noah Williams
Interior Designer & Flooring Expert
Related Posts