
Noah Williams is an interior designer and flooring expert at Nova Floor. In Dubai, he helps people pick the right floor, get it installed, and keep it looking good. He also writes simple, practical flooring and home care guides for readers in Dubai and around the world.
How to Refinish Hardwood Floors in 6 DIY Steps | Refinish Cost & Tips

Noah Williams
| At a glance | |
| Skill level | Advanced (drum sander) / Intermediate (orbital sander) |
| Time | 3 to 5 days per room (water based), up to 7 days (oil based) |
| DIY cost | About $400 to $1,200 for a 500 sq ft (46 m²) room |
| Professional cost | About $3 to 8persqft(32 to $86 per m²) |
| Best for | Solid hardwood and engineered wood with a thick wear layer |
Hardwood floor refinishing means sanding a wood floor down to bare wood, then applying an optional stain and a new protective topcoat such as polyurethane or hardwax oil. You can refinish hardwood floors in six steps: clear and seal the room, repair the boards, sand from coarse to fine grit, screen sand and remove all dust, apply stain, and build the finish. A DIY job costs about $400 to $1,200 in rentals and materials for a 500 sq ft room. A professional crew charges about $1,500 to $4,000 for the same room.
This guide by the Nova Floor team covers the full process, from the first inspection to the final coat. It includes a grit chart, drying and curing tables, itemised costs, sheen choices, safety rules and the mistakes that ruin first attempts. Read the whole guide before you rent a machine, because preparation decides the result more than sanding does.
Contents
What Is Hardwood Floor Refinishing?
Hardwood floor refinishing is the process of removing the old finish and a thin layer of wood with a floor sander, then sealing the bare wood with new stain and topcoat. It removes scratches, worn traffic lanes, grey patches and old colour, and resets the floor to a like-new surface.
It differs from two related jobs:
- Screen and recoat (resurfacing) lightly abrades the existing finish and adds a new topcoat without sanding to bare wood.
- Replacement removes the old boards and installs new flooring.
Can Your Floor Be Refinished? Two Quick Tests
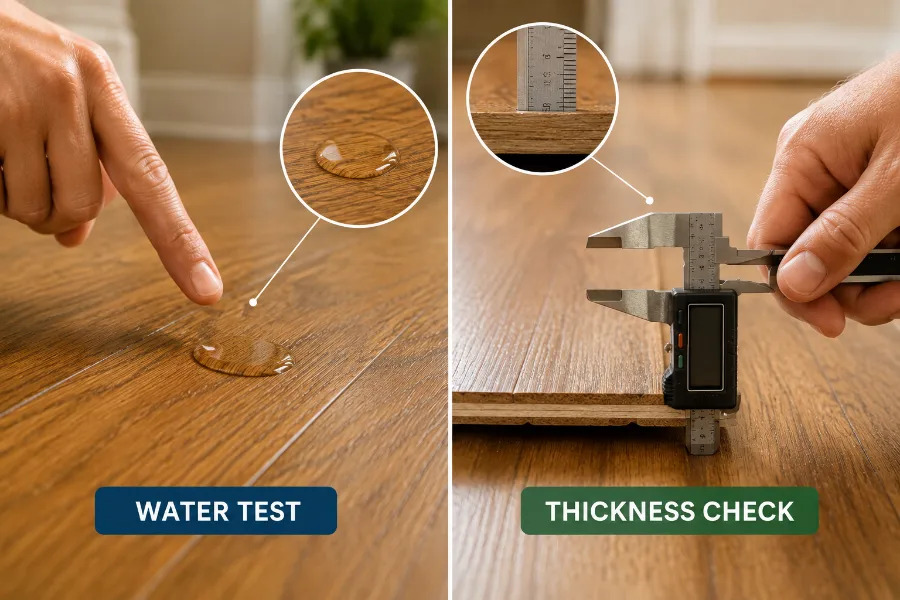
Two checks tell you almost everything before you spend any money.
The Water Drop Test
Sprinkle a few drops of water on a worn traffic lane. If the water beads on the surface, the finish still protects the wood, and a clean or a screen and recoat is enough. If the water soaks in within a minute or two, the finish has worn through and the floor needs full refinishing.
The Thickness Check
Remove a floor vent or lift a threshold and look at the plank edge. Measure the wood above the tongue. That layer is all the sanding the floor can ever take.
| Floor type | Wood above the tongue | How many full sandings |
| Solid hardwood, 3/4 inch (19 mm) | About 1/4 inch (6 mm) | Roughly 4 to 6 |
| Engineered wood, 4 to 6 mm wear layer | 4 to 6 mm | 1 to 3 |
| Engineered wood, 2 to 3 mm wear layer | 2 to 3 mm | 0 to 1 (pro only) |
| Engineered wood, under 2 mm | Under 2 mm | None. Screen and recoat only |
| Thin strip flooring, 1/4 inch (6 mm), often face-nailed | Often no tongue; the whole board is thin | Light sanding or screening only |
Thin floors need a gentler method. On old 1/4 inch strip floors or thin engineered boards, a drum sander can cut through to the tongue or expose nail heads in one pass. Use an orbital floor sander or a buffer with an abrasive screen, and stop as soon as the old finish is gone.
Other Problems to Check
While you are at floor level, look for loose boards, cupping (board edges higher than the centre), crowning (centre higher than the edges), water damage near sinks and dishwashers, and dark pet or water stains. Deep black stains have soaked into the wood fibres, and sanding will not lift them. Those boards need replacement before refinishing.
Refinish, Screen and Recoat, or Replace?
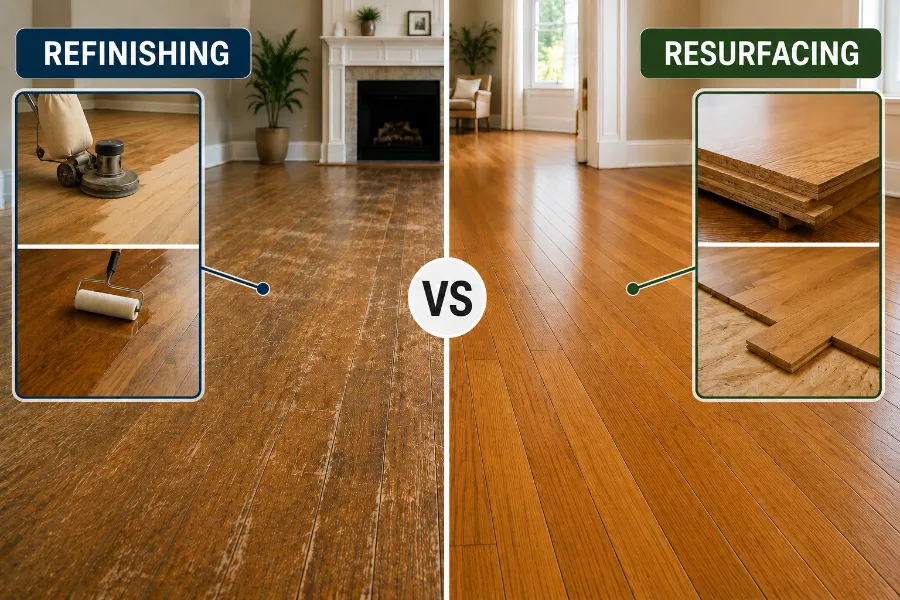
People often use “refinishing” and “resurfacing” as if they mean the same thing. They do not, and the difference can change your budget by thousands.
| Screen and recoat | Full refinish | Replace | |
| What it does | Scuffs the old finish, adds 1 to 2 new coats | Sands to bare wood, new stain and finish | Removes old boards, installs new floor |
| Fixes | Dullness, light surface scratches | Deep scratches, worn lanes, colour change | Rot, severe water damage, no wood left |
| Time | 1 day | 3 to 7 days | 1 to 2 weeks |
| Typical cost | $1 to $2 per sq ft | $3 to $8 per sq ft | Highest |
| Uses wood thickness? | No | Yes | Not applicable |
Choose screen and recoat when the water test beads and the floor only looks tired. Choose a full refinish when the finish has worn through, scratches reach the wood, the sheen is patchy, or you want to change the hardwood floor colour. Choose replacement when boards are rotten, badly cupped from water damage, or have no wear layer left.
One rule saves money: recoat early and often. Regular recoating can delay a full refinish by a decade or more. Once bare wood shows, screening is no longer possible.
Tools and Materials for Refinishing Hardwood Floors
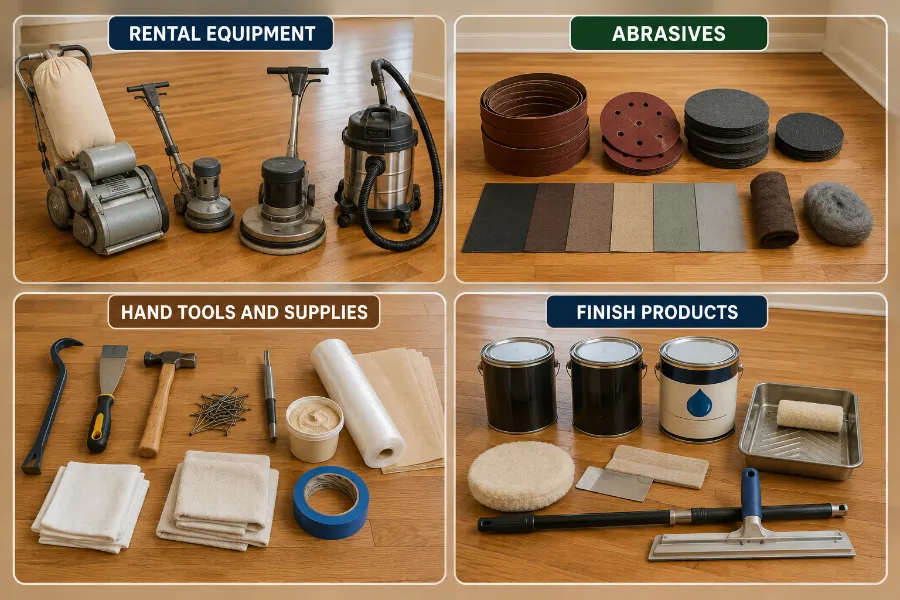
Gather everything before day one. A missing applicator at 6 pm stops the whole job.
Rental equipment
- Drum sander or belt sander for the main floor (fastest, highest risk)
- Orbital floor sander (slower, much safer for beginners and flat floors)
- Floor edger for perimeters and closets
- Floor buffer with abrasive screens
- Shop vacuum with a HEPA filter
Abrasives
- Sanding belts or discs in 36, 40, 60, 80 and 100 grit
- Screening pads in 100 or 120 grit for the buffer
- 220 grit paper or #000 steel wool for light sanding between coats
Hand tools and supplies
- Pry bar, putty knife, hammer, nail set and finish nails
- Wood filler matched to your wood species
- Pull scraper for corners
- Plastic sheeting, painter’s tape and rosin paper
- Pencil (for the sanding check described in Step 3)
- Tack cloths, microfiber pads and clean cotton rags
- A metal can with a tight lid, for used oily rags
Finish products
- Wood floor stain (only if you are changing the colour)
- Sanding sealer compatible with your topcoat (for a natural look)
- Water based polyurethane, oil based polyurethane, or hardwax oil
- Lambswool applicator, cut-in pad and 12 inch T-bar
Safety gear
- Respirator rated for organic vapours (a paper dust mask is not enough)
- Safety glasses, ear protection and knee pads
Rent the sander for the full number of days you need, not one day. Most rooms take longer than beginners expect.
Sanding Grit Chart
Use this sequence on solid hardwood in normal condition. Start coarser only for very thick old finishes or heavy damage, and start finer on thin or engineered floors.
| Pass | Machine | Grit | Purpose |
| 1. Rough cut | Drum sander + edger | 36 or 40 | Removes old finish, levels boards |
| 2. Medium cut | Drum sander + edger | 60 | Removes rough-cut scratches |
| 3. Fine cut | Drum sander + edger | 80 | Smooths the surface |
| 4. Final cut | Drum or orbital sander | 100 | Prepares wood for stain |
| 5. Blending | Buffer with screen | 100 or 120 | Blends drum and edger marks |
| Between coats | Hand or buffer | 220 or #000 steel wool | Helps the next coat bond |
Never skip a grit. Each grit removes the scratch pattern left by the one before it. Jumping from 40 to 100 leaves deep scratches that stain turns into dark streaks.
6 Steps to Refinish Hardwood Floors
Step 1: Clear the Room and Seal It Off
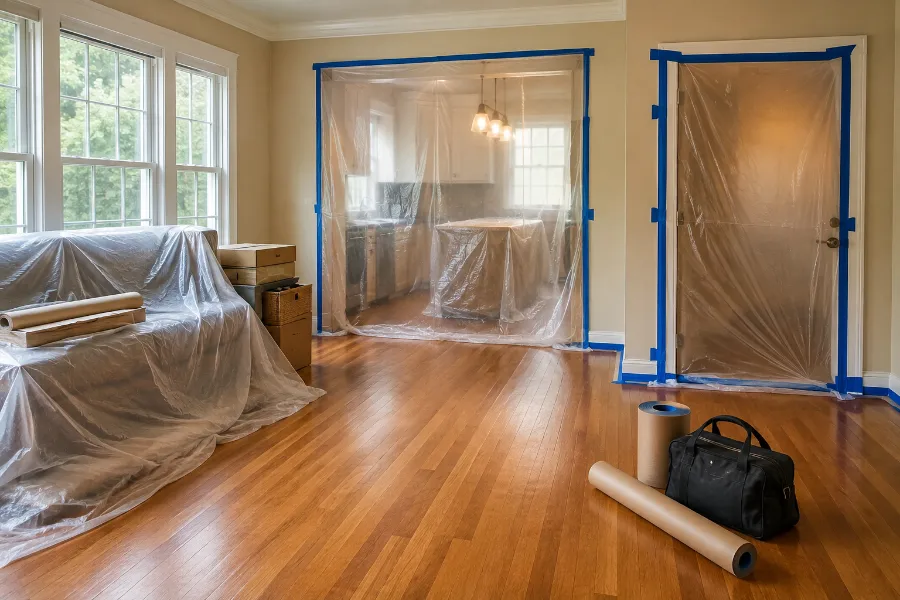
Empty the room completely and seal it from the rest of the house, because sanding dust travels everywhere.
Remove furniture, rugs, curtains and wall art. Pry off the shoe moulding or quarter round where the floor meets the wall. Slip a scrap of wood behind the pry bar so you do not dent the baseboard, and number each piece on the back so reinstallation goes quickly.
Turn off the air conditioning or heating system during sanding and cleanup. A running system pulls fine dust into the ducts and blows it back into every room for months. Seal all vents and returns with plastic and tape, hang plastic over doorways, and cover light fixtures, blinds and built-in shelves. When the job is finished, vacuum the vent openings and replace the AC filter.
Finally, vacuum and wipe the floor. Grit trapped under a sanding belt causes gouges.
Step 2: Repair the Floor Before You Sand
Fix nails, loose boards and damage first, because sanding exposes everything you miss.
Slide a putty knife flat across the boards. Every click marks a raised nail head. Sink each one at least 1/8 inch (3 mm) below the surface with a nail set. A single proud nail can tear a sanding belt and scar the floor.
Walk the room and listen for squeaks. Secure loose boards with finish nails driven at an angle into the subfloor, and predrill so the hardwood does not split. Replace boards with rot, deep gouges or black stains.
Fill nail holes, small splits and narrow gaps with wood filler. For a deep dent, lay a damp cloth over it and press a warm iron on it for a few seconds; the swollen fibres often lift. Light scratches need nothing, because sanding removes them.
Leave wide seasonal gaps alone. Filler in a wide gap cracks and falls out when the boards move. For general filling across a large area, wait until after the first sanding pass, when the gaps are open and clean.
Step 3: Sand the Floor from Coarse to Fine
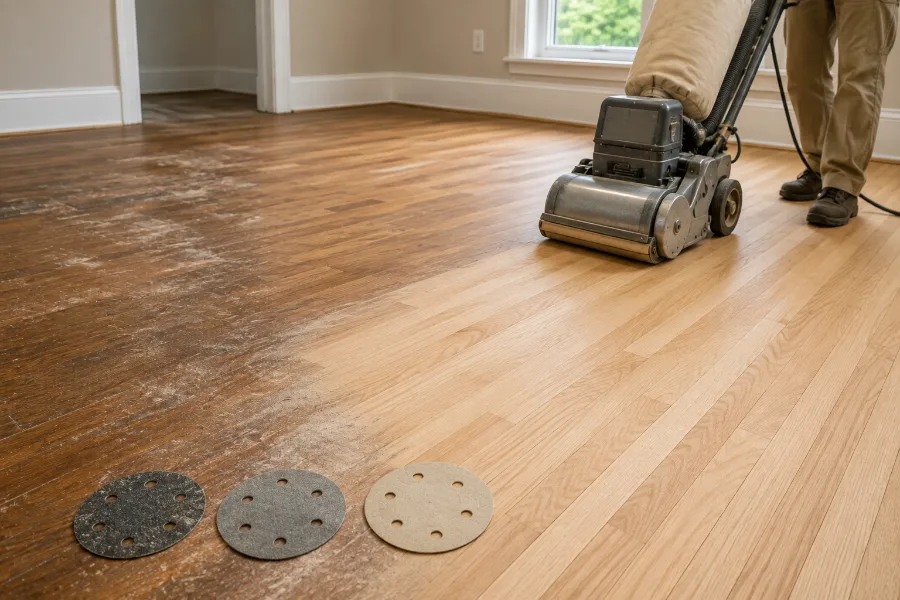
This step carries all the risk, so practise first and keep the machine moving.
A drum sander removes wood quickly. A two-second pause leaves a dip in the boards that shows in side light forever. Practise on a sheet of scrap plywood or inside a closet until starting and stopping feel natural.
Drum sander or orbital sander? A drum sander is fastest and is needed for cupped or uneven floors. An orbital floor sander is slower but far more forgiving, does not leave directional gouges, and suits beginners, flat floors and thin engineered boards.
Rules for the drum sander
- Sand with the grain, along the length of the boards.
- Lower the drum only while the machine is already moving forward.
- Never stop moving with the drum on the floor.
- Work in passes of 3 to 4 feet (1 to 1.2 m), forward then back.
- Overlap each pass by at least one third of the belt width.
- Lift the drum before you change direction.
Follow the grit chart above. Change the belt roughly every 250 sq ft (23 m²), because a dull belt burnishes the wood instead of cutting it, and burnished wood rejects stain. Vacuum thoroughly between every grit change.
Use the pencil trick. Before each new grit, draw light pencil lines across the floor, especially near the walls. When every line has disappeared, that area is fully sanded at the current grit.
Match the edger to the drum. After each drum pass, sand the perimeter, closets and tight areas with the edger at the same grit. If you ran 60 grit with the drum, run 60 grit with the edger before either machine moves to 80. Mismatched grits leave a visible halo around the room. Keep the edger moving in overlapping arcs, since it cuts as fast as a drum sander.
Scrape corners and stair nosings by hand with a sharp pull scraper, then hand sand them to the same grit as the rest of the floor.
For badly cupped or uneven floors, make the first coarse pass at 45 degrees to the boards, then bring every later pass back in line with the grain.
Step 4: Screen Sand, Then Remove Every Trace of Dust
Screening blends all machine marks into one even surface, and cleaning decides whether the finish looks professional.
Fit the buffer with a 100 or 120 grit screen and move in broad, overlapping arcs across the whole floor. The buffer swings left or right as you raise or lower the handle, so guide it gently instead of fighting it. Professionals credit this pass for the difference between a good result and an obvious DIY job; skip it and side lighting will show every seam between the drum and edger.
Then clean as if the finish depends on it, because it does:
- Vacuum the floor, walls, window sills and baseboards.
- Vacuum the floor a second time, along and then across the boards to clear the gaps.
- Wipe the floor with a tack cloth or a barely damp microfiber pad.
- Wait an hour for airborne dust to settle, then wipe again.
Every speck left behind becomes a permanent bump under the topcoat. Dust bags on the drum sander and edger capture a useful amount of dust, so empty them often, and empty them outdoors.
Step 5: Apply the Wood Floor Stain (Optional)
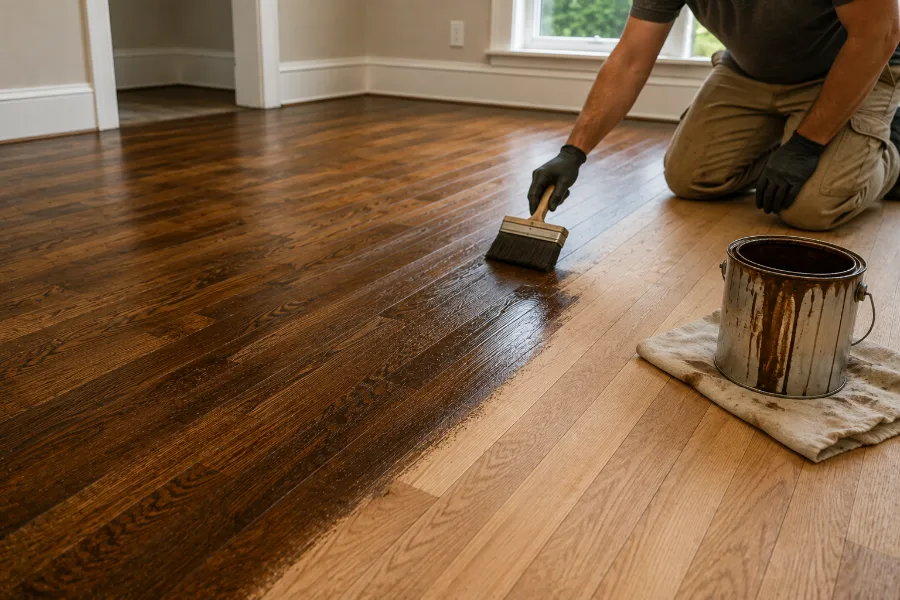
Skip staining for a natural look and go straight to a sanding sealer; stain only when you want to change the colour.
Always test first. Apply two or three stain colours on an inconspicuous patch of the actual floor, let them dry, and view them in daylight and lamplight. Colour shifts dramatically between species:
- Red oak pulls pink tones, especially under grey and white stains.
- White oak stays neutral and takes most stains evenly.
- Maple blotches easily and usually looks best with a clear finish.
Also test the topcoat over the stain sample, because a clear coat deepens and warms the colour noticeably.
Water popping gives deeper, more even colour. Wipe the sanded floor with a damp mop in one direction and let it dry for a few hours. The raised grain absorbs more pigment and evens out absorption on tricky species. Test it first, because it darkens the result.
Application
- Work in sections of about 4 sq ft (0.4 m²).
- Apply stain with a foam pad or rag, following the grain.
- Wipe off the excess after the time on the label, usually 2 to 5 minutes.
- Keep a wet edge and never let a section dry before you blend the next.
- Plan your route so you finish at the doorway.
Two people work better than one here: one applies, one wipes. Lap marks appear wherever stain dries before wiping.
Let the stain dry fully before the topcoat. Oil based stain usually needs 12 to 24 hours, and humid weather extends that. A topcoat over damp stain stays soft and cloudy.
Step 6: Build the Protective Finish
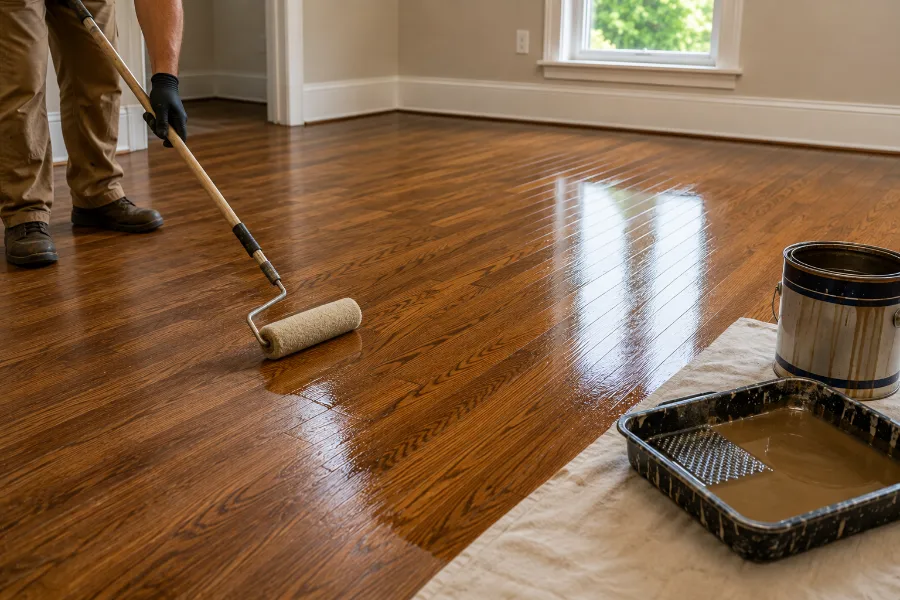
The topcoat does the real work, so choose your finish system before you start.
| Water based polyurethane | Oil based polyurethane | Hardwax oil | |
| Look | Clear, does not yellow | Warm amber tone that deepens | Natural, matte, low sheen |
| Dry time per coat | 2 to 4 hours | About 24 hours | Varies by product; follow the label |
| Odour | Low | Strong; respirator needed | Low to moderate |
| Coats needed | 3 to 4 | 3 | Usually 1 to 2 |
| Ease of use | Dries fast, less forgiving | Flows out, forgiving | Easy; spot repairs possible |
| Cost | Higher | Lower | Higher |
| Best for | Modern light floors, homes that stay occupied | Traditional warm look, budget jobs | Engineered wood, natural matte look |
Premium two-component water based finishes match or beat oil based polyurethane for durability. Hardwax oil penetrates the wood instead of forming a film, so worn spots can be touched up without sanding the whole floor.
Choose Your Sheen
| Sheen | Look | Hides scratches and dust | Best for |
| Matte | Flat, natural wood | Best | Busy homes, pets, children |
| Satin | Soft low glow | Very good | Most homes; the most popular choice |
| Semi-gloss | Noticeable shine | Fair | Formal rooms |
| Gloss | Mirror-like | Poor | Low-traffic, showpiece rooms |
Polyurethane application
- Cut in the perimeter with a brush or pad, about 6 inches (15 cm) out from the wall.
- Pour a line of finish and pull it with a lambswool applicator or T-bar.
- Work along the grain in long, even strokes and keep a wet edge.
- Keep each coat thin. Puddles cure soft and cloudy.
- Sand lightly between coats with 220 grit paper or #000 steel wool.
- Vacuum and tack the floor before each new coat.
Apply three coats of oil based finish or three to four coats of water based finish. Two coats are enough only in low-traffic rooms.
Control your working conditions. Aim for 60 to 80°F (16 to 27°C) and 40 to 60 percent relative humidity. Cold slows curing, and high humidity can turn water based finish cloudy. In hot climates with constant air conditioning, keep the AC off during application to avoid dust and fast surface drying, then run it on a moderate setting between coats to keep temperature and humidity in range.
How to Screen and Recoat a Hardwood Floor
Screen and recoat refreshes a dull floor in one day without sanding to bare wood. Use it only when the water drop test beads and no bare wood shows.
- Clean deeply. Remove all wax, polish and oil soap residue with a wood floor cleaner. New finish will not bond over wax or silicone polishes.
- Hand sand the edges about 6 inches (15 cm) out from the wall with 120 to 150 grit, where the buffer cannot reach.
- Screen the floor with a buffer and a 120 to 150 grit screen or a maroon abrasive pad, moving with the grain. The old finish turns to white powder, which shows where you have been. Stop if you see colour or bare wood.
- Vacuum and tack the floor twice.
- Apply one or two coats of a compatible topcoat with a T-bar or applicator.
- Let it cure using the timeline below.
Check compatibility first. Test a small area with your new finish over the old one. If the new coat beads, peels or stays tacky, the floor needs a full refinish instead.
Drying vs Curing: When Can You Use the Floor?
Dry to the touch does not mean ready for use. Curing continues for days or weeks as the finish hardens.
| Milestone | Water based polyurethane | Oil based polyurethane |
| Socks only | 4 to 6 hours | About 24 hours |
| Light foot traffic | 24 hours | 48 to 72 hours |
| Furniture back (with felt pads) | 3 to 4 days | 7 days |
| Rugs and pets | 7 days | 30 days |
| Full cure | 7 to 14 days | About 30 days |
Rugs trap solvent and can leave permanent outlines on uncured finish, and furniture legs dent it. Lift furniture into place instead of sliding it.
Check your rug pads. Some PVC rug pads react with certain floor finishes and leave a pattern. Choose natural rubber or felt pads labelled as safe for finished wood floors.
Reinstall the shoe moulding once the finish handles light traffic. Painted quarter round suits most modern rooms better than stained moulding, and it hides small gaps along uneven walls.
How Much Does It Cost to Refinish Hardwood Floors?
Professional refinishing typically costs $3 to $8 per sq ft, and DIY costs about $1 to $3 per sq ft in rentals and materials. The floor’s condition affects the price more than anything else.
Professional Refinishing Costs
| Service | Cost per sq ft | Cost per m² |
| Screen and recoat | $1 to $2 | $11 to $22 |
| Sand and clear finish | $3 to $5 | $32 to $54 |
| Sand, stain and multiple coats | $5 to $8 | $54 to $86 |
| Area | Typical total |
| 300 sq ft (28 m²) | About $900 to $2,400 |
| 500 sq ft (46 m²) | About $1,500 to $4,000 |
| 1,000 sq ft (93 m²) | About $3,000 to $8,000 |
Labour makes up most of the price, which is why costs vary so much between cities.
What pushes the price up
- Small rooms, because most contractors charge a minimum fee
- Softwoods such as pine and fir
- Extra coats beyond the standard two or three
- Colour changes, board replacement, or carpet and staple removal
- Stairs, usually priced per tread
- Herringbone, chevron and parquet patterns
- Dustless sanding systems, when charged separately
DIY Refinishing Costs
| Item | Typical cost |
| Drum sander rental | $60 to $100 per day |
| Edger rental | $40 to $55 per day |
| Buffer rental | $30 to $50 per day |
| Belts, discs and screens | $50 to $150 |
| Stain | $40 to $80 |
| Polyurethane (covers 400 to 500 sq ft per coat) | $50 to $80 per gallon |
| Applicators, plastic, tape, filler, safety gear | $100 to $200 |
A 500 sq ft room typically costs $400 to $1,200 to refinish yourself, against $1,500 to $4,000 for a crew. That saves roughly 50 to 70 percent.
Budget for the cost of a fix. If drum marks or edger swirls appear, a professional must sand out your work before doing their own, and that repair can cost more than hiring them from the start.
Hiring a Professional: Questions to Ask
Ask these questions before you sign a quote, because they decide the dust, the timeline and the final look.
- Do you use dustless sanding equipment, and is it included in the price?
- Who removes and reinstalls the shoe moulding, and is it extra?
- Which finish brand and system do you use, and how many coats?
- Will you test stain colours and sheens on my actual floor first?
- How many days will the job take, and when can I walk on the floor and move furniture back?
- Is wood filler, board replacement or stair work included?
- What warranty do you give on the finish?
- Which cleaning products should I use afterward?
Plan Ahead Before You Refinish
Make any layout changes before refinishing, so you never have to refinish the same floor twice.
- Remove fixtures you plan to replace. If a toilet, vanity or kitchen island will change soon, remove it first. Otherwise the new piece may expose an unfinished outline.
- Do stair railing work first. Remove balusters you plan to replace before sanding, because sanding between them by hand is slow and costly.
- Refinish before you move in if you can. An empty house makes the job faster, cleaner and cheaper.
- Plan where you will stay. Water based finishes usually let you stay home if the room is closed off. Oil based fumes often mean two or three nights away.
- Arrange storage. Furniture needs to stay out until the finish can take weight, which can be up to a week for oil based products.
Safety Rules for Refinishing Hardwood Floors
Refinishing involves heavy machines, fine dust and flammable products, so follow these rules on every job.
- Oily rags can catch fire on their own. Rags soaked with oil based stain, oil based finish or hardwax oil heat up as they dry. Lay them flat outdoors to dry, or store them in a sealed metal can filled with water, then dispose of them according to local rules.
- Sanding dust is flammable. Empty sander bags and vacuums into an outdoor bin, never into an indoor trash can.
- Protect your lungs. Wear a respirator rated for organic vapours when applying oil based products, and a dust-rated respirator when sanding.
- Ventilate during application. Open windows and use fans to move fumes out, not through the house.
- Switch off gas appliances, open flames and other ignition sources in or near the room when using solvent-based products.
- Wear eye and ear protection whenever a sander or buffer is running.
- Read the machine’s manual and ask the rental shop for a demonstration before you start.
Common Mistakes That Ruin a Refinishing Job
- Pausing the drum sander on the floor. It gouges the wood in seconds. Keep moving whenever the drum touches down.
- Skipping grits. A jump from 40 to 100 leaves scratches that stain turns into dark streaks.
- Mismatching the edger and the drum. Run the same grit on both machines before stepping up.
- Sanding across the grain on the final passes. Cross-grain scratches never disappear under finish.
- Leaving nails proud. One nail head tears a belt and scars the boards.
- Running the AC during sanding. It spreads dust through the whole house.
- Cleaning carelessly. Dust trapped in the finish is permanent.
- Applying finish too thickly. Thick coats stay soft, turn cloudy and peel.
- Ignoring temperature and humidity. Both change how the finish flows and cures.
- Walking on the floor too early. Footprints in soft finish mean sanding it back.
- Painting yourself into a corner. Plan every coat so you exit through the door.
- Refinishing a floor with no wood left. Measure the wear layer first.
- Rushing the stain. A topcoat over damp stain never hardens properly.
- Throwing oily rags in a bin. They can ignite. Dry them flat outdoors.
Hardwood Floor Maintenance After Refinishing
Good habits can stretch the life of a finish from about five years to fifteen.
Daily and weekly
- Sweep or dust mop several times a week, because grit acts like sandpaper underfoot.
- Vacuum with a hard-floor setting and no beater bar.
- Wipe spills immediately.
Cleaning
- Use a pH-neutral hardwood floor cleaner and a barely damp mop.
- Never wet mop, and never let water stand on the boards.
- Avoid vinegar, ammonia, oil soaps and steam mops, which dull or soften the finish.
- For a full routine, see our guide on how to clean hardwood floors.
Protection
- Put felt pads under every furniture leg and replace them yearly.
- Place mats at exterior doors and encourage a no-shoes habit.
- Trim pet nails.
- Add a rug in high-traffic lanes, with a rug pad safe for wood finishes.
- Keep indoor humidity between 35 and 55 percent to limit board movement.
- Use blinds or curtains to slow uneven fading in sunny rooms.
Long-term care
- Watch the traffic lanes, because the finish always wears there first.
- Book a screen and recoat every three to five years in busy homes.
- Repeat the water drop test once a year.
That recoating habit is the real secret to hardwood floor restoration. Each screen and recoat costs a fraction of a full refinish and uses no wood thickness, so full refinishing becomes a rare event instead of a recurring expense.
Frequently Asked Questions
How long does it take to refinish hardwood floors? A single room takes about three to five days with water based finish and up to a week with oil based products. Sanding takes one to two days. The rest is coating and drying time between coats. Full curing continues for one to four weeks afterward.
Can I refinish hardwood floors without sanding? Yes, if the existing finish is intact. A screen and recoat lightly abrades the old finish and adds a new topcoat without sanding to bare wood. It works for dull or lightly scratched floors, but it cannot fix deep scratches, bare spots or colour problems.
How many times can a hardwood floor be refinished? A 3/4 inch solid hardwood floor can usually be fully sanded about four to six times. Engineered wood can be sanded zero to three times, depending on the thickness of its wear layer. Measure the wood above the tongue before any sanding.
Can engineered wood floors be refinished? Yes, if the wear layer is about 3 mm or thicker. Boards with a 4 to 6 mm wear layer can usually be sanded one to three times. Boards under 2 mm should only be screened and recoated. Use an orbital sander or a professional for engineered floors.
Is it cheaper to refinish or replace hardwood floors? Refinishing is almost always cheaper. It costs about $3 to $8 per sq ft, while replacement adds new material, removal and installation costs. Replacement makes sense only when boards are rotten, badly water damaged or have no wear layer left.
Can I stay in the house while floors are refinished? Usually yes with water based finish, if you can close off the room. Oil based fumes are strong and often mean leaving for two or three nights. Plan to stay off the floor itself until it can take light foot traffic.
Which sheen is best for hardwood floors? Satin is the most popular choice because it has a soft glow and hides scratches well. Matte hides wear best and suits homes with pets and children. Gloss looks dramatic but shows every scratch, footprint and speck of dust.
Is water based or oil based polyurethane better for floors? Water based polyurethane stays clear, has low odour and dries in two to four hours. Oil based polyurethane costs less, flows out smoothly and adds a warm amber tone, but each coat needs about 24 hours. Premium two-component water based finishes are as durable as oil.
Do I have to remove the baseboards? No. An edger and hand scraping reach within an inch or two of the wall. Removing only the shoe moulding or quarter round gives most of the benefit with much less work.
Is dustless sanding really dust free? No. Dustless systems capture most of the dust at the machine, which helps a great deal, but fine dust still settles on walls and surfaces. Cover shelves and fixtures and plan to wipe surfaces afterward.
Can I refinish a floor that squeaks? Fix the squeaks first. Sanding does not stop movement between the boards and the subfloor. Secure loose boards with angled finish nails or screws into the joists before you sand.
The Bottom Line
Hardwood floor refinishing rewards preparation. Confirm the floor has enough wood, repair the boards, respect the grit sequence, keep the air conditioning off during sanding, remove every trace of dust, and give the finish time to cure. Do that, and a decades-old floor can look new again for a fraction of the cost of replacement.
Match the job to your skill honestly. A plain oak room with a clear satin finish suits a careful first-timer with an orbital sander. A dark stain across a herringbone or parquet floor belongs to someone who does this every week.

Noah Williams
Interior Designer & Flooring Expert
Related Posts