Noah Williams is an interior designer and flooring expert at Nova Floor. In Dubai, he helps people pick the right floor, get it installed, and keep it looking good. He also writes simple, practical flooring and home care guides for readers in Dubai and around the world.
Tongue and Groove Flooring Guide | What It Is, How It Works, Types & Benefits
Noah Williams
Tongue and groove flooring is a system where each board has a raised ridge on one edge and a matching slot on the other. The ridge of one board slides into the slot of the next. The boards lock together and form one flat, continuous surface.
It is one of the oldest and most reliable ways to build a floor. It is also one of the most misunderstood. Many people think it describes a material. It does not. It describes a joint.
This guide by Nova Floor Experts explains how the system works, which materials use it, how it is installed, and what to check before you buy.
Contents
What Is Tongue and Groove Flooring?
Tongue and groove flooring is a floor made from boards that interlock along their edges instead of simply sitting side by side.
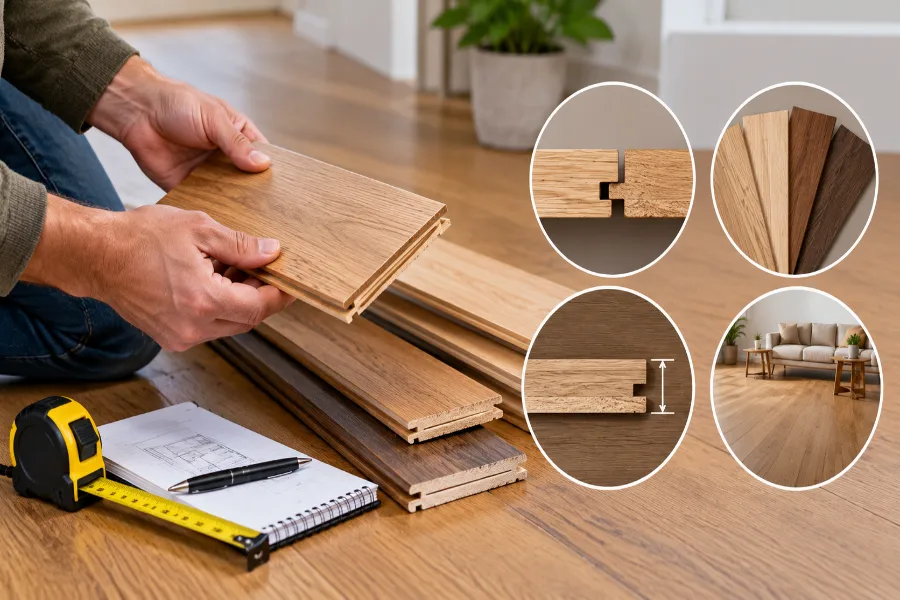
Each board has two parts:
- The tongue. A thin ridge milled along one long edge, and usually one short edge.
- The groove. A channel cut into the opposite long edge and opposite short edge.
Push the tongue into the groove and the two boards lock in the vertical direction. Neither board can lift or drop independently of its neighbour. Repeat this across a room and you get a floor that behaves as a single connected surface rather than a set of loose planks.
You will see the term written several ways: tongue and groove, tongue-and-groove, T&G, or “tongue in groove.” They all mean the same thing.
What Does “Tongue and Groove” Actually Mean?
Tongue and groove is a woodworking joint, not a flooring material. Carpenters have used it for centuries in panelling, ceilings, doors, cabinets, and even the hulls of wooden boats.
The idea is simple. Two flat pieces of timber butted edge to edge will move apart, lift unevenly, and open up gaps. Cutting a matching ridge and slot into those edges solves the problem without any visible fastener.
Because it is a joint and not a product, you will find tongue and groove boards in solid wood, engineered wood, laminate, vinyl, bamboo, and even structural subfloor panels.
How the Tongue and Groove System Works
Understanding the mechanics helps you spot quality and avoid installation mistakes.
The Anatomy of a Board
Look closely at a plank of solid or engineered wood flooring. You will find:
- A groove on one long edge and one short edge.
- A tongue on the other long edge and other short edge.
- A shoulder above and below the tongue that carries the load.
- A slightly shorter tongue than the groove is deep.
That last point surprises people. The tongue is deliberately milled a fraction shorter than the groove. This leaves a small void at the bottom of the joint. It gives glue somewhere to sit and stops the boards from bottoming out before their faces sit flush. If the tongue were a perfect fit, the smallest speck of sawdust would leave a lip on the surface.
Most boards also have a slight relief or hollow milled into the underside. This lets the plank sit flat on a subfloor that is not perfectly level.
How Boards Lock Together
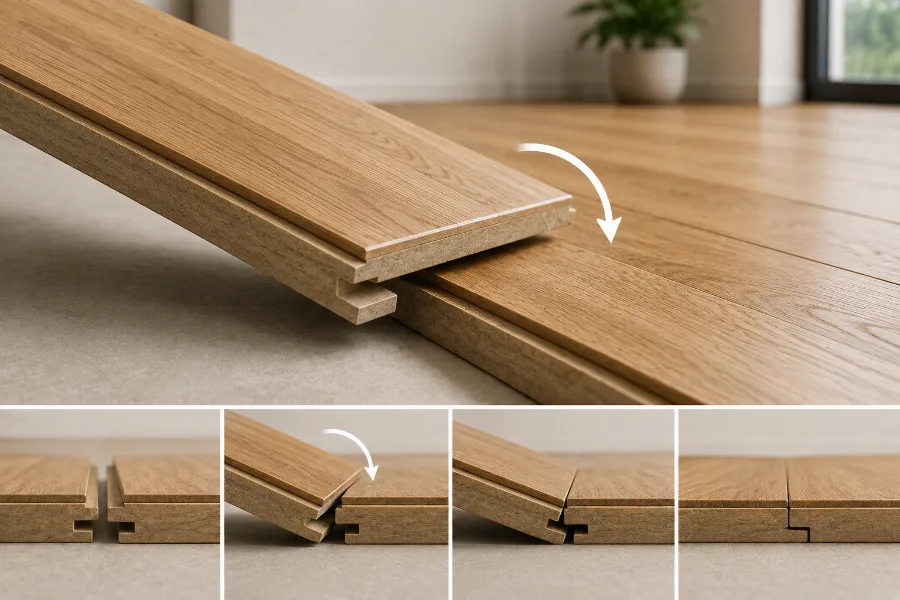
Installation follows a repeating pattern. The fitter holds the new board at an angle, engages the tongue in the groove of the board already laid, then drops it flat. As it drops, the joint pulls tight.
For stiffer boards, a tapping block and mallet close the joint. A pull bar does the same job on the last row, where there is no space to swing a mallet.
The result is a tight seam with almost no visible gap.
Why the Joint Stays Hidden
In nail-down and staple-down installations, the fixing goes through the tongue at roughly a 45-degree angle. The next board’s groove then covers the fastener completely.
This is called secret nailing or blind nailing. It is the reason a traditional hardwood floor shows no nail heads across its surface.
Why the Floor Needs Room to Move
Wood is hygroscopic. It absorbs moisture from the air in humid months and releases it in dry ones. A floor can grow and shrink by several millimetres across a large room over the course of a year.
Tongue and groove handles this well, but only if the floor has somewhere to expand. Fitters leave an expansion gap around the whole perimeter, typically around 10–15 mm (roughly half an inch), and cover it with skirting or beading. Manufacturers publish their own figure, and wide rooms usually need more.
Skip the gap and the floor has nowhere to go. It pushes against the walls and lifts in the middle. Fitters call this peaking.
Why This Flooring Method Is Used
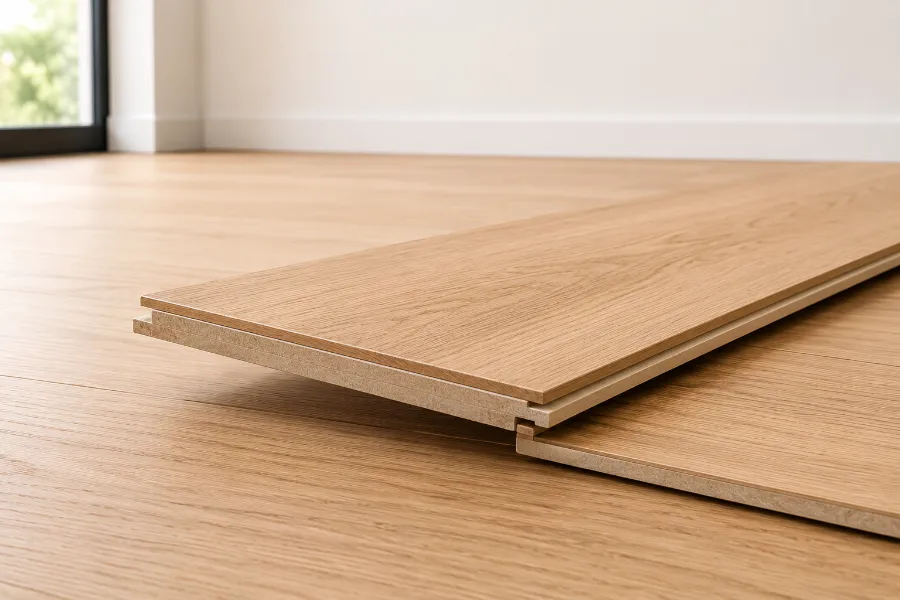
Tongue and groove has survived centuries of competing ideas for good reasons.
It shares load between boards. Step on the edge of a board and its neighbour helps carry the weight. Unconnected boards flex independently, which creates movement, noise, and uneven wear along the seams.
It keeps the surface flat. The joint prevents one board from sitting proud of the next. You get a smooth floor that is comfortable underfoot and easy to clean.
It hides fasteners. No nail heads, no filler, no visible screws.
It speeds up installation. The joint aligns each board for you. There is less measuring, less fiddling, and less room for drift across a room.
It restricts what gets into the seams. A tight joint limits dirt, dust, and surface spills reaching the subfloor. It is not waterproof, but it performs far better than a butt-jointed floor.
It supports several fixing methods. The same board can often be nailed, stapled, glued, or floated, depending on the subfloor.
Main Types of Tongue and Groove Flooring
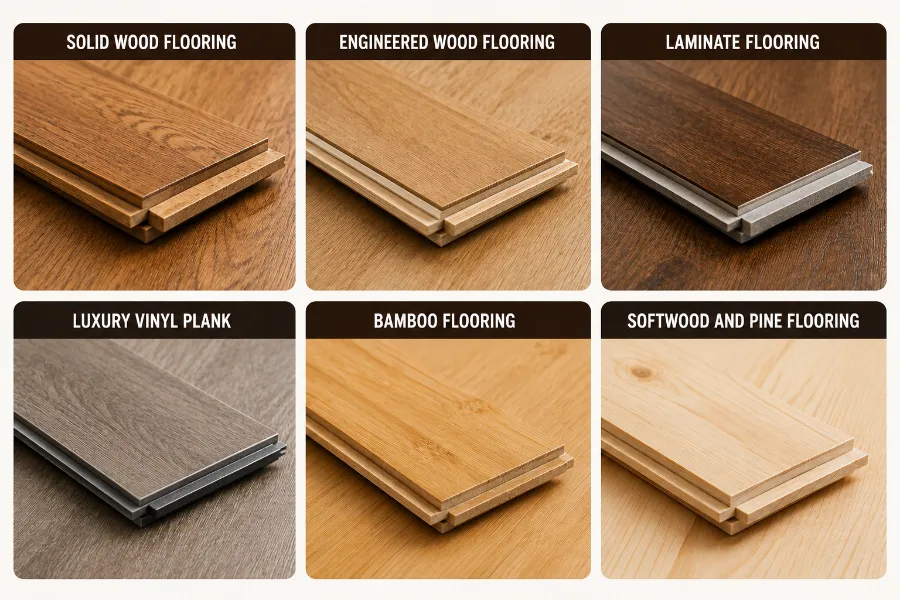
The joint is the same in principle across all of these. The material determines cost, lifespan, and where you can use it.
Solid Wood Flooring
Solid wood flooring boards are milled from a single piece of timber, commonly 18–20 mm (about 3/4 in) thick.
- Features: Full-thickness wood, so it can be sanded and refinished several times over its life. Oak, maple, walnut, ash, and hickory are common.
- Best for: Living rooms, bedrooms, hallways, dining rooms, and period properties.
- Watch out for: Moisture and humidity swings. Solid wood is the most reactive of all the options. It usually needs a timber subfloor for nailing, and most manufacturers do not recommend it over underfloor heating.
- Real-world context: A well-maintained solid oak floor can be sanded back and refinished decades later. This is why solid wood often outlives the building work around it.
Engineered Wood Flooring
Engineered wood Flooring has a real hardwood top layer bonded to a core of plywood, HDF, or cross-laid timber.
- Features: The cross-layered core resists expansion and contraction far better than solid timber. The surface looks identical to solid wood because it is real wood.
- Best for: Kitchens, basements, apartments, wide open spaces, and floors over underfloor heating.
- Watch out for: The wear layer. A 2 mm veneer cannot be sanded meaningfully. A 4–6 mm wear layer can usually take two or three refinishes. This single number drives most of the price difference between engineered products.
- Real-world context: Engineered wood is generally the practical choice for a modern home with underfloor heating, since it moves less with temperature change.
Laminate Flooring
Laminate flooring uses a high-density fibreboard core with a printed decorative layer and a tough resin wear surface.
- Features: Very scratch and dent resistant for the price. Huge range of wood and stone effects. Almost always a floating, click-together system.
- Best for: Rentals, high-traffic family rooms, hallways, and tight budgets.
- Watch out for: Water at the joints. Standard laminate swells if moisture reaches the fibreboard core, and the damage is permanent. Water-resistant grades exist, but check the warranty terms carefully.
Luxury Vinyl Plank (LVP, SPC and WPC)
Vinyl planks are made from PVC layers, often with a rigid mineral or composite core.
- Features: Waterproof core, quiet and warm underfoot, thin profile that suits renovations where floor height matters.
- Best for: Bathrooms, utility rooms, kitchens, basements, and anywhere spills are likely.
- Watch out for: Subfloor flatness shows through thin planks. Cheap vinyl can dent under heavy furniture, and some products discolour in strong direct sunlight.
Bamboo Flooring
Bamboo is a grass, not a timber, but it is milled into tongue and groove planks in the same way.
- Features: Fast-growing raw material. Strand-woven bamboo is notably hard and handles traffic well.
- Best for: Living areas and hallways in stable indoor conditions.
- Watch out for: Humidity. Bamboo flooring reacts to moisture, and quality varies widely between suppliers. Hardness ratings differ a lot between vertical, horizontal, and strand-woven products.
Softwood and Pine Flooring
Pine, Douglas fir, and spruce boards are traditional choices, especially in cabins, cottages, and rustic interiors.
- Features: Warm colour, visible knots and grain, often available in wide boards and long lengths. Usually cheaper per square metre than hardwood.
- Best for: Log homes, holiday properties, attic conversions, and period restorations where the original floor was softwood.
- Watch out for: Softness. Pine dents and marks more easily than oak. Many owners accept this and treat the patina as part of the character.
Tongue and Groove Subfloor Panels
Worth knowing about, because the term appears here too. Structural chipboard and OSB decking panels are made with tongue and groove edges, typically 18 mm or 22 mm thick.
They are glued in the joints and fixed to the joists. They form the flat, load-bearing base that your finished floor sits on. So a project can involve tongue and groove twice: once in the deck below, once in the boards you see.
Types of Tongue and Groove Joints and Profiles
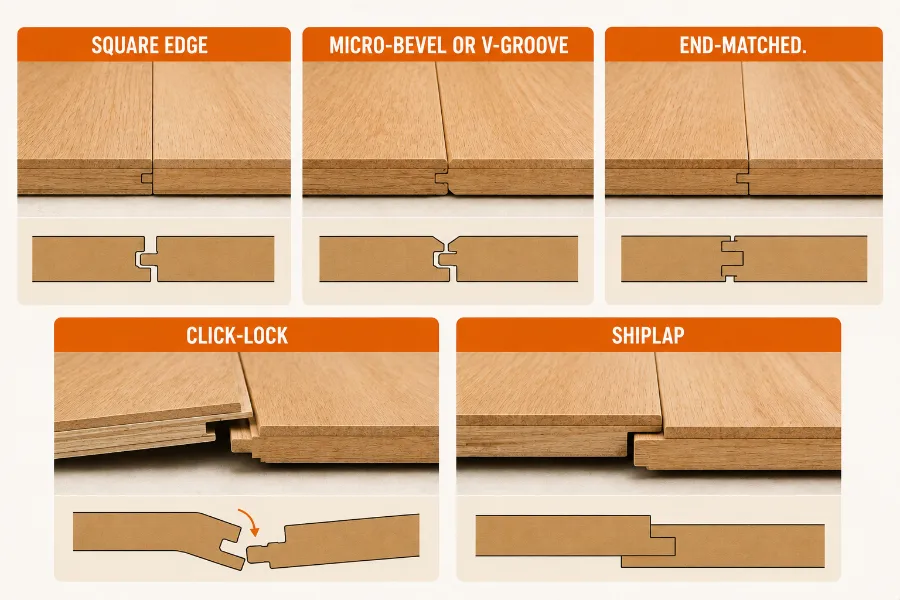
Not all tongue and groove edges look the same once the floor is down.
Square edge. The standard profile. The joint is invisible and the floor reads as one continuous plane.
Micro-bevel or V-groove. A small chamfer on each board edge creates a fine shadow line. It defines each plank visually and hides tiny height differences between boards.
End-matched. The tongue and groove continues on the short edges, not just the long ones. This matters more than it sounds. End-matched boards let you place end joints anywhere, including between joists, and give a tighter finish at every butt joint.
Click-lock (drop-lock and fold-down). A modern evolution of the same idea. The profile is shaped so the boards mechanically lock together without glue or nails.
Shiplap. Often listed alongside tongue and groove, but it is technically different. Shiplap boards have rebated edges that overlap. There is no tongue entering a groove. It is used mainly on walls and ceilings rather than floors.
Installation Methods for Tongue and Groove Flooring
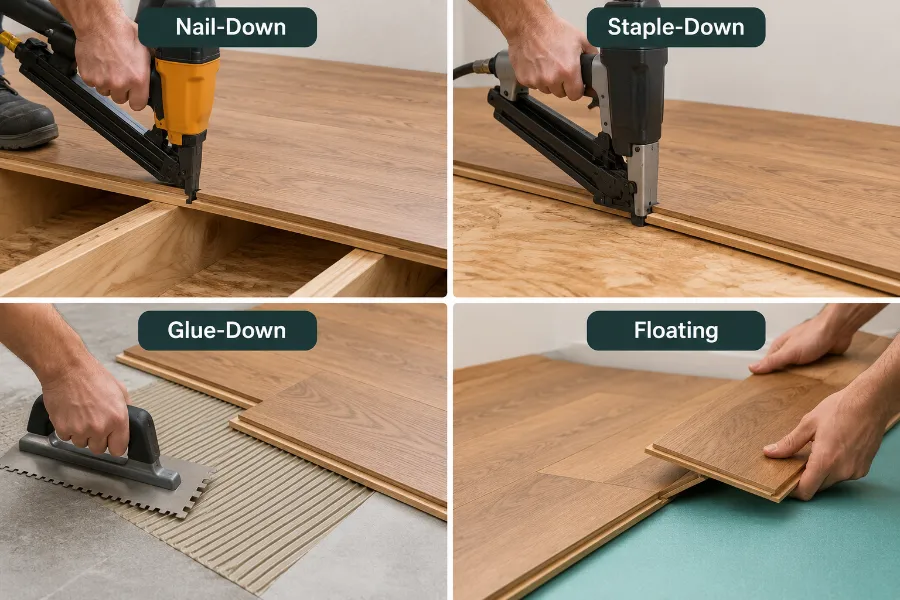
The joint is one thing. How the floor is fixed down is another. This is where most buying guides blur the two.
Nail-Down
Nails or cleats are driven at an angle through the tongue into a timber subfloor.
- Typical use: Solid hardwood over plywood or timber boards.
- Strengths: Very solid, long-established, quiet when done well.
- Limitations: Requires a timber subfloor. Needs a flooring nailer for a good result. Slower than floating.
- Practical note: Fixings are commonly spaced every 200–250 mm (8–10 in) along each board, with extra near the ends. Follow the manufacturer’s specification rather than a rule of thumb.
Staple-Down
Similar to nail-down, but a pneumatic stapler drives staples through the tongue.
- Typical use: Engineered wood over timber.
- Strengths: Faster and cheaper than nailing.
- Limitations: Staples grip tightly and allow the board slightly less natural movement. Poor-quality staples can work loose and cause squeaks.
Glue-Down
Flooring adhesive bonds each board directly to the subfloor.
- Typical use: Engineered wood over concrete, and floors over underfloor heating.
- Strengths: Excellent underfoot feel. No hollow sound. Very good heat transfer from underfloor heating.
- Limitations: Messy, unforgiving, and hard to reverse. Adhesive coverage must be even, and the correct trowel size matters.
Floating
The floor is not fixed to the subfloor at all. It rests on underlay and holds together through its own joints.
- Typical use: Laminate, luxury vinyl, and much engineered wood.
- Strengths: Fastest method. Genuinely DIY-friendly. Works over concrete, plywood, and many existing hard floors.
- Limitations: Can sound hollow without good underlay. Needs a flat subfloor. Older tongue and groove products require glue in the groove; click systems do not.
Tongue and Groove vs Other Flooring Methods
Tongue and Groove vs Click-Lock
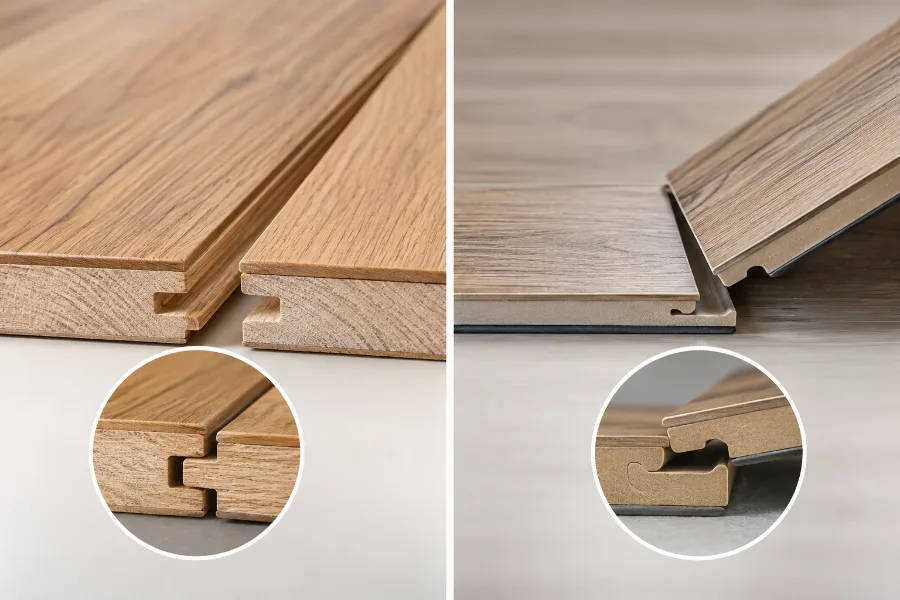
Click-lock is a refined version of the same joint. The difference is mechanical.
Traditional tongue and groove relies on an external fixing to hold the floor together: nails, staples, or glue in the groove. Click-lock profiles are shaped so the boards grip each other on their own.
Click is faster and easier for a first-time installer. Traditional tongue and groove suits nail-down and glue-down installations, which many professionals still prefer for solid wood.
Neither is universally better. The right answer depends on the material and the subfloor.
Tongue and Groove vs Square-Edge Butt-Jointed Boards
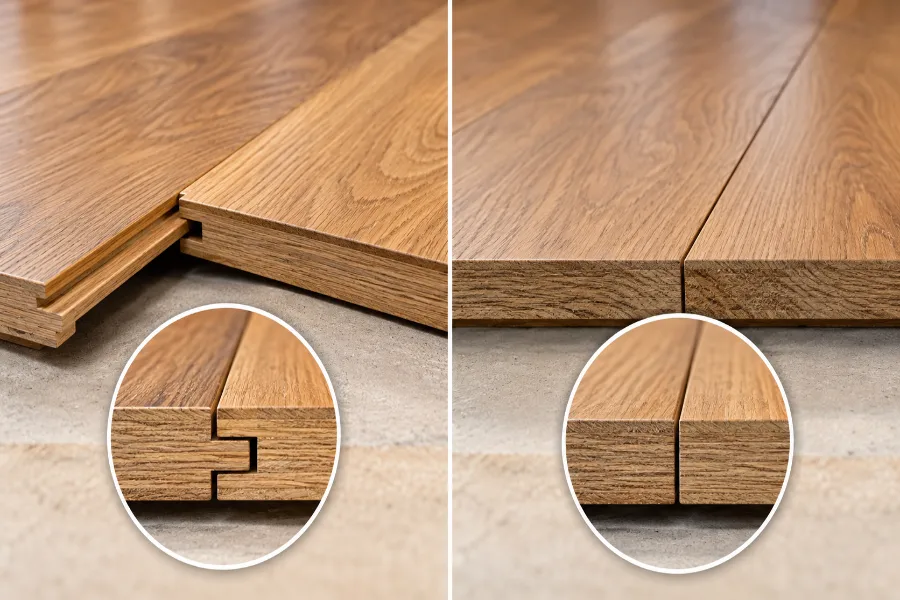
Square-edge boards simply sit next to each other and are face-fixed with nails or screws. You see the fixings, the joints open up over time, and adjacent boards can move independently.
Tongue and groove hides the fixings, resists differential movement, and produces a flatter surface. Square-edge is now mostly used for rustic effects and some reclaimed timber floors.
Tongue and Groove vs Loose-Lay and Sheet Flooring
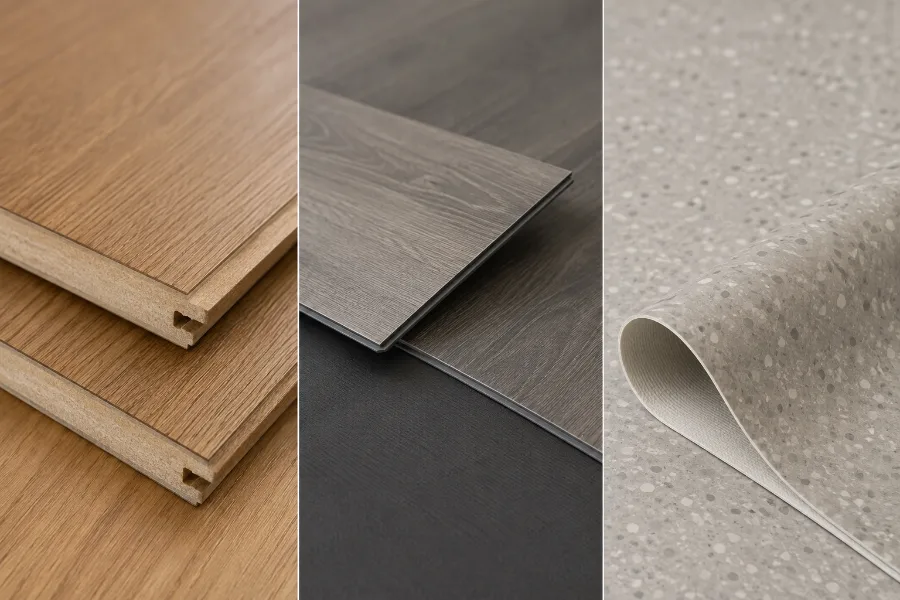
Loose-lay vinyl planks and sheet vinyl have no interlocking edges. They rely on friction, tackifier, or full adhesive.
They are quick to fit and easy to lift, but they do not provide the mechanical connection between boards that gives tongue and groove floors their rigidity.
Advantages and Disadvantages
Advantages
- Strong mechanical connection between every board.
- Flat, level surface with minimal lipping.
- Hidden fasteners and a clean appearance.
- Faster, more accurate installation than face-fixed boards.
- Reduced movement, which means fewer squeaks and open seams.
- Available across almost every flooring material and price point.
- Individual boards can be replaced if damaged.
Disadvantages
- Preparation matters. Uneven subfloors cause squeaks, gaps, and joint failure.
- Boards must be laid in sequence, so mistakes mid-floor are awkward to correct.
- Damaged planks in the middle of a room usually have to be cut out rather than lifted.
- The joint reduces the usable width of each board slightly, so you need extra material.
- Solid wood versions still move with humidity, however good the joint is.
- Milling quality varies. Cheap boards with loose or inconsistent profiles never fit properly.
How to Choose Tongue and Groove Flooring
Match the Material to the Room
Moisture is the deciding factor. Vinyl suits bathrooms and utility rooms. Engineered wood handles kitchens and basements well. Solid wood, bamboo, and standard laminate belong in living rooms, bedrooms, and hallways with stable humidity.
Check Your Subfloor First
This determines your options more than anything else.
- Timber subfloor: Nail, staple, glue, or float.
- Concrete slab: Glue or float. You cannot nail into concrete, so solid wood needs a plywood layer first.
- Underfloor heating: Engineered wood or vinyl, usually glued or floated. Confirm the maximum surface temperature with the manufacturer.
Flatness matters too. Floating floors typically need the subfloor flat to within about 3 mm over a 2 m span. Check with a long straightedge before you order anything.
Look at Thickness and Wear Layer
For engineered wood, the wear layer is the number that matters. Under 2 mm means no refinishing. Around 3 mm allows one sanding. Four to six millimetres gives you several.
For laminate and vinyl, look at the abrasion or wear rating rather than total thickness.
Consider Board Width and Length
Wide boards, around 180 mm and up, look contemporary and expose more grain. They also move more and demand a flatter subfloor.
Narrow boards, around 70–120 mm, suit traditional interiors, are more forgiving to fit, and are less prone to cupping.
Prefinished or Site-Finished
Prefinished boards arrive sealed. Installation is clean and the floor is usable immediately. The factory finish is generally harder than one applied on site.
Site-finished floors are sanded and sealed after installation. This gives a perfectly flat surface with no bevels and lets you choose the exact colour, but it adds days and dust to the job.
Budget for the Whole Job
The board price is one part. Add underlay, adhesive or fasteners, beading or skirting, door threshold bars, subfloor preparation, waste, and labour.
Order 5–10% more material than the room measures. Complex layouts and herringbone patterns need more.
Practical Installation Tips
- Acclimatise the boards. Leave them in the room, in their packaging, for the period the manufacturer specifies. This is commonly 48–72 hours for wood. Some laminate and vinyl products require no acclimatisation at all, so read the instructions rather than assuming.
- Test the subfloor for moisture. Concrete in particular can hold moisture long after it looks dry.
- Open several packs and mix the boards. This blends natural colour variation instead of leaving one dark patch in the middle of the room.
- Start with the groove facing the wall. Lay the first row with the tongue pointing into the room, so you always have a tongue to fix through or drop into.
- Lay boards along the longest wall or towards the main light source. This is the standard approach and it makes the room look longer.
- On a timber subfloor, run the boards across the joists, not parallel with them.
- Stagger the end joints. Aim for at least 150–300 mm between joints in adjacent rows. Randomise the pattern so no obvious repeat appears.
- Dry-lay the last few rows before fixing. It is much easier to adjust the layout than to end up with a 20 mm sliver against the far wall.
- Keep the expansion gap continuous, including around pipes, door frames, and kitchen islands.
Maintenance and Care
Tongue and groove floors are low maintenance, not no maintenance.
- Sweep or vacuum regularly. Grit is the main cause of surface scratching.
- Clean with a barely damp mop and a product suited to the finish. Never soak a wood or laminate floor.
- Wipe spills quickly. Water sitting in a joint is the most common cause of edge damage.
- Keep indoor relative humidity somewhere around 40–60% where you can. Stable humidity is what keeps a wood floor stable.
- Fit felt pads under furniture and use mats at external doors.
- Refinish wood floors when the finish wears through rather than when the timber is damaged. Waiting too long costs you wear layer.
Common Problems and How to Fix Them
Squeaking. Usually caused by an uneven subfloor or loose fixings, not the flooring itself. This is why levelling before installation matters so much.
Gaps appearing in winter. Normal seasonal shrinkage in solid wood. If the gaps close again in summer, no action is needed. Consistent gaps in every season suggest the floor was fitted at too high a moisture content.
Cupping, where board edges rise above the centre. A moisture problem from below or from repeated wet mopping. Find the moisture source before doing anything else.
Peaking, where the floor lifts along a joint. Almost always a missing or blocked expansion gap. Freeing the perimeter usually solves it.
A damaged board in the middle of the floor. You cannot simply lift it, because it is locked on all four edges. The usual method is to cut the damaged board out, remove the lower lip of the groove on the replacement, and glue it into place. A floating floor can alternatively be unclipped back from the nearest wall.
Frequently Asked Questions
Is tongue and groove flooring the same as click-lock? No, though they are closely related. Both use interlocking edges. Click-lock adds a shaped profile that holds boards together without glue or nails. Traditional tongue and groove needs a fixing or adhesive to stay tight.
Can I install tongue and groove flooring myself? Floating floors, especially click laminate and vinyl, are well within reach of a careful DIYer with basic tools. Nail-down and glue-down installations of solid wood are harder and benefit from experience and the right nailer.
Does tongue and groove flooring need glue? It depends on the system. Click floors need no glue. Older floating tongue and groove floors need adhesive in the groove. Nailed and stapled floors do not need glue on the joints.
Can it be installed over concrete? Yes, using the glue-down or floating method, with a suitable damp-proof membrane. Solid wood cannot be nailed to concrete, so it needs a plywood subfloor first.
Which way does the tongue face when installing? Start with the groove edge towards the wall and the tongue facing into the room. Each new board then drops onto the exposed tongue.
Can I use tongue and groove flooring in a bathroom? Choose vinyl for full bathrooms. Engineered wood can work in a well-ventilated space with careful sealing at the perimeter. Solid wood and standard laminate are poor choices in wet rooms.
Does the floor need underlay? Floating floors need it for cushioning, acoustics, and moisture protection. Nailed and glued floors generally do not, though nailed floors are often laid over building paper or a similar membrane.
How long does it last? It depends entirely on the material, the installation, and the traffic. Solid wood can be refinished repeatedly and last for generations. Laminate and vinyl are replaced rather than refinished, so their life is limited by their wear layer.
How much extra material should I order? Allow 5–10% for cutting waste on a standard layout, and more for diagonal or herringbone patterns.
Conclusion
Tongue and groove is a joint, not a product. Each board carries a ridge on one edge and a matching slot on the other, and the two lock together to form a flat, connected floor with no visible fixings.
That single idea delivers most of the benefits people associate with a good floor: stability, a smooth surface, hidden fasteners, quicker installation, and fewer gaps over time.
The joint is available in solid wood, engineered wood, laminate, vinyl, bamboo, and softwood, so the real decision is about material rather than joint type. Match the material to the room’s moisture levels, check what your subfloor allows before you choose a fixing method, pay attention to wear layer thickness, and leave the floor room to expand.
Get those four things right and a tongue and groove floor will stay flat, quiet, and good-looking for many years.

Noah Williams
Interior Designer & Flooring Expert
Related Posts